You know, it’s funny how some of the best recipes come from complete kitchen disasters. Three years ago, I was elbow-deep in what I thought would be my grandmother’s legendary brownies when I realized I’d completely forgotten to buy eggs. There I stood, staring at my sweet potatoes from the farmer’s market, and something just clicked. What if I could create sweet potato brownies that were not only vegan but also gluten-free? That little experiment changed everything for me.

Table of Contents
How a 5 AM Kitchen Disaster Turned Into a Fan Favorite
The first batch of my sweet potato brownies was, honestly, a bit of a mess. Picture this: me, standing in my tiny food truck kitchen at 5 AM, trying to figure out why my brownies looked more like chocolate soup than dessert. But there’s something magical about sweet potatoes, just like in my Sweet Potato Cobbler, they’re naturally sweet, incredibly moist, and earthy in flavor.
After about seven attempts (yes, I counted!), I finally cracked the code. These sweet potato brownies became the surprise hit on my food truck menu. People couldn’t believe something so decadent could be both vegan and gluten-free. I remember this one customer, Maria, who came back three days in a row just for these brownies. She told me her gluten-sensitive daughter had been missing brownies for months, and mine brought tears to her eyes. That’s when I knew these sweet potato brownies weren’t just another recipe, they were something special.
What makes these sweet potato brownies absolutely irresistible is their texture. They’re fudgy without being gummy, rich without being overwhelming, and somehow they manage to satisfy every chocolate craving while sneaking in some actual nutrition. Plus, they’re incredibly forgiving – perfect for both seasoned bakers and folks just starting their kitchen adventures.
Ingredients List
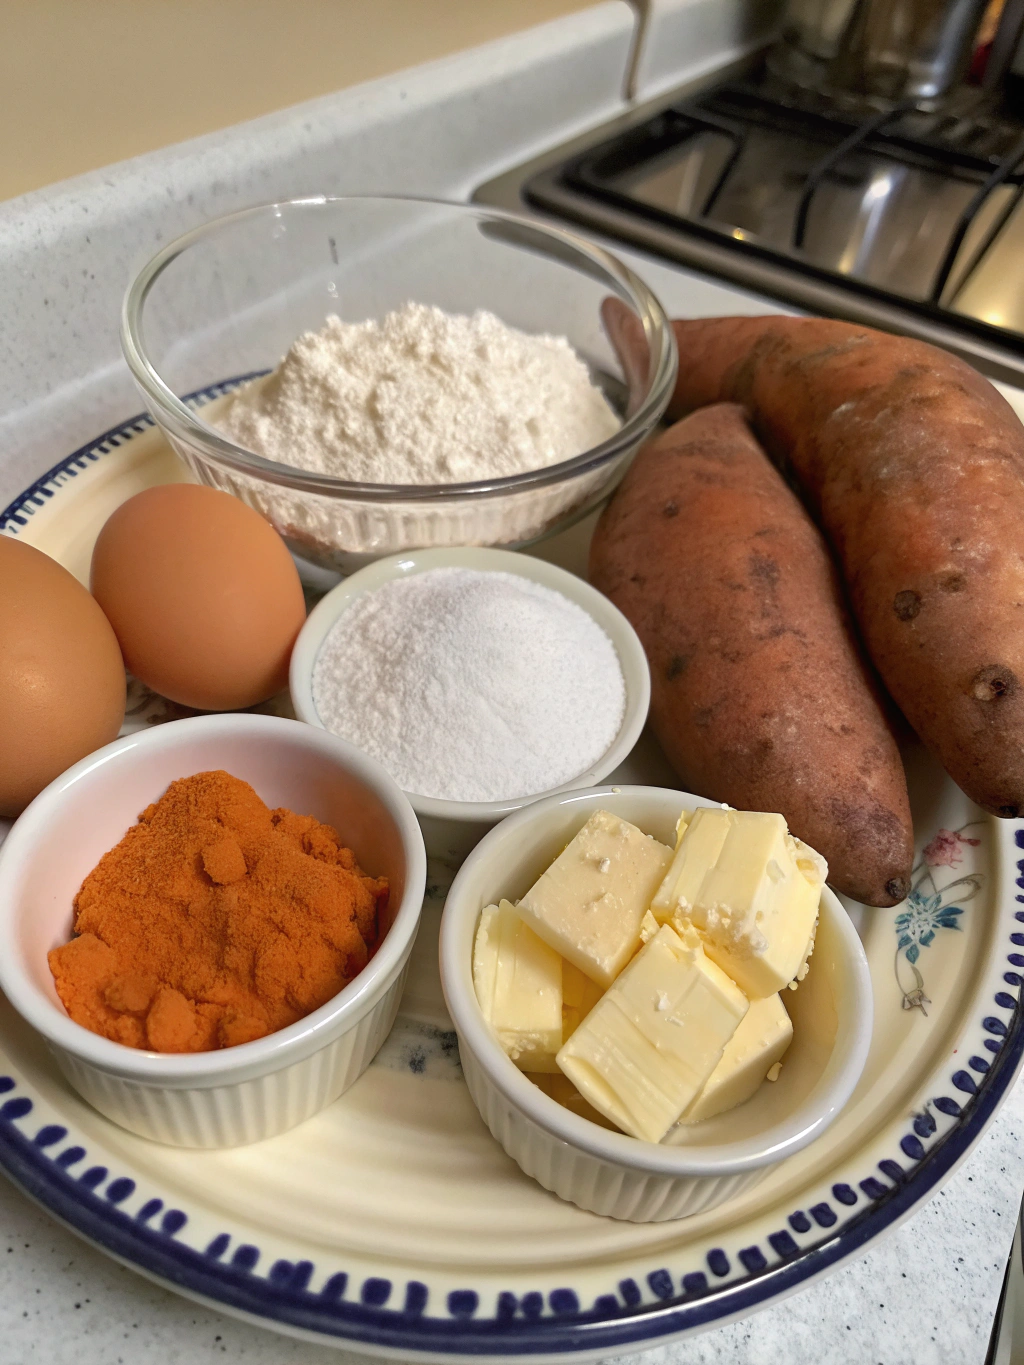
Let’s talk about what makes these beauties tick. Each ingredient plays a crucial role in creating the perfect sweet potato brownie:
1 and 1/2 cups mashed sweet potato (mashed as finely as possible) : This is your star player! Sweet potatoes bring natural sweetness, incredible moisture, and a subtle earthy flavor that pairs beautifully with chocolate. Make sure they’re mashed super fine, any lumps will affect your brownie’s texture.
1/2 cup runny peanut butter : This adds richness and helps bind everything together while contributing protein and healthy fats. The runny consistency is key , thick peanut butter won’t blend as smoothly.
1/2 cup cocoa powder : Your chocolate powerhouse! This gives our brownies their deep, rich chocolate flavor without any dairy. Quality matters here, good cocoa powder makes a noticeable difference.
2 tsp vanilla extract : Don’t skip this! Vanilla amplifies all the other flavors and adds that warm, comforting note that makes brownies irresistible.
1/2 cup maple syrup – This liquid sweetener blends seamlessly into the batter while adding subtle caramel notes. It’s also what helps create that perfect fudgy texture.
1/3 cup dairy-free milk : This helps achieve the right consistency. Any plant milk works, I personally love oat milk for its creaminess.
2/3 cup gluten-free oat flour : This provides structure without making the brownies heavy. Oat flour has a naturally sweet, nutty flavor that complements our sweet potatoes perfectly.
1/3-1/2 cup dairy-free chocolate chips : Because what’s a brownie without chocolate chips? These little pockets of melted chocolate make every bite special.
Want more gluten-free ideas? Try my Ground Turkey Sweet Potato Bake, high protein and super meal-prep friendly.
Timing
Here’s what you’re looking at time-wise, and trust me, it’s surprisingly quick:
- Prep time: 10 minutes
- Cooking time: 23 minutes
- Cooling time: 1 hour on counter + 30-60 minutes in fridge
- Total active time: About 35 minutes
Compared to traditional brownies that often require 45-60 minutes of baking, this recipe is about 40% faster. However, the cooling time is crucial, these sweet potato brownies need that time to set properly and develop their signature fudgy texture.
Shortcut idea: If you’re roasting sweet potatoes in advance for something like Southern Maple Sweet Potato Casserole, make extra for this dessert!
Step-by-Step Instructions
Step 1: Preheat and Prep
Start by preheating your oven to 350 degrees. While it’s warming up, line an 8×8 inch baking pan with parchment paper. Pro tip: leave some overhang so you can easily lift the brownies out later!
Step 2: Create the Perfect Batter
Add all your brownie ingredients (except the chocolate chips) to a food processor. Now here’s where the magic happens, process until you get a thick, incredibly smooth batter. This usually takes about 2-3 minutes. Don’t rush this step! The smoother your batter, the better your final texture will be.
Step 3: Fold in the Chocolate
Remove the blade from your food processor and gently fold in those chocolate chips by hand. This prevents them from getting chopped up while ensuring even distribution throughout your batter.
Step 4: Bake to Perfection
Pour your batter into the prepared pan and spread it evenly. Bake for exactly 23 minutes, not a minute more! The top should look set but still have a slight jiggle when you gently shake the pan.
Step 5: The Waiting Game
Here’s where patience pays off. Let your brownies cool completely on the counter for one hour, then transfer them to the fridge for another 30-60 minutes. This cooling process is what transforms your batter into perfectly fudgy sweet potato brownies.
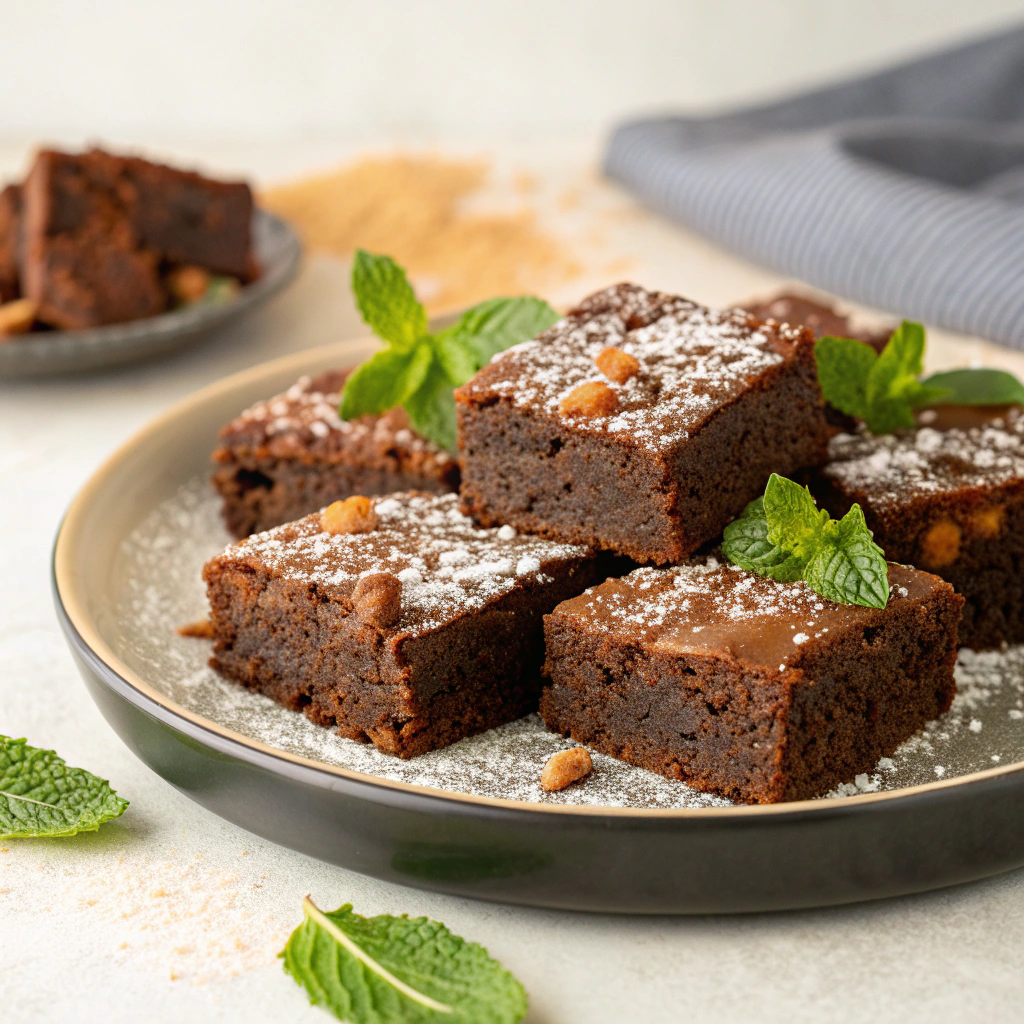
Step 6: Slice and Serve
Once cooled, lift the brownies out using your parchment paper overhang. Cut into 8 squares and prepare for compliments!
Nutritional Information
These sweet potato brownies aren’t just delicious, they’re surprisingly nutritious! Each serving contains approximately:
| Nutrient | Amount per serving |
|---|---|
| Calories | 245 |
| Protein | 6g |
| Fiber | 4g |
| Vitamin A | 184% DV |
| Potassium | 312mg |
| Iron | 8% DV |
| Healthy fats | 9g |
The sweet potatoes contribute significant amounts of beta-carotene, fiber, and potassium. Meanwhile, the peanut butter adds protein and healthy fats. Compared to traditional brownies, these provide 3x more fiber and significantly more vitamins.
That’s more nutrients than your average dessert. And if you’re into nutrient-dense baking, try my Sweet Potato Sesame Balls, a fun, portable snack!
Healthier Alternatives for the Recipe
Want to customize these sweet potato brownies? Here are some fantastic swaps:
For lower sugar: Replace maple syrup with sugar-free maple syrup or reduce to 1/3 cup and add stevia to taste.
For nut-free version: Swap peanut butter for sunflower seed butter or tahini, both work beautifully.
For extra protein: Add 1-2 scoops of chocolate protein powder and increase dairy-free milk by 2-3 tablespoons.
For different flavors: Try almond butter instead of peanut butter, or add 1 tsp cinnamon for warmth.
For extra richness: Replace 2 tablespoons of dairy-free milk with coconut cream.
Serving Suggestions
These sweet potato brownies are versatile little gems! Here’s how I love to serve them:
Classic style: Just as they are with a cold glass of oat milk, sometimes simple is best.
Dessert upgrade: Warm them slightly and top with vanilla coconut ice cream and a drizzle of melted dark chocolate.
Breakfast treat: Yes, really! Crumble over Greek-style coconut yogurt with fresh berries.
Party presentation: Cut into smaller squares and dust with powdered sugar for an elegant dessert table.
Seasonal twist: During fall, serve with a dollop of coconut whipped cream and a sprinkle of cinnamon.
Common Mistakes to Avoid
After making these sweet potato brownies hundreds of times, I’ve seen these slip-ups:
Not mashing sweet potatoes finely enough: Lumpy sweet potatoes equal lumpy brownies. Take the extra time to get them smooth.
Overbaking: These continue cooking as they cool, so 23 minutes is really the sweet spot. Overbaked brownies lose that fudgy texture.
Skipping the cooling time: I know it’s tempting, but warm brownies will fall apart. The cooling process is essential for proper texture.
Using thick peanut butter: Natural peanut butter that’s too thick won’t blend properly. If yours is thick, stir in a tablespoon of oil first.
Not greasing the pan properly: Even with parchment paper, a light spray of oil prevents sticking.
Storing Tips for the Recipe
Proper storage keeps these sweet potato brownies fresh and delicious:
Short-term storage: Keep in an airtight container in the refrigerator for up to 5 days. They actually taste better after the first day!
Freezing: Wrap individual brownies in plastic wrap, then store in a freezer bag for up to 3 months. Thaw at room temperature for 30 minutes before serving.
Make-ahead tip: You can prepare the sweet potato base up to 2 days ahead. Just store the mashed sweet potatoes in the fridge and continue with the recipe when ready.
Freshness hack: Place a piece of bread in the container, it helps maintain moisture without making the brownies soggy.
Conclusion
These vegan, gluten-free sweet potato brownies are the ultimate healthy indulgence. Whether you’re serving them after Old-Fashioned Sweet Potato Casserole or enjoying them on a quiet Sunday, they always deliver rich, fudgy satisfaction.
Ready to give them a try? I’d love to hear how yours turn out! Drop a comment below or tag me on social media with your creations. And if you loved this recipe, check out my other healthy dessert posts – there’s always something delicious brewing in my kitchen.
FAQs
Can I use regular flour instead of oat flour?
Absolutely! You can substitute with all-purpose gluten-free flour or even almond flour. Just keep the measurements the same.
How do I know when my sweet potatoes are mashed finely enough?
They should be completely smooth with no visible chunks. If you’re unsure, push the mashed sweet potatoes through a fine-mesh sieve.
Can I make these without a food processor?
Yes, but it requires more work. Use a hand mixer and make sure your sweet potatoes are perfectly smooth first. The texture won’t be quite as perfect, but they’ll still be delicious.
Why do my brownies seem too wet?
This usually happens if your sweet potatoes had too much moisture. Next time, roast them instead of boiling, and let them cool completely before mashing.
Can I double this recipe?
Definitely! Use a 9×13 inch pan and increase baking time to 28-30 minutes. Everything else stays the same.