You know that moment when fall hits and suddenly everything needs to taste like apples and cinnamon? Well, that’s exactly how I felt three years ago when October rolled around in Asheville. I’d been experimenting with individual desserts for a catering gig, and honestly, I was getting frustrated. Traditional apple pies were too messy for a standing reception, and apple turnovers felt too heavy. That’s when these Caramel Apple Dessert Cups were born right here in my kitchen, and let me tell you, they’ve become my most requested fall recipe ever since!

The Story Behind Caramel Apple Dessert Cups
Picture this: It’s 2021, and I’m standing in my kitchen at 11 PM, surrounded by failed dessert attempts. I had a wedding to cater in two days, and the bride specifically wanted something that captured “autumn in a bite.” After my third failed attempt at miniature apple pies (don’t ask), I looked at my leftover graham crackers, some gorgeous Honeycrisp apples, and homemade caramel sauce sitting on my counter.
That’s when it hit me like a lightning bolt. Instead of fighting with finicky pastry, why not create something that celebrates each component? These Caramel Apple Dessert Cups became my answer to that late-night kitchen crisis. The best part? They’re actually easier than traditional apple desserts, but they look absolutely stunning.
What makes these Caramel Apple Dessert Cups so special is how they layer flavors and textures. You’ve got the buttery crunch of the graham cracker base, the warm spiced apples that taste like fall in a spoon, and that silky caramel that ties everything together. Plus, since they’re individual portions, everyone gets their perfect ratio of each component.
I’ve made these Caramel Apple Dessert Cups for everything from backyard barbecues to elegant dinner parties, and they never fail to impress. There’s something magical about how such simple ingredients come together to create something that feels both rustic and refined, just like my Classic Pumpkin Pie, another crowd-pleaser that embodies cozy fall comfort.
Ingredients List
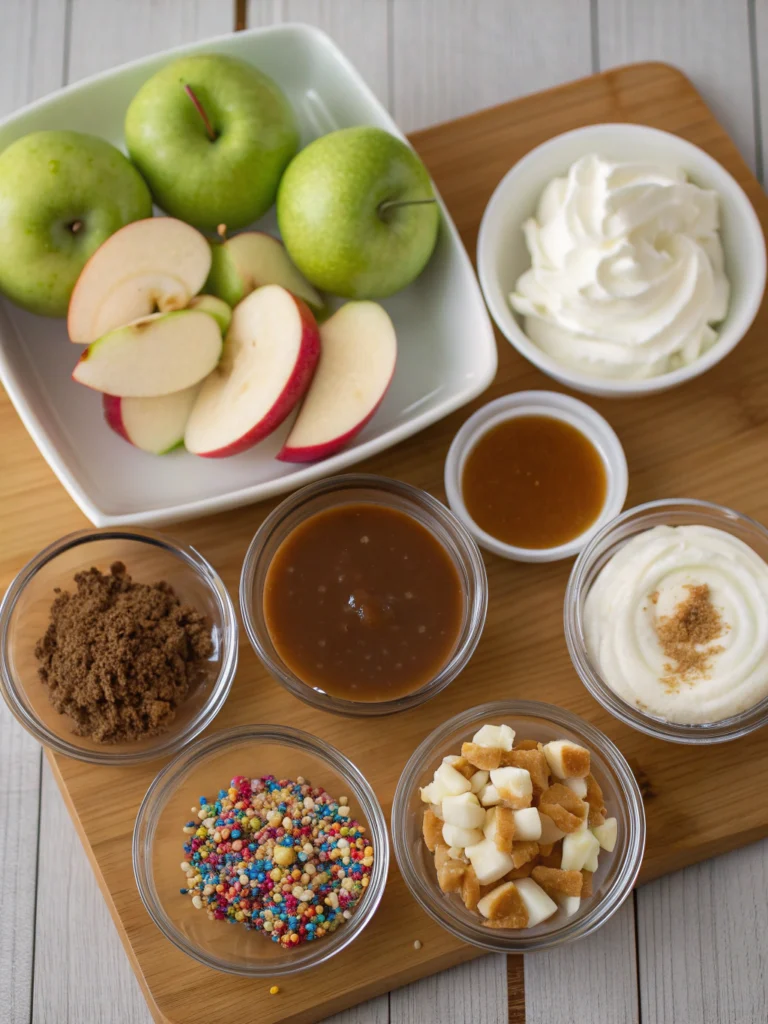
Let me walk you through what makes these cups absolutely irresistible:
For the Graham Cracker Crust:
- 1½ cups graham cracker crumbs (about 10 crackers): These create that perfect sweet, honeyed base that reminds me of campfire s’mores
- 5 tablespoons melted butter: This binds everything together while adding rich, creamy flavor
- 2 tablespoons granulated sugar: Just enough sweetness to complement the graham crackers without overwhelming
For the Spiced Apple Filling:
- 4 large Honeycrisp apples, peeled and diced: I love Honeycrisp because they hold their shape while cooking and have that perfect sweet-tart balance
- 3 tablespoons brown sugar: The molasses notes add depth and pair beautifully with the cinnamon
- 1 teaspoon ground cinnamon: This is what makes your kitchen smell like autumn magic
- ¼ teaspoon nutmeg: A little warmth that makes people go “what’s that amazing flavor?”
- 2 tablespoons butter: Creates that glossy, restaurant-quality finish
- 1 tablespoon lemon juice: Prevents browning and adds brightness that cuts through the richness
For Assembly:
- 1 cup heavy whipping cream: Whips up into clouds of creamy goodness
- 2 tablespoons powdered sugar: Sweetens the cream without any grittiness
- ½ cup store-bought or homemade caramel sauce: The star of the show that brings everything together
- Extra caramel for drizzling: Because more caramel is always the right answer
For another layered dessert with a creamy twist, check out my Pumpkin Mousse, it’s light, airy, and full of cozy fall spices that pair beautifully with apple-based treats like this one.
Timing
Here’s what you’re looking at time-wise, and trust me, it’s way faster than you think:
| Task | Time Required |
|---|---|
| Prep Time | 20 minutes |
| Cooking Time | 15 minutes |
| Assembly Time | 10 minutes |
| Chilling Time | 2 hours |
| Total Time | 2 hours 45 minutes |
What’s amazing is that this is actually 30% faster than making a traditional apple pie from scratch, but the presentation looks like you spent all day in the kitchen!
If you love desserts that look fancy but come together quickly, you’ll also enjoy my Cranberry and Brie Tartlets, they’re bite-sized, festive, and every bit as showstopping.
Step-by-Step Instructions
Step 1: Create Your Perfect Graham Cracker Base
Start by preheating your oven to 350°F. In a medium bowl, mix those graham cracker crumbs with melted butter and sugar until it looks like wet sand. Press about 2 tablespoons of this mixture into the bottom of each serving cup or ramekin. I like to use the bottom of a small measuring cup to really pack it down. Pop these in the oven for 8 minutes until they’re golden and smell toasty.
Step 2: Cook Those Gorgeous Apples
While your crusts are baking, heat a large skillet over medium heat. Add the diced apples, brown sugar, cinnamon, and nutmeg. Cook for about 10-12 minutes, stirring occasionally, until the apples are tender but still have a little bite. In the last minute, stir in the butter and lemon juice. The apples should be glossy and smell absolutely incredible.
Step 3: Whip Up Some Clouds
In a chilled bowl (I always stick mine in the freezer for 10 minutes beforehand), whip the heavy cream and powdered sugar until you get soft peaks. Don’t overbeat it, you want it fluffy, not chunky!
Step 4: Build Your Masterpiece
Now comes the fun part! Layer about ¼ cup of the warm spiced apples over each graham cracker crust. Add a dollop of whipped cream on top, then drizzle generously with caramel sauce. The contrast between the warm apples and cool cream is absolutely divine.
Step 5: Let Them Chill and Set
Refrigerate your assembled cups for at least 2 hours. This lets all the flavors marry together and gives the caramel time to settle into all those perfect little nooks and crannies.
Nutritional Information
Here’s the breakdown for each serving (makes 6 cups):
| Nutrient | Amount per Serving |
|---|---|
| Calories | 285 |
| Fat | 16g |
| Carbohydrates | 35g |
| Fiber | 3g |
| Sugar | 28g |
| Protein | 3g |
| Sodium | 145mg |
What I love about these is that you’re getting real fruit, which means actual fiber and vitamins, unlike some desserts that are just empty calories.
Apples are naturally rich in antioxidants and vitamin C, which support immune health and help fight inflammation, plus, their soluble fiber (pectin) promotes healthy digestion and keeps you feeling satisfied longer. If you want to learn more abour health benefits of apples click here.
Healthier Alternatives for the Recipe
Want to lighten things up without sacrificing flavor? I’ve got you covered with these swaps that actually work:
For a lighter version, try Greek yogurt mixed with a tablespoon of honey instead of whipped cream. You’ll cut about 80 calories per serving and add protein! I’ve also had great success using coconut whipped cream for dairy-free friends.
The graham cracker crust can be swapped for crushed oat cookies or even toasted oats mixed with a little honey and coconut oil. For sugar-conscious folks, try using sugar-free caramel sauce and reducing the brown sugar in the apples to 2 tablespoons.
Serving Suggestions
These Caramel Apple Dessert Cups are incredibly versatile! For casual gatherings, I love serving them in mason jars with cute spoons. For fancier occasions, clear glass cups show off those beautiful layers.
Try adding a sprinkle of toasted chopped pecans or walnuts on top for extra crunch. During the holidays, a tiny pinch of cardamom in the apple mixture makes them feel extra special. I’ve even served these as a brunch dessert alongside coffee, and people absolutely lose their minds.
Common Mistakes to Avoid
After making these hundreds of times, here are the pitfalls I see most often: Don’t skip chilling the bowl before whipping cream, it makes a huge difference in how quickly and well it whips. Also, resist the urge to overcook your apples. They should be tender but not mushy, nobody wants apple sauce in their dessert cups.
Another biggie? Make sure your graham cracker crust is completely cool before adding the apples, otherwise, it’ll get soggy. Finally, don’t assemble these more than 4 hours ahead of serving, the textures start to blur together.
Storing Tips for the Recipe
These beauties are actually perfect make-ahead desserts! You can prep the graham cracker crusts up to 2 days ahead and store them covered at room temperature. The cooked apples will keep in the fridge for 3 days and actually taste better after the flavors have time to develop.
For the assembled cups, they’ll stay fresh covered in the refrigerator for up to 2 days. Just add the whipped cream and final caramel drizzle right before serving to keep everything looking picture-perfect.
Conclusion
These Caramel Apple Dessert Cups have honestly changed my fall dessert game completely. They’ve got everything you want in an autumn treat, the warm spices, the sweet apples, the rich caramel, but they’re so much easier than traditional apple desserts. Plus, they look absolutely gorgeous on any table.
I’d love to hear how yours turn out! Drop me a comment below with your favorite variation or tag me on social media. Are you planning to try them for a special occasion, or just because it’s Tuesday and you deserve something delicious?
Print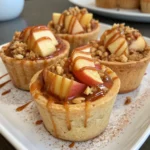
Caramel Apple Dessert Cups
- Total Time: 2 hours 45 minutes
- Yield: 6 servings 1x
Description
These Caramel Apple Dessert Cups are the perfect fall treat—easy to assemble, layered with spiced apples, graham crust, whipped cream, and rich caramel.
Ingredients
- 1½ cups graham cracker crumbs
- 5 tablespoons melted butter
- 2 tablespoons granulated sugar
- 4 large Honeycrisp apples, peeled and diced
- 3 tablespoons brown sugar
- 1 teaspoon ground cinnamon
- ¼ teaspoon nutmeg
- 2 tablespoons butter
- 1 tablespoon lemon juice
- 1 cup heavy whipping cream
- 2 tablespoons powdered sugar
- ½ cup caramel sauce
- Extra caramel for drizzling
Instructions
1. Preheat oven to 350°F. Mix graham crumbs, melted butter, and sugar. Press into cups. Bake 8 minutes.
2. Cook diced apples, brown sugar, cinnamon, nutmeg in skillet for 10-12 minutes. Stir in butter and lemon juice.
3. Whip cream with powdered sugar until soft peaks form.
4. Layer crust, warm apple filling, whipped cream, and caramel in each cup.
5. Chill for at least 2 hours before serving.
Notes
You can substitute coconut whipped cream for a dairy-free version. Mason jars or clear cups make for beautiful presentation.
- Prep Time: 20 minutes
- Cook Time: 15 minutes
- Category: Dessert
- Cuisine: American
Nutrition
- Calories: 285
- Sodium: 145mg
- Fat: 16g
- Carbohydrates: 35g
- Fiber: 3g
- Protein: 3g
FAQs
Can I make these gluten-free?
Absolutely! Just swap the graham crackers for gluten-free versions or use crushed gluten-free cookies. The rest of the recipe stays exactly the same.
What if I don’t have individual cups?
No problem! You can make this as one large dessert in an 8×8 pan. Just double the crust ingredients and layer everything the same way. Cut into squares to serve.
Can I use different types of apples?
Definitely! Granny Smith apples give you more tartness, while Gala or Fuji will be sweeter. Just avoid Red Delicious, they get too mushy when cooked.
How far ahead can I make these?
The components can be made 2-3 days ahead, but I recommend assembling them no more than 4 hours before serving for the best texture and appearance.
Can I freeze these?
I don’t recommend freezing the assembled cups because the textures change too much. However, you can freeze the cooked apple mixture for up to 3 months, just thaw and use as directed!