There’s something magical about the combination of bright citrus and rich chocolate that instantly transports me back to my food truck days. I’ll never forget the first time I served Chocolate Dipped Candied Orange Slices at The Cozy Fork. A little girl tugged on her mom’s sleeve and whispered, “It tastes like sunshine covered in happiness!” That moment captured exactly why these treats became one of my signature holiday offerings. Today, I’m sharing this beloved recipe with you because these beautiful, tangy-sweet confections deserve a spot on every holiday table.

Table of Contents
Why These Chocolate Dipped Candied Orange Slices Steal the Show Every Season
Picture this: it’s December 2018, and I’m frantically prepping for the biggest holiday market of the year. My usual dessert offerings felt too ordinary, and I needed something that would make people stop in their tracks. That’s when I remembered my grandmother’s candied orange peels, but I wanted to create something more visually stunning.
After three test batches and chocolate-covered fingers, I finally perfected these Chocolate Dipped Candied Orange Slices. The translucent orange rings looked like stained glass windows, and when half-dipped in dark chocolate, they became little works of art. What started as a last-minute experiment turned into my most requested holiday treat.
The beauty of these slices lies in their perfect balance. The slow candying process transforms the orange’s natural tartness into concentrated citrus sweetness, while the bitter dark chocolate adds a sophisticated contrast, similar to the sweet-and-savory magic in my Apple Cranberry Pecan Salad. Every bite delivers a burst of orange flavor followed by rich, creamy chocolate.
These Chocolate Dipped Candied Orange Slices aren’t just treats; they’re conversation starters. I’ve watched people pick them up with curiosity, take that first bite, and immediately light up with surprise and delight. There’s something almost alchemical about how simple ingredients transform into something so extraordinary.
Ingredients List
Let me walk you through each ingredient and why it’s crucial for creating these stunning treats:
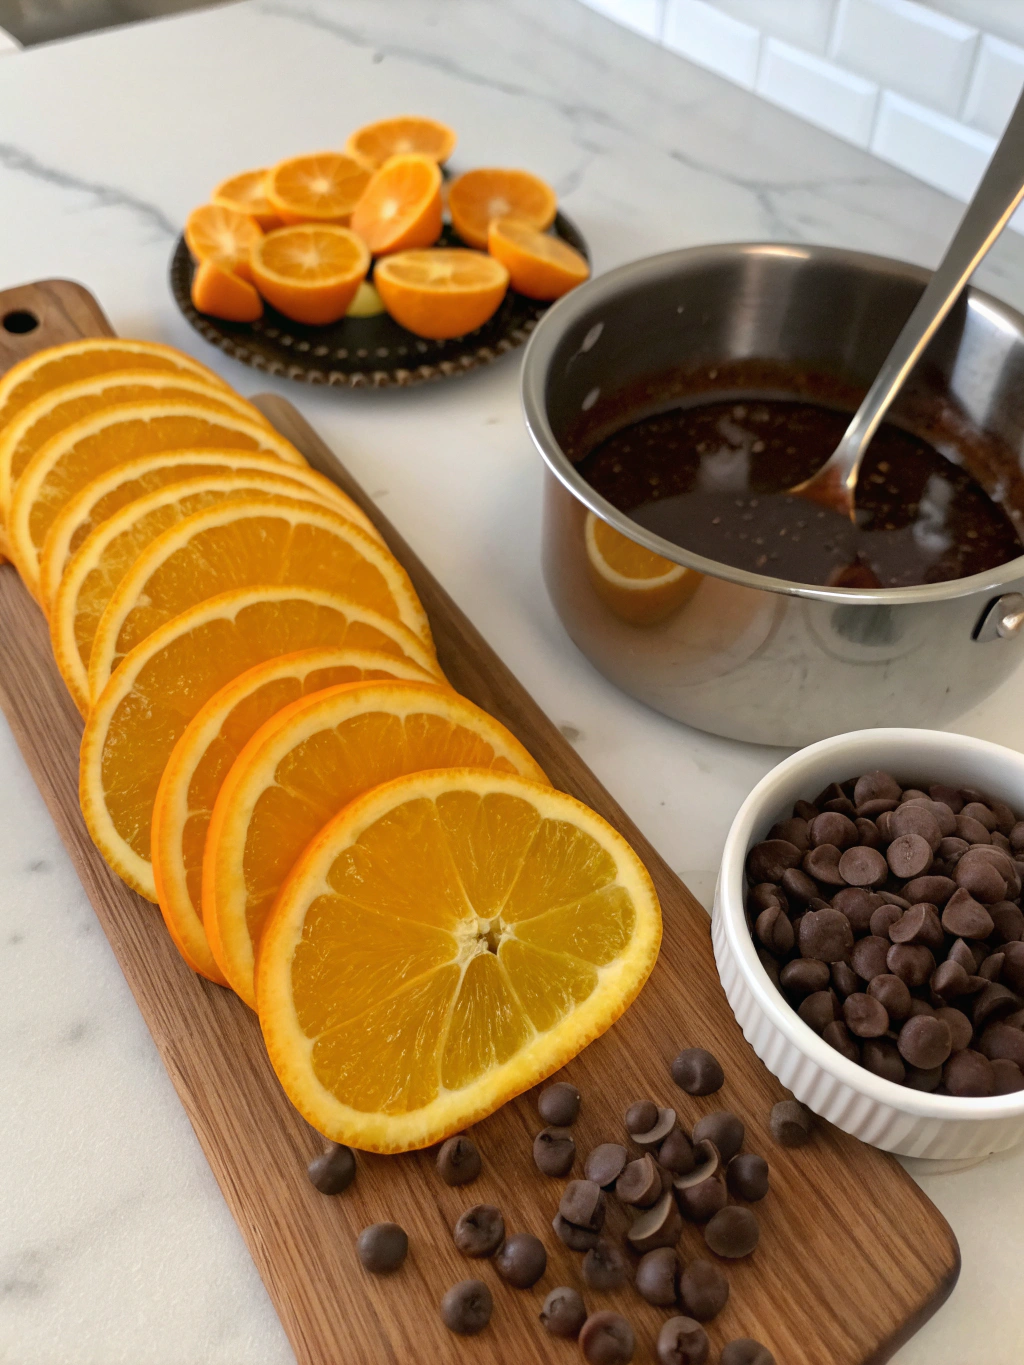
2 to 3 oranges (any variety): I love mixing navel, cara cara, and blood oranges for visual variety. The different oranges bring unique flavor profiles. Navel oranges offer classic citrus taste, cara cara adds subtle berry notes, while blood oranges contribute gorgeous color and slightly tart complexity.
1 cup granulated sugar: This creates the syrup that slowly penetrates the orange slices, preserving them while concentrating their natural sweetness. Granulated sugar dissolves cleanly and creates that beautiful translucent effect we’re after.
2 cups water: Combined with sugar, this creates the candying syrup. The ratio is perfect for gentle cooking that won’t make the oranges tough or overly sweet.
1 cup dark chocolate melting wafers: The deep chocolate flavor balances the orange beautifully, just as it does in my Classic Cherry Cheesecake topping swirl.
Flaky sea salt (optional): Just a pinch on the wet chocolate creates an amazing flavor explosion. The salt brightens both the chocolate and orange flavors while adding a gourmet touch that makes these treats feel restaurant-quality.
Timing
Here’s what you need to know about timing for this recipe:
- Prep Time: 10 minutes
- Cook Time: 1 hour 5 minutes
- Additional Time: 1 day 15 minutes (drying time)
- Total Time: 1 day 1 hour 30 minutes
- Servings: 16 slices
Don’t let that total time scare you! Most of it is passive drying time, similar to the slow-roasting process in my Roasted Sweet Potato Goat Cheese Salad, patience here truly pays off in flavor and texture.
Step-by-Step Instructions
Step 1: Prepare Your Workspace
Line a rimmed baking sheet with parchment paper and set it aside. This will be your landing pad for the candied oranges, so make sure it’s easily accessible to your stovetop. Trust me, you don’t want to be searching for parchment paper with hot orange slices ready to come out of the pan!
Step 2: Slice the Oranges
Slice your oranges into 1/4-inch thick rounds. Consistency matters here because even thickness means even cooking. Remove any seeds you encounter. I like to lay the slices on a cutting board and quickly scan for seeds before cooking. Pro tip: a sharp knife makes cleaner cuts that hold together better during the candying process.
Step 3: Create the Sugar Syrup
Combine sugar and water in a wide, large skillet. Over medium-high heat, bring the mixture to a rolling boil, whisking constantly until the sugar completely dissolves. You’ll know it’s ready when the liquid is crystal clear. The wide skillet is key because it gives the orange slices room to cook evenly without overlapping.
Step 4: Candy the Orange Slices
Add orange slices in a single, even layer. If your skillet isn’t large enough, work in batches rather than crowding. Bring the liquid back to a gentle simmer, then reduce heat to maintain that simmer for approximately 1 hour, uncovered. The orange slices will gradually become translucent and beautiful. They’re done when they look like little stained glass windows!
Step 5: Dry the Candied Oranges
Carefully remove the orange slices to your prepared baking sheet using a slotted spoon or tongs. Let them dry uncovered for at least 24 hours. They’ll still feel slightly sticky, and that’s perfectly normal. This drying time is crucial for achieving the right texture for chocolate dipping.
Step 6: Melt the Chocolate
Place chocolate melting wafers in a microwave-safe bowl. Melt in 10-15 second increments, stirring between each interval, until smooth and glossy. Alternatively, use a double-boiler over medium-low heat if you prefer more control. The key is gentle heat to prevent the chocolate from seizing or burning.
Step 7: Dip and Set
Once your chocolate is perfectly melted, dip each orange slice halfway into the chocolate, allowing excess to drip off. Return to the parchment-lined baking sheet immediately. If you’re using flaky sea salt, sprinkle it on the wet chocolate right after dipping for the best adhesion.
Step 8: Final Setting
Repeat the dipping process until all slices are chocolate-coated. Let everything set for at least 15 minutes until the chocolate hardens completely. The wait is torture when they smell so amazing, but proper setting prevents messy fingers and broken chocolate later!
Nutritional Information
Here’s the approximate nutritional breakdown per slice:
| Nutrient | Amount per Slice |
|---|---|
| Calories | 85-95 |
| Total Fat | 3-4g |
| Saturated Fat | 2g |
| Carbohydrates | 18-20g |
| Sugars | 16-18g |
| Fiber | 1-2g |
| Protein | 1g |
| Vitamin C | 15-20mg |
These treats are naturally gluten-free and deliver beneficial antioxidants from the chocolate, and vitamin C from the oranges. If you’d like to learn more about natural vitamin C sources, check out 20 Foods That Are High in Vitamin C from Healthline.
Healthier Alternatives for the Recipe
Want to lighten things up? Here are some smart swaps that maintain the magic:
Sugar alternatives: Replace granulated sugar with coconut sugar for lower glycemic impact and subtle caramel notes. Alternatively, use sugar-free granulated sweetener, though the texture will be slightly different.
Chocolate options: Choose 70% or higher dark chocolate for more antioxidants and less added sugar. Sugar-free chocolate chips work too, though they may not set as firmly.
Portion control: Cut oranges into smaller wedges instead of full rounds to create bite-sized portions with fewer calories per piece.
Add nutrients: Sprinkle chopped nuts like almonds or pistachios on the wet chocolate for healthy fats and protein.
Serving Suggestions
These gorgeous treats shine in so many ways! Arrange them on a white platter for stunning visual contrast, or tuck them into gift boxes lined with tissue paper for edible presents that wow.
For holiday parties, create a dessert board featuring these alongside dark chocolate squares, fresh berries, and nuts. They also make elegant garnishes for vanilla ice cream or chocolate mousse.
Try pairing them with coffee or tea for afternoon treats, or serve alongside cheese boards where their bright acidity cuts through rich flavors beautifully. During summer months, they’re fantastic with vanilla frozen yogurt or as cocktail garnishes in citrus-forward drinks.
Common Mistakes to Avoid
After making thousands of these treats, I’ve seen every possible mishap. Here’s how to avoid the most common pitfalls:
Rushing the drying time: I know 24 hours feels like forever, but underdried oranges won’t hold chocolate properly. The surface moisture prevents good adhesion, leading to chocolate that slides right off.
Overheating chocolate: Keep temperatures gentle! Overheated chocolate becomes grainy and loses its glossy finish. If your chocolate seems thick, add a tiny bit of coconut oil rather than more heat.
Crowding the pan: Overlapping orange slices cook unevenly. Some will be perfectly candied while others remain tough. Patience with batches pays off in consistent results.
Wrong orange thickness: Too thin and they’ll fall apart; too thick and they won’t candy properly. That 1/4-inch measurement isn’t arbitrary, it’s the sweet spot for perfect texture.
Storing Tips for the Recipe
Proper storage keeps these treats fresh and delicious for days. Store completed Chocolate Dipped Candied Orange Slices in an airtight container in the refrigerator for up to 5 days. Layer them between parchment paper to prevent sticking.
For longer storage, freeze them for 2-3 months. Place them in a single layer on a baking sheet until frozen solid, then transfer to freezer-safe containers. They thaw beautifully at room temperature in about 15 minutes.
Never store them at room temperature in humid conditions, as the chocolate may bloom and the candied oranges can become sticky. If you live in a dry climate, room temperature storage works for 2-3 days maximum.
Conclusion
These Chocolate Dipped Candied Orange Slices represent everything I love about holiday cooking. They’re stunning enough for special occasions yet simple enough for home bakers to master. The combination of bright citrus and rich chocolate creates pure magic that transforms any gathering into something memorable.
The best part? You can make them days ahead, which means less stress during busy holiday preparations. Whether you’re hosting a dinner party, bringing treats to the office, or creating edible gifts, these beauties never fail to impress.
So grab some oranges, fire up that stove, and get ready to create something truly special. Don’t forget to share photos of your creations! I love seeing how everyone makes this recipe their own.
Print
Chocolate Dipped Candied Orange Slices
- Total Time: 1 day 1 hour 30 minutes
- Yield: 16 slices 1x
Description
These Chocolate Dipped Candied Orange Slices combine sweet, tangy citrus with rich dark chocolate. A stunning holiday treat or edible gift.
Ingredients
- 2 to 3 oranges (navel, cara cara, or blood oranges), sliced 1/4-inch thick
- 1 cup granulated sugar
- 2 cups water
- 1 cup dark chocolate melting wafers
- Flaky sea salt (optional)
Instructions
1. Line a baking sheet with parchment paper and set aside.
2. Slice oranges into 1/4-inch rounds. Remove any seeds.
3. In a wide skillet, combine sugar and water. Bring to a boil, stirring to dissolve sugar.
4. Add orange slices in a single layer. Simmer gently for 1 hour until translucent.
5. Remove slices and place on parchment. Let dry uncovered for 24 hours.
6. Melt chocolate in microwave-safe bowl or double boiler until smooth.
7. Dip each orange slice halfway in chocolate. Let excess drip off.
8. Place dipped slices back on parchment. Sprinkle sea salt if using.
9. Let set for 15 minutes until chocolate hardens.
Notes
Use a wide skillet to avoid overlapping slices.
Dry slices fully before dipping to ensure chocolate sticks.
You can freeze them after chocolate sets for long-term storage.
Great as edible gifts, dessert platter stars, or cocktail garnishes.
- Prep Time: 10 minutes
- Cook Time: 1 hour 5 minutes
- Category: Dessert
- Method: Stovetop
- Cuisine: American
Nutrition
- Serving Size: 1 slice
- Calories: 90
- Sugar: 17g
- Sodium: 0mg
- Fat: 4g
- Saturated Fat: 2g
- Unsaturated Fat: 1g
- Trans Fat: 0g
- Carbohydrates: 19g
- Fiber: 1g
- Protein: 1g
- Cholesterol: 0mg
FAQs
Can I use different citrus fruits?
Absolutely! Grapefruit, lemons, and limes all work beautifully. Adjust cooking time based on thickness, and expect different flavor profiles. Grapefruit creates stunning large slices, while limes offer intense tartness.
What if I don’t have melting wafers?
Regular chocolate chips work fine! Just chop them smaller for easier melting, and consider adding a teaspoon of coconut oil for smoother consistency.
Can I make these without the drying time?
You can try dipping after just a few hours, but the chocolate won’t adhere as well and may slide off. The 24-hour wait really does make a difference in the final result.
How do I know when the oranges are properly candied?
They’ll look translucent and glassy, almost like amber. The texture should be tender but not mushy, and they’ll have absorbed most of the syrup’s sweetness.
What’s the best way to gift these?
Layer them in small boxes between parchment paper, or arrange in clear containers so people can see their beauty. They keep well for several days, making them perfect make-ahead gifts.