Table of Contents
Last March, while Portland’s rain drummed against my kitchen window, my niece Emma bounded through the door with a box of limited edition green clover Lucky Charms. Her eyes sparkled with excitement as she asked, “Aunt Kate, can we make something magical with these?” That afternoon became one of those spontaneous cooking adventures I treasure most.
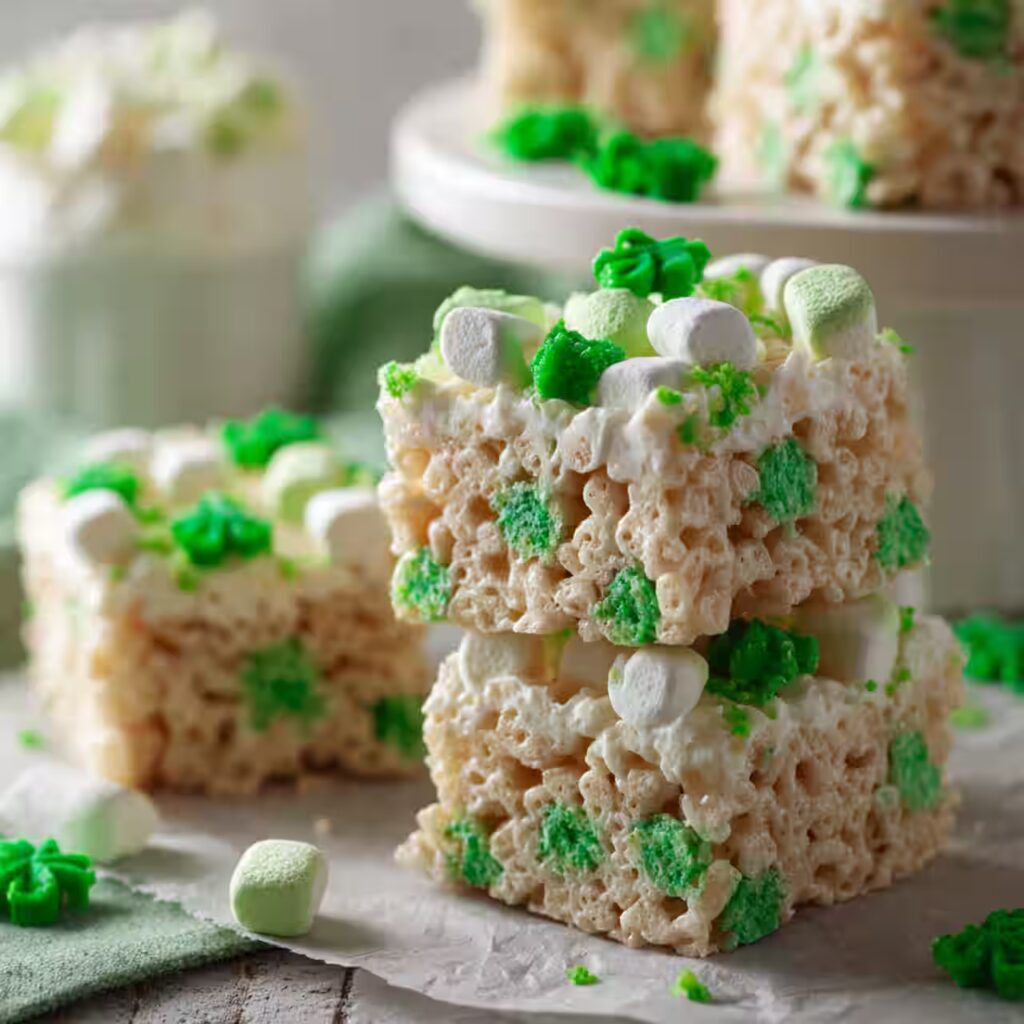
You know how sometimes the simplest ideas create the most memorable moments? That’s exactly what happened with these Clover Bars. Emma and I started with the classic Rice Krispie treats concept, just like my Lucky Charms Rice Krispie Treats, but we gave it our own lucky twist. Instead of plain cereal, we used those adorable green clover marshmallows that only appear around St. Patrick’s Day.
The result? Absolutely magical Clover Bars that taste like childhood dreams and look like they came straight from a leprechaun’s bakery, especially if you love fun cereal-based desserts like these Lucky Charms Sugar Cookies.
What started as a rainy day activity has become my go-to recipe whenever I need something that’s equal parts whimsical and delicious. These Clover Bars have since appeared at birthday parties, school events, and even my friend’s Irish-themed wedding shower.
There’s something beautifully nostalgic about transforming breakfast cereal into dessert. Every bite of these Clover Bars brings back memories of Saturday mornings and cartoon marathons. Plus, they’re incredibly easy to make, even Emma, who was seven at the time, could help with almost every step.
Ingredients List
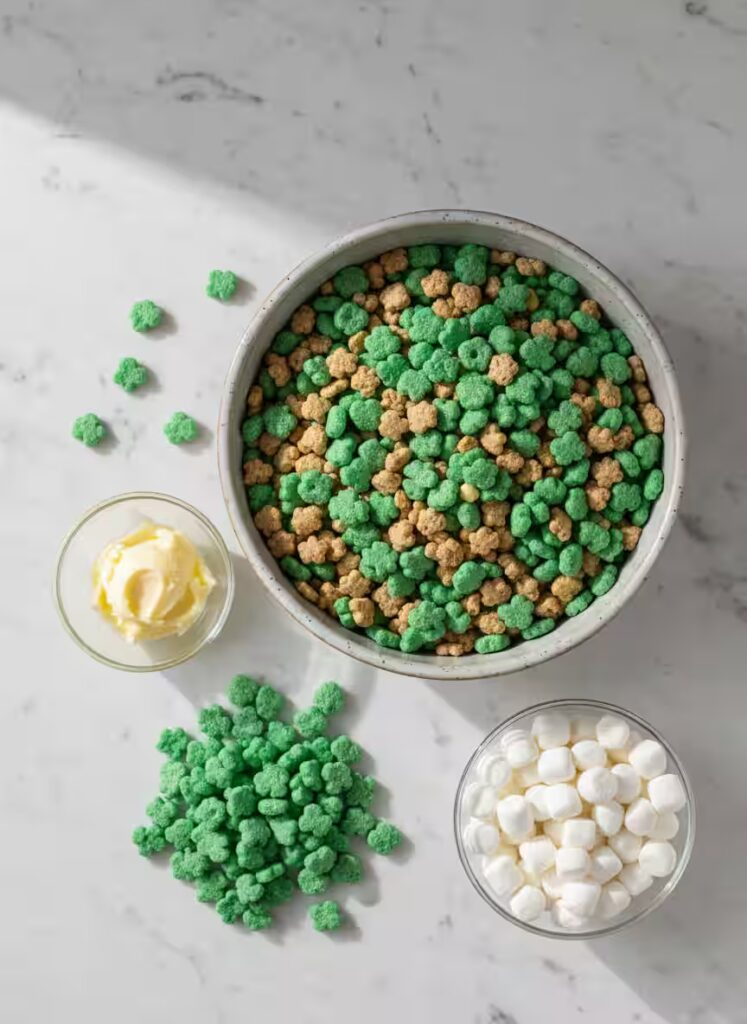
You’ll need just three simple ingredients to create these enchanting treats:
6 cups limited edition green clover Lucky Charms: These special edition cereals are the star of the show, providing that signature marshmallow sweetness and delightful crunch. The green clovers add visual appeal and authentic Lucky Charms flavor that regular cereal simply can’t match.
10 oz bag miniature marshmallows: These create the binding “glue” that holds everything together. When melted, they transform into a sweet, stretchy mixture that coats each piece of cereal perfectly. Mini marshmallows melt more evenly than large ones, creating a smoother texture.
3 tablespoons softened butter: This prevents the marshmallows from sticking to your bowl and adds richness to the final product. Softened butter incorporates more easily, creating a silky marshmallow base that’s easier to work with.
40-50 extra marshmallow clovers: These go on top for decoration, making your bars look professionally crafted and adding extra bursts of marshmallow goodness in every bite.
Timing
Here’s what you’re looking at time-wise:
| Phase | Time Required |
|---|---|
| Prep Time | 10 minutes |
| Cooking Time | 2 minutes |
| Freezing Time | 20 minutes |
| Total Time | 32 minutes |
This recipe clocks in at just over 30 minutes from start to finish, which is roughly 40% faster than most homemade bar recipes. Most of that time is hands-off freezing, so you’re only actively working for about 12 minutes.
Step-by-Step Instructions
Step 1: Prepare Your Pan
Start by greasing an 8×8 baking pan with nonstick cooking spray. Don’t skip this step – trust me, you’ll thank yourself later when these bars release effortlessly from the pan.
Step 2: Melt the Marshmallow Base
In a large microwave-safe mixing bowl, combine your miniature marshmallows and softened butter. Microwave for 1-2 minutes until the marshmallows become puffy and soft. Here’s a pro tip: stop and stir every 30 seconds to prevent overheating.
Step 3: Mix the Magic
Stir your marshmallow mixture thoroughly until completely smooth. Now comes the fun part, gradually mix in your 6 cups of Lucky Charms cereal. I always use a long metal spoon because it won’t melt like plastic might, and it gives you better leverage for mixing.
Step 4: Press Into Pan
Scoop your cereal mixture into your prepared baking dish. Here’s where things get a bit sticky, literally! I like to grease a plastic bag and use it to press the mixture evenly into the pan. Alternatively, a greased potato masher works wonderfully for creating an even surface.
Step 5: Add the Finishing Touch
Gently press 40-50 of those extra marshmallow clovers onto the top of your bars. This step transforms them from simple cereal bars into something that looks bakery-worthy.
Step 6: Set and Slice
Pop your pan into the freezer for 20 minutes. This quick chill makes slicing clean and easy. Once firm, cut into bars and enjoy!
Nutritional Information
Each Clover Bar (assuming 9 servings per batch) contains approximately:
| Nutrient | Amount |
|---|---|
| Calories | 180 |
| Total Fat | 2g |
| Sodium | 95mg |
| Total Carbs | 42g |
| Sugars | 28g |
| Protein | 2g |
| Iron | 4% DV |
These treats are naturally fat-free and provide some iron fortification from the cereal. While they’re definitely a dessert, they’re surprisingly not as calorie-dense as many traditional bar cookies.
Healthier Alternatives for the Recipe
Want to lighten things up without sacrificing that magical taste? Here are some smart swaps:
Sugar-free marshmallows can reduce the overall sugar content by about 30%. They melt just as beautifully and taste nearly identical to regular marshmallows.
Coconut oil instead of butter adds healthy fats and works especially well if you let it soften to room temperature first.
Add protein powder by mixing 2 tablespoons of vanilla protein powder into your melted marshmallow mixture for an extra nutritional boost.
Mix in freeze-dried strawberries for added vitamin C and natural fruit flavor that complements the marshmallow sweetness perfectly.
Serving Suggestions
These versatile bars shine in so many situations! Cut them into small squares for party appetizers, or slice them larger for after-school snacks. I love serving them at St. Patrick’s Day gatherings alongside green punch or Irish coffee.
For birthday parties, try cutting them with fun cookie cutters while they’re still slightly warm. They also make fantastic additions to dessert boards, their bright green color creates beautiful contrast against chocolate treats like Chocolate Dipped Pretzels.
During summer picnics, these bars travel beautifully and don’t require refrigeration. Pack them in a covered container, and they’ll stay fresh for hours in the heat.
Common Mistakes to Avoid
Overheating the marshmallows is the biggest pitfall I see. When marshmallows get too hot, they become tough and chewy. Always use short intervals and stir frequently.
Not greasing your hands or tools will turn the pressing step into a sticky nightmare. Keep that plastic bag or potato masher well-greased!
Cutting too soon results in crumbly, messy bars. That 20-minute freeze time isn’t negotiable, it’s what gives you clean, professional-looking cuts.
Using stale cereal affects both texture and flavor. Fresh Lucky Charms should still have some crunch and vibrant marshmallow pieces.
Storing Tips for the Recipe
Store your finished Clover Bars in an airtight container at room temperature for up to one week. Layer them between parchment paper to prevent sticking.
For longer storage, these bars freeze beautifully for up to three months. Wrap individual bars in plastic wrap, then store in a freezer bag. They thaw in just 15 minutes at room temperature.
If you’re making them ahead for an event, you can prepare the entire recipe up to three days in advance. They actually taste better after sitting overnight, the flavors meld together beautifully.
Conclusion
These magical Clover Bars prove that the best recipes often come from spontaneous moments and simple ingredients. With just three main components and 30 minutes of your time, you’ll create treats that bring smiles to faces and spark conversations about childhood memories.
Whether you’re planning a St. Patrick’s Day celebration, need a quick dessert for unexpected guests, or just want to surprise someone special, these bars deliver every single time. The combination of crunchy cereal, gooey marshmallow, and those adorable green clovers creates something truly special.
Ready to bring a little luck to your kitchen? Grab those limited edition Lucky Charms while they’re still available, and let’s make some magic happen! Don’t forget to share photos of your creations,They also make fantastic additions to dessert boards – their bright green color creates beautiful contrast against chocolate treats. I love seeing how these bars bring joy to kitchens everywhere.
Print
Clover Bars Recipe
- Total Time: 32 minutes
- Yield: 9 bars 1x
- Diet: Vegetarian
Description
Magical Clover Bars made with limited edition green clover Lucky Charms, mini marshmallows, and butter. A festive, no-bake treat perfect for St. Patrick’s Day or any day you want a sprinkle of fun and nostalgia.
Ingredients
- 6 cups limited edition green clover Lucky Charms
- 10 oz miniature marshmallows
- 3 tablespoons softened butter
- 40–50 extra marshmallow clovers (for topping)
Instructions
1. Grease an 8×8 baking dish with nonstick spray.
2. In a large microwave-safe bowl, combine mini marshmallows and softened butter.
3. Microwave for 1-2 minutes, stirring every 30 seconds, until smooth.
4. Fold in the Lucky Charms cereal until evenly coated.
5. Press the mixture into the prepared pan using a greased plastic bag or utensil.
6. Top with extra marshmallow clovers and gently press them in.
7. Freeze for 20 minutes to set.
8. Slice into bars and serve.
Notes
- Use fresh cereal for the best crunch and flavor.
- Avoid overheating the marshmallows to prevent a tough texture.
- Store in an airtight container for up to 1 week or freeze for up to 3 months.
- Prep Time: 10 minutes
- Cook Time: 2 minutes
- Category: Dessert
- Method: No-Bake
- Cuisine: American
Nutrition
- Serving Size: 1 bar
- Calories: 180
- Sugar: 28g
- Sodium: 95mg
- Fat: 2g
- Saturated Fat: 1g
- Unsaturated Fat: 1g
- Trans Fat: 0g
- Carbohydrates: 42g
- Fiber: 0g
- Protein: 2g
- Cholesterol: 5mg
FAQs
Can I use regular Lucky Charms instead of the limited edition green clover ones?
Absolutely! Regular Lucky Charms work perfectly, though you’ll get a more colorful result instead of the monochromatic green theme. The taste remains delicious either way.
Why do my bars fall apart when I cut them?
This usually happens when the marshmallow mixture wasn’t hot enough to properly bind the cereal, or the bars weren’t given enough time to set. Make sure your marshmallows are fully melted and allow the full 20-minute freeze time.
Can I double this recipe?
Yes! Use a 9×13 pan instead of 8×8, and increase the microwave time slightly since you’ll have more marshmallows to melt. Everything else stays proportionally the same.
How do I prevent the mixture from sticking to my hands?
Grease everything! Use cooking spray on your hands, spoon, and any pressing tools. I keep a small bowl of cooking spray nearby for easy re-application.
Can I add other ingredients like chocolate chips?
Definitely! Fold in up to 1/2 cup of add-ins like mini chocolate chips, sprinkles, or chopped nuts after mixing in the cereal but before pressing into the pan.