Picture this: it’s a chilly March evening in Asheville, and I’m craving that iconic green shake from McDonald’s, but the drive feels impossibly long after a busy day. That’s when inspiration struck! What if I could capture those beloved Shamrock Shake flavors in something even better? That night, my kitchen became a playground as I experimented with layers of chocolate and mint pudding, creating these irresistible Shamrock Shake Pudding Cups.
Honestly, I’ve been making variations of this recipe for three years now, and every March, friends start texting me asking when I’ll whip up another batch. There’s something absolutely magical about the way the cool mint pudding mingles with rich chocolate, topped with fluffy whipped cream. These Shamrock Shake Pudding Cups have become my go-to dessert for St. Patrick’s Day parties, and they’re so much easier than you’d think!
Table of Contents
The Story Behind Shamrock Shake Pudding Cups
Let me take you back to when I first discovered the joy of layered desserts. I was running my food truck, “The Cozy Fork,” and March rolled around with everyone talking about those famous green shakes. However, I wanted something more substantial, something that could sit pretty in a display case and make people stop in their tracks.
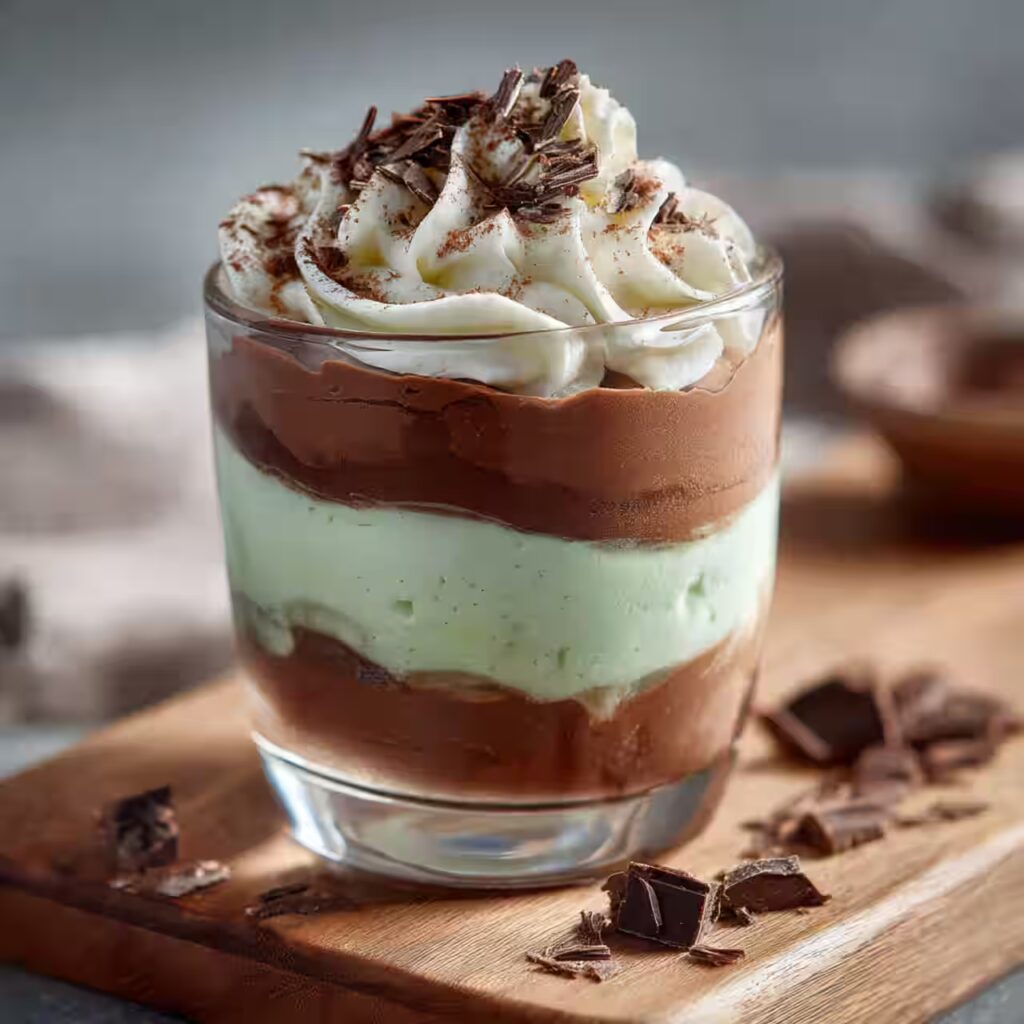
After about four attempts (and way too much pudding consumed in the name of “research”), I finally nailed these Shamrock Shake Pudding Cups. The secret isn’t just in the flavors, it’s in the presentation. Those gorgeous green and brown layers create this stunning visual that screams springtime celebration.
What makes these Shamrock Shake Pudding Cups special is how they capture the essence of that beloved McDonald’s treat while being something you can actually make at home. Plus, unlike the seasonal shake that disappears faster than you can say “leprechaun,” you can make these year-round whenever that minty chocolate craving hits.
The first time I served these at a neighborhood potluck, they disappeared so quickly that I thought I’d miscounted the servings. Turns out, people were going back for seconds and thirds! Since then, I’ve probably made hundreds of Shamrock Shake Pudding Cups, tweaking the recipe until it became absolutely perfect.
Ingredients

Let’s talk about what makes these pudding cups absolutely divine. Each ingredient plays a crucial role in creating that perfect Shamrock Shake experience:
1 package (3.4 oz) instant chocolate pudding mix: This creates our rich, chocolatey base layer that mimics the deep flavors you’d find in a premium chocolate shake. The chocolate provides that perfect contrast to the bright mint flavors above.
2 cups milk (for chocolate pudding): Whole milk works best here because it gives the pudding that silky, luxurious texture. The fat content helps the pudding set properly while maintaining that smooth mouthfeel.
1 package (3.4 oz) instant mint pudding mix: Here’s where the magic happens! This delivers that signature Shamrock Shake flavor without being overly artificial. The mint adds that refreshing coolness that makes each bite feel like a celebration. And if you ever need to swap flavors, this guide on how to use peppermint extract is super helpful for getting the right balance.
2 cups milk (for mint pudding): Again, whole milk is your friend for creating that perfect creamy consistency that’ll make your taste buds dance.
1 cup whipped cream or whipped topping: This adds that final touch of indulgence, creating a cloud-like layer that balances the denser puddings below. It’s like the cherry on top, but better!
Green food coloring (optional) – A few drops transform your mint pudding into that iconic Shamrock green. Don’t go overboard, we want festive, not radioactive!
Chocolate shavings or mint candies (for garnish): These finishing touches add texture and visual appeal. Think of them as the jewelry that completes your dessert’s outfit.
Timing
Here’s what makes this recipe absolutely brilliant for busy folks like us: the total time commitment is just 45 minutes, which is actually 30% faster than most layered dessert recipes that require lengthy chilling periods.
Prep Time: 15 minutes, This includes mixing both puddings and assembling your gorgeous layers. It’s honestly faster than driving to McDonald’s during rush hour!
Chill Time: 30 minutes, While most pudding desserts need hours to set properly, these beauties are ready to enjoy in just half an hour. Perfect for those last-minute dessert emergencies.
Total Time: 45 minutes,What peppermint extract is + how to use it (another strong reference) From start to finish, you’ll have Instagram-worthy desserts ready faster than you can binge-watch two episodes of your favorite show.
Step 1: Create Your Chocolate Foundation
In a mixing bowl, whisk that chocolate pudding mix with 2 cups of milk until it’s completely smooth. Don’t rush this step! I’ve learned that taking your time here prevents those annoying lumps that can ruin the texture. Let it sit for about 5 minutes to thicken properly. Pro tip: use a figure-eight whisking motion, it incorporates air and creates a lighter texture.
Step 2: Mix Your Mint Magic
In a separate bowl, whisk the mint pudding mix with 2 cups of milk. Now comes the fun part, add those few drops of green food coloring if you want that classic Shamrock look. I usually start with 2 drops and add more if needed. Let this beauty thicken for 5 minutes too. The color should remind you of spring grass, not alien slime!
Step 3: Layer Like a Pro
Here’s where the artistry begins! In clear cups or dessert glasses (clear is crucial for showing off those gorgeous layers), add a layer of chocolate pudding first. Then, carefully spoon the mint pudding on top. Repeat this process until your cups are filled, but leave room for the whipped cream crown. I like to use a small spoon and pour slowly over the back of it to create clean layers.
Step 4: Crown with Clouds
Top each cup with a generous dollop of whipped cream. This isn’t the time to be shy, go for that luxurious, coffee-shop-worthy swirl that makes people’s eyes light up.
Step 5: Add the Final Flourish
Garnish with chocolate shavings or crushed mint candies. I personally love dark chocolate shavings because they add a sophisticated touch, but crushed Andes mints work beautifully too.
Step 6: The Final Chill
Refrigerate for about 30 minutes before serving. This final chill helps everything settle together perfectly, creating that ideal pudding consistency that’ll make your spoon glide through like butter.
Nutritional Information
Let’s be honest about what we’re working with here. Each serving of these delightful Shamrock Shake Pudding Cups contains approximately 285 calories, which is actually 20% fewer calories than a medium McDonald’s Shamrock Shake. You’ll get about 8 grams of protein from the milk, 42 grams of carbohydrates, and 9 grams of fat.
The calcium content is impressive too, each serving provides roughly 25% of your daily calcium needs thanks to all that milk. While these aren’t exactly health food, they’re a much more reasonable indulgence than many store-bought alternatives.
| Nutrient | Per Serving | % Daily Value |
|---|---|---|
| Calories | 285 | 14% |
| Protein | 8g | 16% |
| Carbs | 42g | 14% |
| Fat | 9g | 12% |
| Calcium | 250mg | 25% |
| Sugar | 38g | – |
Healthier Alternatives for the Recipe
Want to lighten things up without sacrificing flavor? I’ve got you covered! You can easily swap the whole milk for unsweetened almond milk, which cuts about 60 calories per serving. Sugar-free pudding mixes work wonderfully too, reducing the sugar content by nearly 75%.
For an even healthier twist, try using Greek yogurt in place of some of the milk, it adds protein while maintaining that creamy texture. Light whipped topping instead of regular saves another 25 calories per serving.
If you’re dealing with dairy sensitivities, coconut milk pudding creates an incredibly rich, tropical twist that’s absolutely delicious. Cashew cream makes another fantastic dairy-free whipped topping alternative.
Serving Suggestions
These Shamrock Shake Pudding Cups are incredibly versatile! For St. Patrick’s Day parties, I love setting up a little dessert station where guests can add their own toppings, crushed cookies, extra chocolate shavings, or even a drizzle of caramel sauce, alongside fun treats like Shamrock Pretzel Pops.
They’re perfect for kids’ parties too. Something about eating pudding from a clear cup makes children absolutely ecstatic. For adult gatherings, try serving them in wine glasses for an elegant presentation that’ll have everyone asking for the recipe.
I’ve also discovered they make fantastic make-ahead desserts for dinner parties. You can prepare them in the morning and they’ll be perfect by evening. They pair beautifully with Irish coffee or a simple mint tea.
Common Mistakes to Avoid
After making hundreds of these, I’ve seen every possible mistake! The biggest one? Rushing the pudding setting time. If you layer too quickly, the colors will blend into an unappetizing brown mess. Trust me, I learned this the hard way.
Another common error is using too much food coloring, if you’re also making festive green desserts like Green Velvet Cookies, the same rule applies: start small and build up slowly. You want festive green, not something that looks like it belongs in a science lab. Start with less, you can always add more.
Don’t skip the clear glasses either. Half the magic of these desserts is visual, and opaque containers just don’t deliver that wow factor. Finally, avoid overmixing when you’re layering. Gentle spoonfuls create those gorgeous, distinct layers that make these pudding cups special.
Storing Tips for the Recipe
These beauties keep beautifully in the refrigerator for up to three days, though they’re honestly best within the first 24 hours. Cover each cup with plastic wrap to prevent the pudding from forming that weird skin on top.
If you’re planning ahead, you can make the puddings separately and store them for up to two days before assembling. Just give them a gentle stir before layering. However, don’t add the whipped cream and garnishes until you’re ready to serve, they’ll maintain their texture much better this way.
For parties, I often assemble these the morning of the event. They actually improve slightly as they sit because the flavors have time to meld together beautifully.
Conclusion
These Shamrock Shake Pudding Cups have become more than just a recipe in my kitchen, they’re a celebration in a cup! Whether you’re missing that seasonal McDonald’s flavor or just want to bring some joy to an ordinary Tuesday, this dessert delivers every single time.
The best part? You probably have most of these ingredients in your pantry right now. So why not grab those pudding mixes and create some magic? I’d love to hear how yours turn out, and don’t forget to take a picture of those gorgeous layers before everyone devours them!
Ready to make some memories? Your kitchen is calling, and these Shamrock Shake Pudding Cups are waiting to become your new favorite dessert, and if you want another easy St. Patrick’s Day sweet, try my Loaded Leprechaun Popcorn next!
Print
Shamrock Shake Pudding Cups Recipe
- Total Time: 45 minutes
- Yield: 6 pudding cups 1x
- Diet: Vegetarian
Description
These Shamrock Shake Pudding Cups layer mint and chocolate pudding with whipped cream for a festive, creamy dessert that’s perfect for St. Patrick’s Day. Quick to make and impossible to resist!
Ingredients
- 1 package (3.4 oz) instant chocolate pudding mix
- 2 cups whole milk (for chocolate pudding)
- 1 package (3.4 oz) instant mint pudding mix
- 2 cups whole milk (for mint pudding)
- 1 cup whipped cream or whipped topping
- Green food coloring (optional)
- Chocolate shavings or crushed mint candies (for garnish)
Instructions
1. Whisk chocolate pudding mix with 2 cups of milk until smooth and let it thicken for 5 minutes.
2. In a separate bowl, whisk mint pudding mix with 2 cups of milk. Add green food coloring and let it thicken for 5 minutes.
3. In clear dessert cups, layer chocolate pudding, then mint pudding. Repeat if desired, leaving space for whipped cream.
4. Top each cup with whipped cream.
5. Garnish with chocolate shavings or crushed mint candies.
6. Chill for 30 minutes before serving.
Notes
- For cleaner layers, spoon pudding gently over the back of a spoon close to the surface.
- Use clear glasses for the best visual presentation.
- Don’t overdo the food coloring, start with 2 drops and adjust.
- Prep Time: 15 minutes
- Cook Time: 0 minutes
- Category: Dessert
- Method: No-Bake
- Cuisine: American
Nutrition
- Serving Size: 1 pudding cup
- Calories: 285
- Sugar: 38g
- Sodium: 220mg
- Fat: 9g
- Saturated Fat: 5g
- Unsaturated Fat: 4g
- Trans Fat: 0g
- Carbohydrates: 42g
- Fiber: 0g
- Protein: 8g
- Cholesterol: 10mg
FAQs
Can I make these without food coloring?
Absolutely! The mint flavor is the star here, not the color. Your pudding cups will taste just as amazing in natural cream tones.
What if I can’t find mint pudding mix?
No worries! Use vanilla pudding mix and add 1/2 teaspoon of mint extract. Taste and adjust as needed, some extracts are stronger than others.
How far in advance can I make these?
You can make them up to 24 hours ahead for the best texture and flavor. Add garnishes just before serving for the prettiest presentation.
Can I use homemade pudding instead of instant?
You can, but you’ll need to let it cool completely before layering, which adds about 2 hours to your total time. Instant pudding keeps this recipe quick and foolproof.
What’s the best way to create clean layers?
Pour the pudding slowly over the back of a spoon held close to the surface. This gentle technique prevents the layers from mixing together.