Table of Contents
There’s something absolutely magical about the smell of freshly baked strawberry scones wafting through your kitchen on a lazy Saturday morning. As someone who’s spent years perfecting this recipe, I can tell you these aren’t your average dry, crumbly scones, they’re buttery, tender, and bursting with sweet strawberry goodness.
The Story Behind Strawberry Scones
Picture this: it’s 2019, and I’m standing in my tiny food truck kitchen at 5 AM, desperately trying to figure out why my strawberry scones keep turning out like hockey pucks. My customers were asking for something lighter than my usual hearty fare, and honestly, I was stumped.
That morning, everything changed when Mrs. Henderson, a regular who reminded me so much of my grandma, shuffled up to my window and shared her secret. “Honey,” she said with a knowing smile, “cold butter is your best friend, and strawberries need to be folded in like you’re tucking a baby into bed.” Something about her words just clicked.
I went back to basics, thinking about those early kitchen lessons with my grandma. The key wasn’t fancy techniques, it was treating each ingredient with respect. Within a week, my strawberry scones became the talk of downtown Asheville. People would line up before I even opened just to snag these golden beauties fresh from my tiny oven.
Now, years later, this recipe has become one of my absolute favorites to share. These strawberry scones represent everything I love about baking: simple ingredients transformed into something extraordinary through patience and care. Plus, at just 218 calories per serving, you can enjoy them without any guilt!
Ingredients List
Let’s talk about what makes these strawberry scones so incredibly delicious. Every single ingredient plays a crucial role in creating that perfect texture and flavor.
For The Scones:
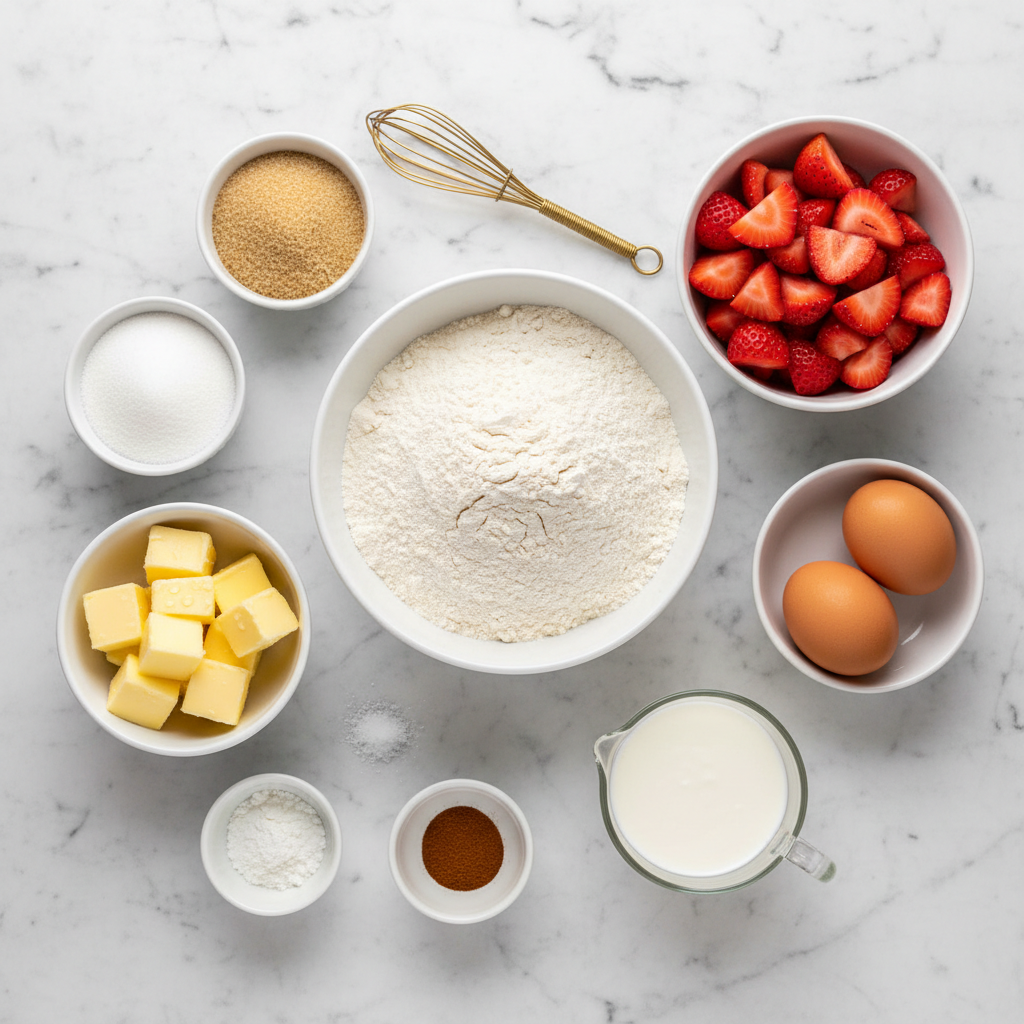
⅓ cup buttermilk : This tangy liquid gold creates the most tender crumb while adding a subtle richness that regular milk just can’t match. The acidity also helps activate our baking powder for maximum lift.
1 large egg (slightly beaten) : Our binding superhero! This creates structure while keeping everything moist and giving our scones that beautiful golden color when baked.
2 cups all-purpose flour (plus ¼ cup for dusting) : The foundation of our scones. All-purpose flour gives us just the right amount of protein for a tender, not tough, texture.
3 tablespoons granulated sugar : Just enough sweetness to complement our strawberries without overwhelming their natural flavor. This also helps create those gorgeous golden edges.
2 teaspoons baking powder : Our lift agent! This creates those lovely, flaky layers that make people think you’re a baking wizard.
¾ teaspoon fine sea salt : Never underestimate salt in baking! It brightens every other flavor and makes our strawberries taste even more strawberry-ish.
6 tablespoons cold unsalted butter (cubed) : The star of the show! Cold butter creates steam pockets as it melts, giving us those irresistible flaky layers.
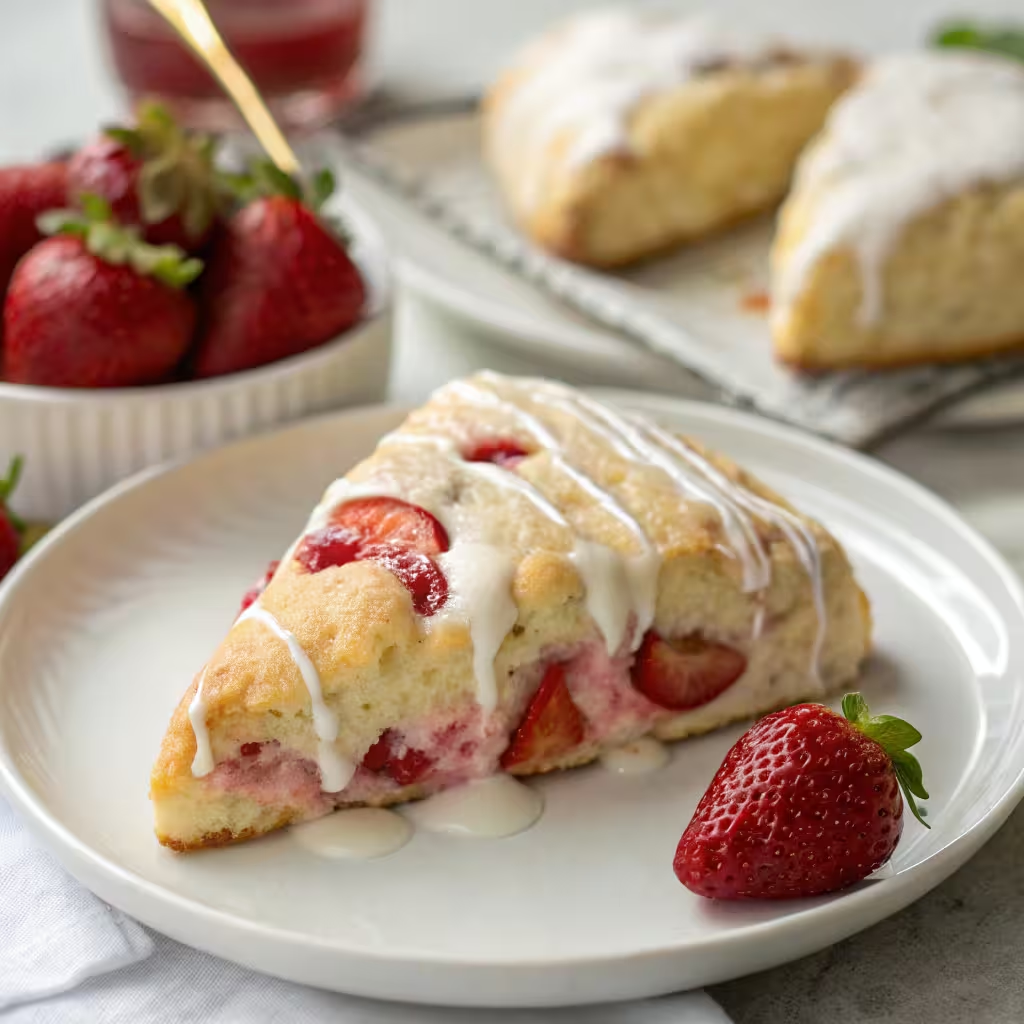
½ cup chopped fresh strawberries : Sweet, juicy bursts of summer in every bite. Fresh is absolutely essential here, frozen will make your dough soggy.
For The Optional Glaze:
1¼ cups powdered sugar : Creates a smooth, sweet coating that sets perfectly.
2 tablespoons fresh lemon juice : Bright, citrusy tang that cuts through the richness and makes your taste buds sing.
Timing
Here’s what you need to know about timing for these strawberry scones:
- Prep Time: 25 minutes
- Chill Time: 1 hour (trust me, don’t skip this!)
- Cook Time: 12 minutes
- Total Time: 1 hour 37 minutes
Interestingly, this recipe takes about 30% less active time than traditional scone methods because we’re using a stand mixer instead of the old-fashioned pastry cutter method. The chilling time might seem long, but it’s what transforms good scones into absolutely incredible ones.
Step by Step Instructions
Step 1: Create Your Wet Base
Whisk together the buttermilk and egg in a large measuring pitcher until they’re completely combined. Set this aside, we’ll need it ready to go once our dry ingredients are prepped. This step ensures even distribution and prevents overmixing later.
Step 2: Mix Your Dry Foundation
Add flour, 2 tablespoons granulated sugar, baking powder, and ¾ teaspoon sea salt to your stand mixer bowl with the paddle attachment. Mix on low speed until everything’s evenly combined. Don’t have a stand mixer? No worries, a large bowl and whisk work perfectly too.
Step 3: Create Butter Magic
Add those cold butter cubes to your flour mixture. Mix on medium speed until the butter breaks down into pea-sized bits. This is where the magic happens, those butter pieces will create steam pockets that give us flaky layers. If working by hand, use a pastry blender or even two forks.
Step 4: Bring It Together
Reduce mixer speed to low and slowly drizzle in your buttermilk mixture. Here’s the crucial part, stop mixing the moment your dough comes together. Overmixing is the enemy of tender scones!
Step 5: Fold in Strawberry Goodness
Add your chopped strawberries and mix on low just until they’re evenly distributed. Think gentle folding motions rather than aggressive mixing.
Step 6: Shape and Chill
Place dough on a floured surface and pat into a round about 1 inch thick. Wrap in plastic wrap and refrigerate for 1-2 hours. This chilling step is non-negotiable, it keeps our butter cold and prevents spreading during baking.
Step 7: Prep for Baking
Preheat your oven to 400°F and line a baking sheet with parchment paper or a silicone mat. High heat creates immediate steam, which equals maximum flakiness.
Step 8: Cut and Arrange
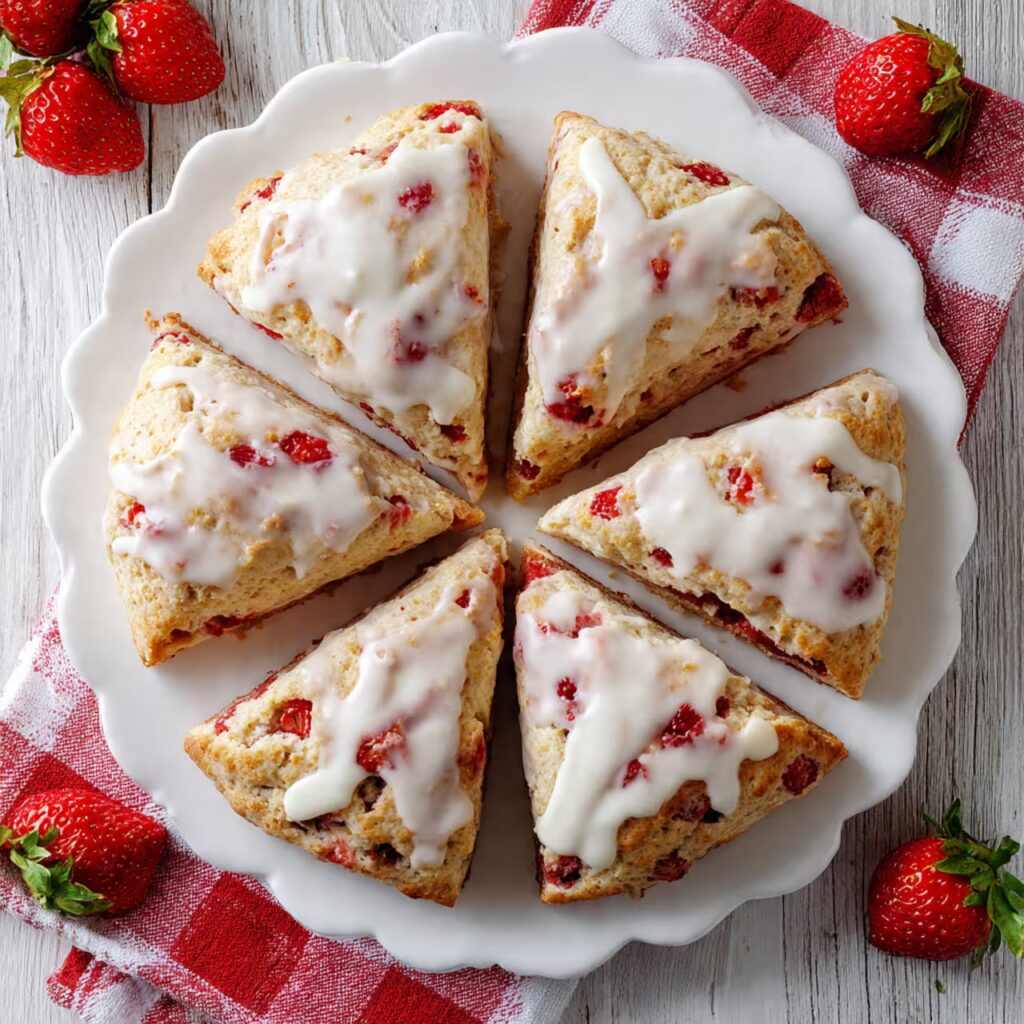
Using a sharp knife or pastry cutter, slice your chilled dough into 8 wedges. Place them 2 inches apart on your prepared baking sheet, they need room to spread slightly.
Step 9: Bake to Golden Perfection
Bake for 15-18 minutes until golden brown and cooked through. Your kitchen will smell absolutely amazing! Transfer to a cooling rack and let them cool completely.
Step 10: Add the Finishing Touch
Mix powdered sugar and lemon juice until smooth. Drizzle over cooled scones and let set for about an hour. This creates a beautiful, glossy finish that’s almost too pretty to eat.
Nutritional Information
Each strawberry scone contains approximately:
| Nutrient | Amount |
|---|---|
| Calories | 218 |
| Carbohydrates | 28g |
| Protein | 3g |
| Fat | 9g |
| Saturated Fat | 5g |
| Cholesterol | 43mg |
| Sodium | 208mg |
| Potassium | 143mg |
| Sugar | 6g |
| Vitamin A | 305IU |
| Vitamin C | 0.3mg |
| Calcium | 62mg |
| Iron | 1.4mg |
What’s particularly interesting is that these scones provide a balanced mix of carbohydrates for energy and moderate fat content for satiety. The fresh strawberries add natural sweetness and a small dose of vitamin C, making these a more nutritious choice than many commercial breakfast pastries.
Healthier Alternatives for the Recipe
Want to make these strawberry scones a bit lighter? Here are some swaps I’ve tested that still deliver amazing results:
Flour substitutions: Replace up to half the all-purpose flour with white whole wheat flour for added fiber. If you enjoy lighter, naturally sweet baked goods made with simple swaps, you might also love my lemon blueberry cupcakes, which use similar balance techniques to keep the crumb soft and tender.
Butter alternatives: Use coconut oil (solid, not melted) for a dairy-free version, or try Greek yogurt for a lighter option, though you’ll sacrifice some flakiness.
Sugar swaps: Coconut sugar works beautifully and adds a subtle caramel note. You can also reduce the sugar to 2 tablespoons if your strawberries are particularly sweet.
Dairy-free options: Substitute the buttermilk with plant-based milk mixed with 1 teaspoon lemon juice. Oat milk creates the creamiest texture.
Glaze modifications: Skip the glaze entirely for a more rustic feel, or use a simple milk wash with a sprinkle of coarse sugar before baking.
Serving Suggestions
These strawberry scones are incredibly versatile! Here’s how I love to serve them:
Classic breakfast: Pair with strong coffee or Earl Grey tea for that perfect morning combination. The citrus notes in the tea complement the strawberries beautifully.
Afternoon tea spread: Serve alongside clotted cream, jam, and fresh berries for an elegant tea time experience.
Brunch star: Cut into smaller portions and arrange on a platter with other pastries for a stunning brunch display.
Dessert transformation: Warm slightly and serve with vanilla ice cream and fresh strawberry sauce for an unexpected dessert. For another strawberry-forward dessert that feels indulgent yet elegant, my chocolate strawberry mousse cake parfaits make a beautiful follow-up treat.
On-the-go breakfast: These travel beautifully wrapped in parchment paper, perfect for busy mornings or picnic baskets.
Common Mistakes to Avoid
After making thousands of strawberry scones, I’ve seen every possible mistake. Here’s how to avoid the most common ones:
Using warm butter: This is mistake number one! Cold butter creates steam pockets for flaky layers. Room temperature butter just makes dense, cake-like scones.
Overmixing the dough: Mix just until ingredients come together. Overworked dough develops too much gluten, resulting in tough, chewy scones, which is exactly why understanding why overmixing matters in baking can make all the difference when you’re aiming for tender, flaky results.
Skipping the chill time: I know it’s tempting, but chilled dough holds its shape better and creates more defined layers.
Using frozen strawberries: They release too much moisture and create soggy spots. Fresh strawberries are essential for the best texture.
Wrong oven temperature: Too low and they’ll be pale and dense. Too high and they’ll burn before cooking through. 400°F is the sweet spot.
Cutting with a dull knife: This seals the edges and prevents proper rising. Use a sharp knife or bench scraper for clean cuts.
Storing Tips for the Recipe
Proper storage keeps these strawberry scones fresh and delicious:
Room temperature: Store in an airtight container for up to 2 days. They’re best eaten fresh, but still good the next day.
Refrigerator storage: Keep for up to 5 days in the fridge. Warm them gently in a 300°F oven for 3-4 minutes before serving.
Freezing options: Freeze baked scones for up to 3 months. Wrap individually in plastic wrap, then place in freezer bags. Thaw overnight and warm before serving.
Make-ahead trick: You can freeze the cut, unbaked scones on a baking sheet, then transfer to freezer bags. Bake directly from frozen, adding 2-3 extra minutes to the baking time.
Dough storage: The shaped, chilled dough can stay in the refrigerator for up to 24 hours before baking, perfect for fresh morning treats!
Conclusion
These strawberry scones have become more than just a recipe to me, they’re a connection to those early mornings in my food truck, to my grandmother’s patient teaching, and to the joy of sharing something homemade with the people you love.
What makes this recipe special isn’t just the technique (though that cold butter trick really is magic), it’s the way these scones bring people together. Whether you’re making them for a special weekend breakfast or just because Wednesday needs a little extra sweetness, they’re guaranteed to fill your kitchen with warmth and your heart with satisfaction.
Ready to give them a try? Trust me, once you taste these buttery, flaky strawberry scones with that bright lemon glaze, you’ll understand why they became the star of my food truck menu. Share a photo of your creations, I’d love to see how they turn out in your kitchen!
Print
These Buttery Strawberry Scones
- Total Time: 1 hour 37 minutes
- Yield: 8 scones 1x
- Diet: Vegetarian
Description
Tender, buttery, flaky strawberry scones with a bright lemon glaze. Perfect for breakfast, brunch, or an afternoon treat.
Ingredients
- ⅓ cup buttermilk
- 1 large egg (slightly beaten)
- 2 cups all-purpose flour (plus ¼ cup for dusting)
- 3 tablespoons granulated sugar
- 2 teaspoons baking powder
- ¾ teaspoon fine sea salt
- 6 tablespoons cold unsalted butter (cubed)
- ½ cup chopped fresh strawberries
- For the optional glaze:
- 1¼ cups powdered sugar
- 2 tablespoons fresh lemon juice
Instructions
1. Whisk together buttermilk and egg in a pitcher and set aside.
2. Combine flour, sugar, baking powder, and salt in a bowl or stand mixer.
3. Add cold butter and mix until pea-sized crumbles form.
4. Slowly add the buttermilk mixture until just combined.
5. Fold in chopped strawberries gently.
6. Shape dough into a 1-inch thick round and chill wrapped for 1–2 hours.
7. Preheat oven to 400°F and line a baking sheet.
8. Cut chilled dough into 8 wedges and space on the sheet.
9. Bake for 15–18 minutes until golden brown.
10. Cool completely before drizzling with lemon glaze.
Notes
- Chill the dough, it’s crucial for flaky layers.
- Use fresh strawberries only to prevent soggy dough.
- Don’t overmix, mix just until dough comes together.
- Skip the glaze for a rustic version or use coarse sugar before baking.
- Prep Time: 25 minutes
- Cook Time: 12 minutes
- Category: Breakfast, Brunch, Baking
- Method: Baked
- Cuisine: American
Nutrition
- Serving Size: 1 scone
- Calories: 218
- Sugar: 6g
- Sodium: 208mg
- Fat: 9g
- Saturated Fat: 5g
- Unsaturated Fat: 3g
- Trans Fat: 0g
- Carbohydrates: 28g
- Fiber: 1g
- Protein: 3g
- Cholesterol: 43mg
FAQs
Can I make these strawberry scones without a stand mixer?
Absolutely! Use a large bowl and pastry blender to cut the butter into the flour mixture. You can even use two forks if you don’t have a pastry blender, it just takes a bit more patience.
What if I don’t have buttermilk?
Make your own by adding 1 teaspoon of lemon juice or white vinegar to ⅓ cup regular milk. Let it sit for 5 minutes until it thickens slightly.
Can I use different fruits instead of strawberries?
Yes! Blueberries, raspberries, or diced peaches work wonderfully. Just keep the amount to about ½ cup and make sure they’re dry before folding in.
Why do my scones spread instead of rising?
This usually happens when the butter is too warm or the dough wasn’t chilled long enough. Make sure your butter is cold and don’t skip the refrigeration step.
How do I know when the scones are done?
They should be golden brown on top and sound hollow when tapped lightly. The internal temperature should reach 200°F if you want to be precise.
Can I make the dough ahead of time?
Yes! You can prepare the dough, shape it, and refrigerate for up to 24 hours before cutting and baking. This actually improves the flavor as the ingredients have time to meld together.