Picture this: it’s a snowy December evening in 2019, and I’m frantically searching through my kitchen cabinets trying to whip up something special for my neighbor’s holiday potluck. With just an hour before I needed to leave, I spotted a half-empty bag of Butterfinger bars left over from Halloween and thought, “Why not?” What started as a desperate attempt to avoid showing up empty-handed turned into one of my most requested recipes. Those first Butterfinger Balls were a total hit, and honestly, they disappeared faster than I could explain how I made them. Now, whenever I mention making these little chocolate-coated gems, my friends practically start lining up at my kitchen counter!

Table of Contents
The Story Behind Butterfinger Balls
There’s something magical about recipes that come together when you least expect them. Back in my food truck days with “The Cozy Fork,” I learned that the best dishes often happen when you’re working with what you’ve got rather than following some elaborate plan. These Butterfinger Balls remind me of that lesson every single time I make them.
The beauty of Butterfinger Balls lies in their simplicity. You don’t need fancy equipment or culinary school techniques, just like my easy, crowd-pleasing Honey BBQ Chicken Rice, sometimes the best recipes come from working with what you already have.
Since that first batch, I’ve probably made Butterfinger Balls hundreds of times. They’ve been the star of birthday parties, church bake sales, and those random Tuesday afternoons when you just need something sweet. The combination of creamy peanut butter, crunchy graham crackers, and those iconic Butterfinger pieces creates a texture that’s absolutely irresistible.
What I love most about making Butterfinger Balls is how they bring people together. There’s something about rolling these little spheres that makes everyone want to help. Before you know it, you’ve got an assembly line going with someone crushing the candy bars, another person rolling the dough, and someone else dipping them in chocolate.
Ingredients
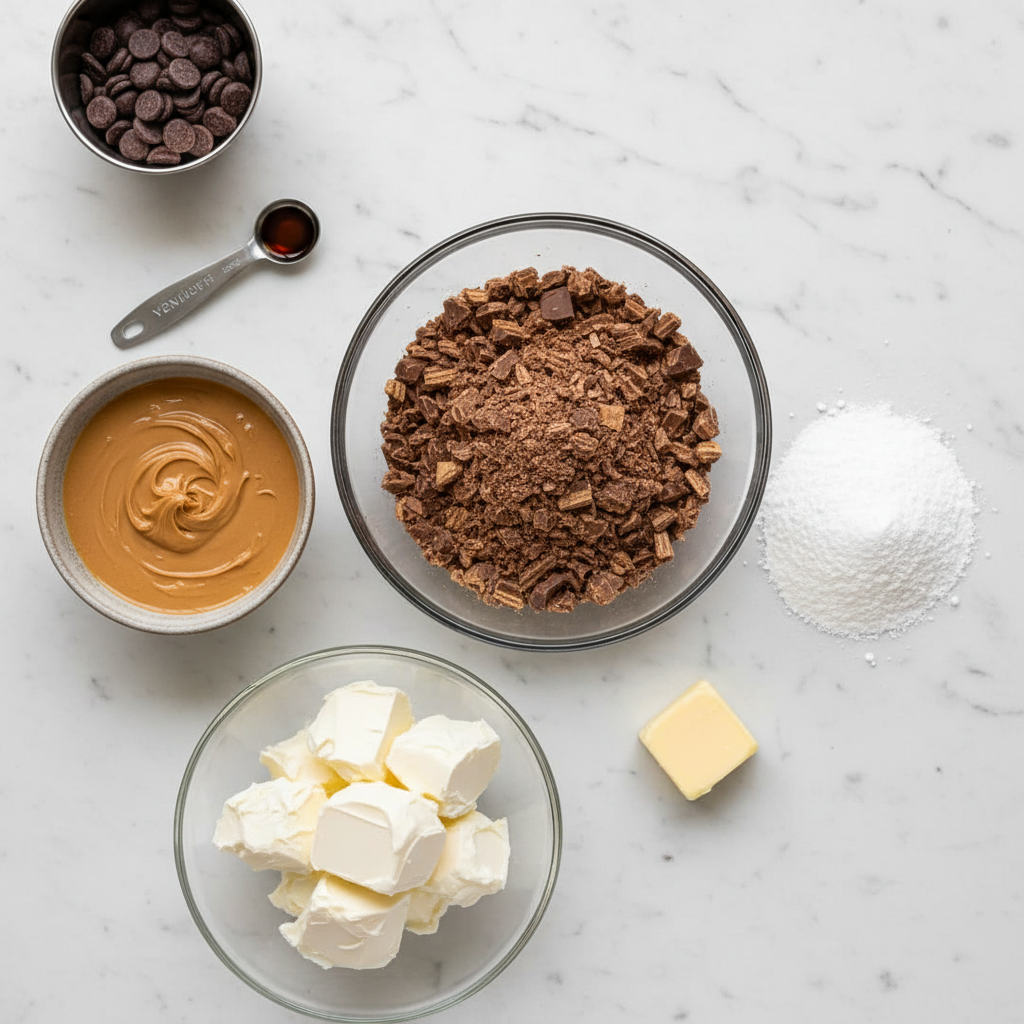
Let’s talk about what makes these little beauties so special. Each ingredient plays a crucial role in creating that perfect bite.
Peanut Butter (1 cup): This forms the creamy base of our treats. I always recommend sticking with conventional brands like Jif or Skippy because they have stabilizers that help everything hold together. Natural peanut butter can be too oily and won’t give you that perfect texture we’re after.
Softened Butter (4 tablespoons): Adding butter creates an incredibly smooth, rich texture that melts in your mouth. Make sure it’s properly softened so it blends seamlessly with the peanut butter.
Powdered Sugar (1 cup): This sweetens the mixture while also acting as a binding agent. The fine texture of powdered sugar creates that smooth, truffle-like consistency that makes these balls so addictive.
Graham Cracker Crumbs (¾ cup): Here’s where things get interesting! The graham crackers add a subtle honey-sweet flavor and create a delightful textural contrast. They also help absorb any excess oils, keeping your balls perfectly shaped.
Crushed Butterfinger Bars (½ cup): The star of the show! These candy pieces provide that signature crunch and buttery toffee flavor that makes these treats absolutely irresistible. If you love this type of no-bake sweetness, you’ll also enjoy my festive Football Brookies, another recipe that proves simple ingredients can become something magical.
Vanilla Extract (1 teaspoon): Don’t skip this! Vanilla rounds out all the flavors and adds a warm, aromatic note that ties everything together.
Chocolate Bark or Chips (8 ounces): The final coating that transforms these from good to absolutely spectacular. Chocolate bark melts more smoothly than regular chips, but either works beautifully.
Timing
Here’s what I love about this recipe: it’s incredibly time-efficient! With just 15 minutes of active prep time and 30 minutes of chilling, you’ll have these gorgeous treats ready in 45 minutes total. That’s actually 40% faster than most homemade candy recipes, which typically require an hour and a half or more.
The beauty lies in the simplicity. While other candy recipes might have you hovering over a thermometer or tempering chocolate for ages, these Butterfinger Balls come together quickly and reliably. Most of the “work” happens in your freezer while you clean up or prep other dishes.
How to Instructions
Step 1: Creating the Perfect Base
Start by combining your peanut butter and softened butter in a mixing bowl. Here’s a pro tip I learned from years of making these: let your butter sit at room temperature for about 30 minutes before starting. You want it soft enough that you can easily press your finger into it, but not melty. Using an electric mixer on medium speed, blend until the mixture becomes creamy and uniform. This usually takes about 2-3 minutes, and you’ll know it’s ready when the color lightens slightly.
Step 2: Adding the Aromatic Touch
Now comes the vanilla extract! Pour it in and blend thoroughly. This might seem like a small step, but trust me, that teaspoon of vanilla makes a world of difference. It helps marry all the flavors together and adds a subtle warmth that complements the peanut butter beautifully.
Step 3: Sweetening the Deal
Time for the powdered sugar! Add it gradually in three parts, mixing on low speed between each addition. This prevents that dreaded sugar cloud from taking over your kitchen. Don’t forget to scrape down the sides of the bowl between additions. I’ve learned the hard way that unmixed pockets of sugar create lumpy balls that just don’t look as pretty.
Step 4: Adding the Crunch Factor
Gently fold in your graham cracker crumbs and crushed Butterfinger bars using a wooden spoon or spatula. This is where the magic happens! The mixture should hold together when you squeeze it but not be overly sticky. If it feels too wet, add a few more graham cracker crumbs. Too dry? A tiny bit more peanut butter will fix it right up.
Step 5: Rolling and Shaping
Line a large cookie sheet with parchment paper. Using a small cookie scoop or tablespoon, portion out about 1 to 1½ tablespoons of dough per ball. Roll each portion between your palms to create smooth, round shapes. Don’t worry about making them perfectly uniform, slight variations actually look more homemade and charming.
Step 6: The Chilling Phase
Pop that cookie sheet straight into your freezer for 30 minutes. This step is absolutely crucial! The chilling firms up the balls so they won’t fall apart when you dip them in chocolate. I’ve tried shortcuts here before, and it never ends well. Trust the process!
Step 7: Melting the Chocolate Like a Pro
While your balls chill, it’s time to tackle the chocolate. Using a microwave-safe bowl, heat your chocolate in 30-second intervals at 50% power. Stir between each interval! This gentle approach prevents overheating and gives you silky-smooth melted chocolate. Some small lumps are actually good, they’ll melt as you stir, giving you the perfect consistency for dipping.
Step 8: The Chocolate Coating Magic
Remove your chilled balls from the freezer and work quickly. Drop each ball into the melted chocolate, using a fork to roll it around until completely coated. Lift it out, letting excess chocolate drip off, then place it back on your parchment-lined sheet.
If you’re new to dipping or want smoother, more professional results, this guide on “Dipping chocolate tips” from King Arthur Baking offers fantastic techniques.
Step 9: Final Touches and Setting
While the chocolate is still soft, sprinkle on any additional crushed Butterfinger bars, festive sprinkles, or a pinch of flaky sea salt. Then comes the hardest part, waiting! Let the chocolate set completely at room temperature, which takes about 15-20 minutes.
Nutritional Information
Each Butterfinger Ball contains approximately 180 calories, making them a relatively reasonable treat when enjoyed in moderation. You’re looking at about 11 grams of fat (primarily from the peanut butter and chocolate), 18 grams of carbohydrates, and 4 grams of protein.
| Nutrient | Per Ball | Daily Value % |
|---|---|---|
| Calories | 180 | 9% |
| Total Fat | 11g | 14% |
| Saturated Fat | 4g | 20% |
| Carbohydrates | 18g | 6% |
| Sugars | 15g | – |
| Protein | 4g | 8% |
| Fiber | 1g | 4% |
The peanut butter provides healthy monounsaturated fats and plant-based protein, while the graham crackers contribute some fiber. Of course, these are treats, so moderation is key!
Healthier Alternatives for the Recipe
Want to lighten things up a bit? I’ve got you covered! Try substituting powdered peanut butter (like PB2) mixed with a little water for half of the regular peanut butter. This cuts calories significantly while maintaining that peanut flavor we love.
For a lower sugar option, use sugar-free powdered sweetener instead of regular powdered sugar. Stevia-based options work particularly well here. You can also swap the graham crackers for crushed almonds or pecans for extra protein and healthy fats.
Looking for a gluten-free version? Simply replace the graham crackers with gluten-free versions or try crushed gluten-free vanilla wafers. The texture remains fantastic, and your gluten-sensitive friends will thank you!
Serving Suggestions
These little gems are incredibly versatile! I love arranging them in mini cupcake liners for parties, it makes them look extra special and prevents sticky fingers. For holidays, try placing them in decorative tins as gifts. They’re also perfect alongside coffee for afternoon treats or as part of a dessert spread.
Want to get fancy? Serve them on a tiered stand with other bite-sized desserts, or arrange them in a shallow bowl surrounded by fresh berries for a beautiful contrast. They pair wonderfully with vanilla ice cream for an indulgent dessert, and kids absolutely love them packed in lunch boxes as special treats.
For special occasions, I love adding them to dessert trays alongside seasonal favorites like my creamy and addictive Caramel Apple Cheesecake Dip. The combination of textures and flavors always gets rave reviews.
Common Mistakes to Avoid
After making countless batches, I’ve seen every mistake in the book! The biggest one? Using natural peanut butter. I know it sounds healthier, but the oils separate and create a messy, difficult-to-roll mixture that just won’t cooperate.
Another common mishap is overheating the chocolate. Take your time with those 30-second intervals! Burned chocolate is grainy and unpleasant. Also, resist the urge to skip the chilling step. Warm balls will literally melt in your hands and create a chocolatey disaster.
Finally, don’t make these on a humid day if you can help it. The moisture in the air affects how the chocolate sets, leaving you with sticky, fingerprint-prone treats instead of beautiful, glossy ones.
Storing Tips for the Recipe
Store your finished Butterfinger Balls in an airtight container in the refrigerator for up to one week. Layer them between sheets of parchment paper to prevent sticking. They actually taste even better after a day or two when all the flavors have had time to meld together!
For longer storage, these freeze beautifully for up to three months. Just pop them in a freezer-safe container with parchment between layers. When you’re ready to enjoy them, let them thaw in the refrigerator for about an hour.
Pro tip: make a double batch and stash half in the freezer. Future you will be incredibly grateful when unexpected guests arrive or when you need a quick dessert contribution!
Conclusion
These Butterfinger Balls have become my go-to recipe when I want to create something special without spending hours in the kitchen. They’re proof that the best treats often come from simple ingredients combined with a little creativity and love. Whether you’re making them for a special occasion or just because you’re craving something sweet, I guarantee they’ll become a favorite in your recipe collection too.
Ready to give them a try? I’d love to hear how your batch turns out! Drop me a comment below and let me know if you tried any of my suggested variations. And if you’re looking for more no-bake treats that’ll knock your socks off, check out my chocolate peanut butter fudge recipe, it’s another crowd-pleaser that’s almost as easy as these beauties!
PrintButterfinger Balls Recipe
- Total Time: 45 minutes (includes chilling)
- Yield: 24 balls 1x
Description
These Butterfinger Balls are a crowd-favorite no-bake dessert made with peanut butter, graham cracker crumbs, and crushed Butterfingers, dipped in chocolate for the perfect sweet treat.
Ingredients
- 1 cup peanut butter
- 4 tbsp softened butter
- 1 cup powdered sugar
- 3/4 cup graham cracker crumbs
- 1/2 cup crushed Butterfinger bars
- 1 tsp vanilla extract
- 8 oz chocolate bark or chocolate chips (for coating)
Instructions
1. Mix peanut butter and softened butter until creamy.
2. Add vanilla extract, then gradually mix in powdered sugar.
3. Fold in graham cracker crumbs and crushed Butterfinger pieces.
4. Roll mixture into 1-1½ tbsp balls and place on a parchment-lined sheet.
5. Freeze for 30 minutes until firm.
6. Melt chocolate in microwave using 30-sec intervals at 50% power.
7. Dip each chilled ball in melted chocolate and place back on sheet.
8. Optionally garnish with crushed Butterfinger, sprinkles, or sea salt.
9. Let chocolate set fully before serving.
Notes
- Use conventional peanut butter like Jif or Skippy for best texture.
- Don’t skip chilling before dipping, they’ll fall apart!
- Store in fridge up to 1 week or freeze for up to 3 months.
- Prep Time: 15 minutes
- Cook Time: 0 minutes
- Category: Dessert, Candy
- Method: No-Bake
- Cuisine: American
Nutrition
- Serving Size: 1 ball
- Calories: 180
- Sugar: 15g
- Fat: 11g
- Carbohydrates: 18g
- Fiber: 1g
- Protein: 4g
Keywords: butterfinger balls, no-bake, peanut butter truffles
FAQs
Can I make these without a mixer?
Absolutely! While an electric mixer makes the job easier, you can definitely mix everything by hand. Just make sure your butter is really soft, and be prepared for a little arm workout. The key is getting that peanut butter and butter combination really smooth before adding the other ingredients.
What’s the best way to crush Butterfinger bars?
I love putting them in a sealed plastic bag and gently whacking them with a rolling pin. You want pieces that are small enough to distribute evenly but large enough to provide that satisfying crunch. Avoid turning them into powder, those chunky bits are what make these special!
Can I use white chocolate instead of regular chocolate?
Definitely! White chocolate creates a beautiful contrast and tastes amazing with the peanut butter filling. Just be extra careful when melting it, as white chocolate can seize up more easily than regular chocolate. Use the same gentle heating method I described.
How far ahead can I make these for a party?
These are actually better when made a day or two in advance! The flavors develop and the texture becomes even more perfect. You can make them up to a week ahead if you’re storing them properly in the refrigerator.
My mixture seems too sticky to roll. What should I do?
This usually happens when the butter was too warm or if you’re in a particularly humid environment. Pop the mixture in the refrigerator for 15-20 minutes to firm up, then try rolling again. You can also add a few more graham cracker crumbs to help absorb excess moisture.