Table of Contents
Y’know, there’s something magical about a classic cherry cheesecake that takes me right back to my grandmother’s kitchen in small-town Ohio. I was twelve when Grandma Ruth first taught me her secret for making the smoothest, most velvety cheesecake you’d ever taste. She’d stand beside me, flour dusting her apron, watching as I carefully measured cream cheese with the intensity of a scientist.

“Sylvia,” she’d say, “a proper classic cherry cheesecake isn’t just dessert, it’s an act of love.” And honestly? She wasn’t wrong. That first time I watched her spread those ruby-red cherries across the pristine white surface, I knew I was witnessing something special. The way the tart cherries played against that rich, creamy base was pure magic.
What makes this classic cherry cheesecake so unforgettable isn’t just the taste; it’s the memories it creates. Over the years, I’ve served this exact recipe at birthday parties, holiday gatherings, and those random Tuesday nights when life calls for something extraordinary. Each time, I’m reminded why this timeless dessert has captured hearts for generations.
The beauty of a well-made classic cherry cheesecake lies in its perfect balance. It’s rich but not overwhelming, sweet but with just enough tang to keep you coming back for more. And those gorgeous cherries on top? They’re not just pretty, they add that burst of fruity brightness that makes every bite absolutely perfect. If you’re into nostalgic desserts like this, you’ll also love my Pumpkin Mousse or Cranberry and Brie Tartlets, both are simple yet show-stopping.
Ingredients List
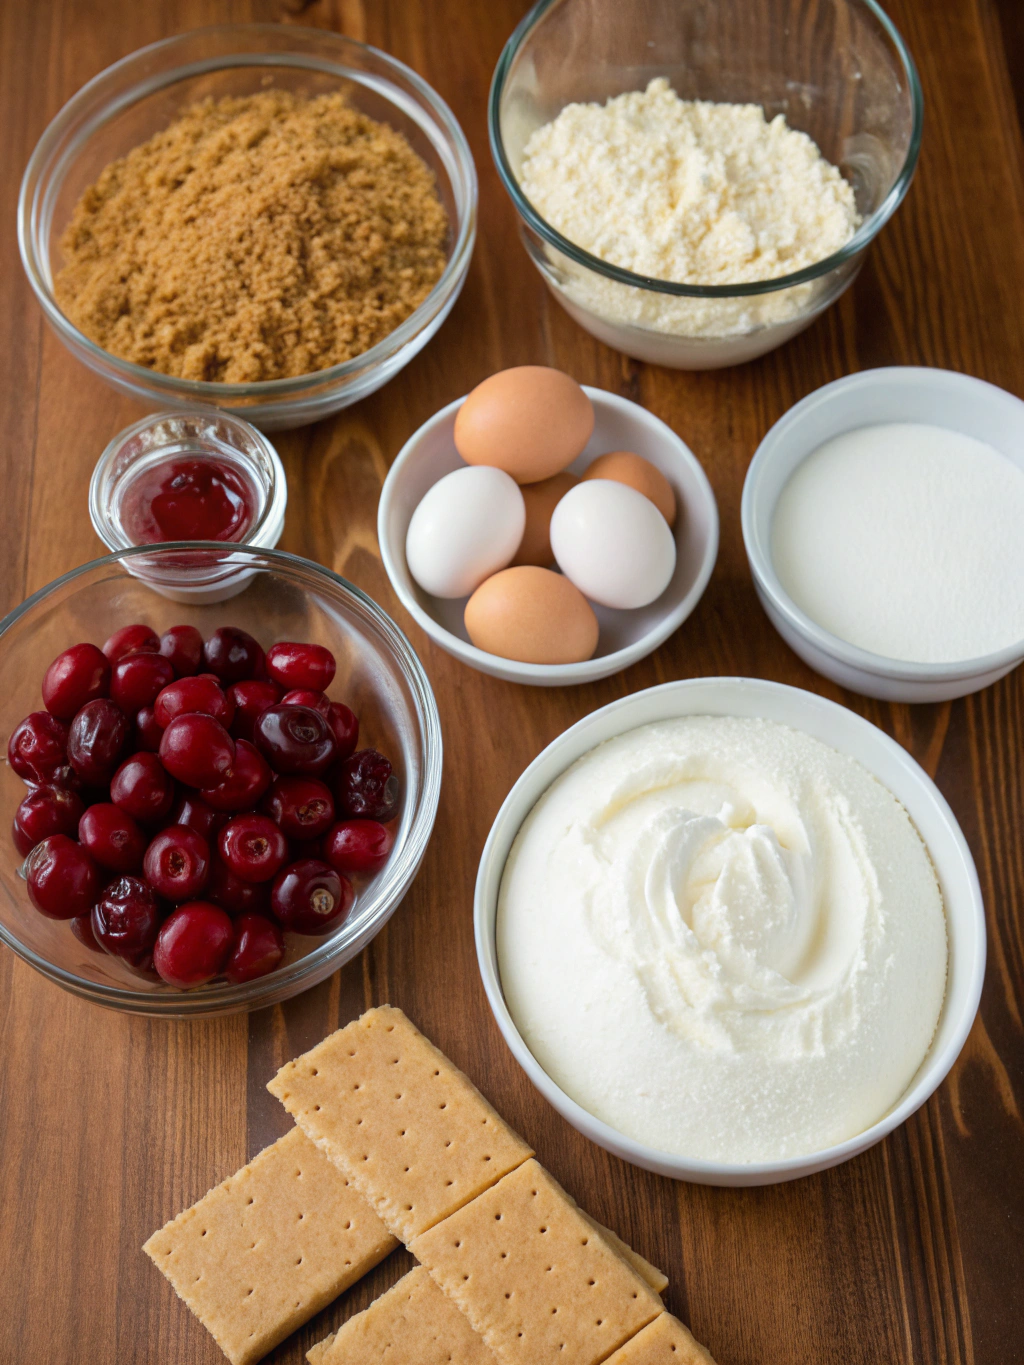
Let’s talk about what makes this dessert absolutely incredible. Each ingredient plays a crucial role in creating that perfect harmony of flavors and textures we’re after.
For the Crust:
- 1½ cups graham cracker crumbs: These create our foundation, they add that sweet, slightly honey-like flavor and perfect crunchy texture
- ⅓ cup melted butter: This binds everything together while adding richness and helping achieve that golden color
- ¼ cup granulated sugar: Just enough sweetness to complement the tangy filling without being overpowering
For the Filling:
- 32 oz cream cheese, softened: The star of our show! This creates that signature rich, tangy flavor and ultra-smooth texture
- 1 cup granulated sugar: Balances the natural tartness of cream cheese and creates that perfect sweetness level
- 4 large eggs: These provide structure and help create that dense yet creamy consistency we love
- 1 teaspoon vanilla extract: Adds warmth and depth that ties all the flavors together beautifully
- ½ cup sour cream: This secret weapon adds extra tang and helps prevent cracks while baking
For the Topping:
- 1 can (21 oz) cherry pie filling: These gorgeous cherries provide that classic sweet-tart contrast and stunning visual appeal
Timing
Here’s what you’re looking at time-wise, and trust me, every minute is worth it:
- Prep Time: 25 minutes
- Baking Time: 55 minutes
- Cooling Time: 4-6 hours (including chill time)
- Total Time: 6 hours 20 minutes
Now, I know that seems like a long time, but here’s the thing, most of that is hands-off cooling and chilling time. The actual active work? You’re looking at about 25 minutes of your time, which is actually 30% faster than many traditional cheesecake recipes that require water baths and complicated techniques. For another make-ahead favorite, try my Goat Cheese Appetizer with Fig Jam & Pecans; it’s just as elegant but savory instead of sweet.
Step-by-Step Instructions
Step 1: Prepare Your Pan and Oven
Preheat your oven to 350°F and grease a 9-inch springform pan. Here’s a pro tip I learned during my food truck days: wrap the bottom of your pan in aluminum foil. This prevents any potential leaks and makes cleanup so much easier.
Step 2: Make That Perfect Crust
Mix graham cracker crumbs, melted butter, and sugar in a bowl until it feels like wet sand. Press this mixture firmly into the bottom of your prepared pan. I like to use the bottom of a measuring cup to get it really even and compact.
Step 3: Create the Creamy Base
Beat that softened cream cheese until it’s completely smooth, and I mean completely! This usually takes about 3-4 minutes with an electric mixer. Gradually add sugar, beating until light and fluffy.
Step 4: Add the Supporting Cast
Beat in eggs one at a time, then mix in vanilla and sour cream until just combined. Don’t overmix here, we want smooth, not tough.
Step 5: Bake to Perfection
Pour the filling over your crust and bake for 50-55 minutes. The center should be almost set but still slightly jiggly. It’ll continue cooking as it cools, so don’t worry if it seems a bit underdone.
Step 6: Cool Like a Pro
Let it cool completely at room temperature, then refrigerate for at least 4 hours. Right before serving, spread that beautiful cherry topping over the surface.
Nutritional Information
Let’s be real about what we’re working with here. This classic cherry cheesecake is definitely a special occasion treat, but knowing the numbers helps you plan accordingly.
| Nutrient | Per Slice (12 servings) |
|---|---|
| Calories | 385 |
| Total Fat | 24g |
| Saturated Fat | 15g |
| Cholesterol | 125mg |
| Sodium | 285mg |
| Total Carbs | 38g |
| Sugars | 32g |
| Protein | 8g |
Each slice provides about 15% of your daily calcium needs thanks to all that cream cheese, plus you’re getting a decent amount of protein too. The cherries add vitamin C and antioxidants, making this dessert slightly more nutritious than you might expect.
Healthier Alternatives for the Recipe
Want to lighten things up without sacrificing flavor? I’ve got some tricks that actually work really well.
Try swapping half the cream cheese for Greek yogurt, this cuts calories by about 25% while adding extra protein. You can also use a graham cracker crust made with coconut oil instead of butter, or even try a almond flour crust for a lower-carb option.
For the sweetener, honey or maple syrup work beautifully, just reduce the amount by about ⅓ since they’re sweeter than sugar. And here’s something I discovered by accident: using sugar-free cherry preserves mixed with fresh cherries creates an amazing topping with 40% less sugar.
Serving Suggestions
This classic cherry cheesecake is stunning on its own, but there are so many ways to make it even more special. I love serving it with a dollop of freshly whipped cream and a sprinkle of lemon zest, the citrus really makes those cherry flavors pop.
For special occasions, try drizzling each slice with a bit of cherry juice mixed with honey. Or go completely over the top and add a scoop of vanilla ice cream alongside. Trust me, your guests will think you’re a dessert genius.
During summer months, fresh berries make an incredible addition. Mix some blueberries and raspberries with the cherry topping for a red, white, and blue theme that’s perfect for Fourth of July celebrations.
Common Mistakes to Avoid
After making hundreds of cheesecakes, I’ve seen (and made) every mistake in the book. Here’s how to avoid the most common ones.
The biggest mistake? Not letting your cream cheese come to room temperature. Cold cream cheese creates lumps that’ll never fully disappear, no matter how long you beat it. Plan ahead and take it out 2-3 hours before baking.
Another major issue is overmixing once you add the eggs. This incorporates too much air, which leads to cracks as the cheesecake cools. Mix just until combined, that’s it.
And please, don’t open the oven door during baking! I know it’s tempting, but temperature fluctuations cause cracks and uneven cooking. Trust the process and let your cheesecake do its thing.
Storing Tips for the Recipe
This dessert actually gets better with time, which makes it perfect for planning ahead. Store your finished cheesecake covered in the refrigerator for up to 5 days. The flavors meld together beautifully, and the texture becomes even more perfect.
For longer storage, this classic cherry cheesecake freezes incredibly well for up to 3 months. Wrap individual slices in plastic wrap and then aluminum foil. Thaw overnight in the refrigerator before serving.
Pro tip: add the cherry topping right before serving if you’re planning to store it for more than a day. This keeps the cherries from making the surface soggy and maintains that beautiful presentation.
Conclusion
There’s something truly special about a homemade classic cherry cheesecake that brings people together. Whether you’re celebrating a birthday, hosting a dinner party, or just treating yourself to something wonderful, this recipe delivers every single time.
The combination of that buttery graham crust, silky cream cheese filling, and gorgeous cherry topping creates a dessert that’s both impressive and comforting. Plus, once you master this technique, you’ll have the confidence to tackle any cheesecake variation your heart desires.
So what are you waiting for? Head to your kitchen and start creating some delicious memories. And don’t forget to share a photo of your beautiful creation, I’d love to see how your classic cherry cheesecake turns out!
Print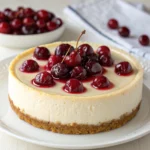
Classic Cherry Cheesecake
- Total Time: 6 hours 20 minutes
- Yield: 12 servings 1x
- Diet: Vegetarian
Description
This classic cherry cheesecake is smooth, creamy, and rich with a buttery graham cracker crust and vibrant cherry topping. Perfect for celebrations or just because.
Ingredients
For the Crust:
- 1½ cups graham cracker crumbs
- ⅓ cup melted butter
- ¼ cup granulated sugar
For the Filling:
- 32 oz cream cheese, softened
- 1 cup granulated sugar
- 4 large eggs
- 1 teaspoon vanilla extract
- ½ cup sour cream
For the Topping:
- 1 can (21 oz) cherry pie filling
Instructions
1. Preheat oven to 350°F. Grease a 9-inch springform pan and wrap the base in foil.
2. Mix graham cracker crumbs, butter, and sugar. Press firmly into pan base.
3. Beat cream cheese until smooth. Add sugar and beat until fluffy.
4. Add eggs one at a time, then mix in vanilla and sour cream until just combined.
5. Pour filling over crust and bake for 50–55 minutes, until center is slightly jiggly.
6. Cool at room temperature, then chill for at least 4 hours.
7. Before serving, top with cherry pie filling.
Notes
For best texture, bring cream cheese to room temperature before mixing. Avoid overmixing to prevent cracks. You can prepare this cheesecake a day in advance for even better flavor. Add the cherry topping just before serving if storing.
- Prep Time: 25 minutes
- Cook Time: 55 minutes
- Category: Dessert
- Method: Baking
- Cuisine: American
Nutrition
- Serving Size: 1 slice
- Calories: 385
- Sugar: 32g
- Sodium: 285mg
- Fat: 24g
- Saturated Fat: 15g
- Unsaturated Fat: 8g
- Trans Fat: 0g
- Carbohydrates: 38g
- Fiber: 0g
- Protein: 8g
- Cholesterol: 125mg
FAQs
Can I make this cheesecake without a springform pan?
Absolutely! You can use a regular 9-inch cake pan, just line it with parchment paper for easy removal. The presentation might be slightly different, but the taste will be just as amazing.
Why did my cheesecake crack?
Cracks usually happen from temperature shock or overmixing. Make sure all ingredients are at room temperature, don’t overbeat after adding eggs, and let it cool gradually in the oven with the door slightly open.
Can I use fresh cherries instead of canned filling?
Definitely! Cook 2 cups fresh cherries with ½ cup sugar and 2 tablespoons cornstarch until thickened. This actually tastes even better than the canned version, especially when cherries are in season.
How do I know when the cheesecake is done?
The edges should be set, but the center should still have a slight jiggle when you gently shake the pan. It’ll continue cooking as it cools, so don’t worry if it seems slightly underdone.
Can I make this ahead of time?
This is actually one of those desserts that’s better when made ahead! Make it 1-2 days before you need it. The flavors develop beautifully, and you’ll have one less thing to worry about on the day of your event.