There’s something magical about the first bite of Green Velvet Cookies that takes me right back to last March. I was standing in my Portland kitchen, watching the rain streak down the windows, when my neighbor Sarah knocked on my door with her six-year-old daughter Emma in tow. Emma had just learned about St. Patrick’s Day at school and was absolutely convinced that everything green was “good luck food.” As they chatted excitedly about leprechauns and four-leaf clovers, I found myself staring at my pantry, wondering how I could create something special for this little believer in magic.

That’s when inspiration struck! Why not take the beloved red velvet concept and give it a vibrant green makeover? After all, Green Velvet Cookies would be the perfect way to capture that same rich, slightly chocolatey flavor we all love, but with a festive twist that would make Emma’s eyes light up. As I started pulling ingredients from my cupboard, I could already picture these beautiful emerald treats topped with fluffy cream cheese frosting.
The result? Pure magic. These Green Velvet Cookies became an instant hit not just with Emma, but with everyone who tried them. They’ve got that signature velvet cake texture, but in a handheld form that’s perfect for sharing. Plus, the gorgeous green color makes them absolutely perfect for St. Patrick’s Day, spring celebrations, or any time you want to add a pop of color to your dessert table.
Table of Contents
The Story behind Green Velvet Cookies
You know how some recipes just happen by accident? Well, my Green Velvet Cookies story started with a happy mistake and a determined little girl who believed in the power of green food. After Emma’s visit that rainy afternoon, I couldn’t get the idea out of my head. I’d been making red velvet cakes for years, especially favorites like Red Velvet Sugar Cookies, but something about creating a green version felt fresh and exciting.
My first attempt was honestly a bit of a disaster. I used way too much food coloring and ended up with cookies that looked more like they belonged in a Dr. Seuss book than on a dessert table. But you know what? Emma loved them anyway. She called them “magic cookies” and insisted they tasted like “spring and happiness.” Kids have a way of seeing potential where adults see problems, don’t they?
After several tweaks and taste tests (my friends were very patient guinea pigs), I finally perfected these Green Velvet Cookies. The secret lies in getting just the right balance of cocoa powder and food coloring to achieve that signature velvet flavor with a stunning green appearance. Now, every time I make a batch, I think about Emma’s pure joy when she saw that first tray come out of the oven. These Green Velvet Cookies have become my go-to recipe for bringing a little magic to ordinary days.
Ingredients
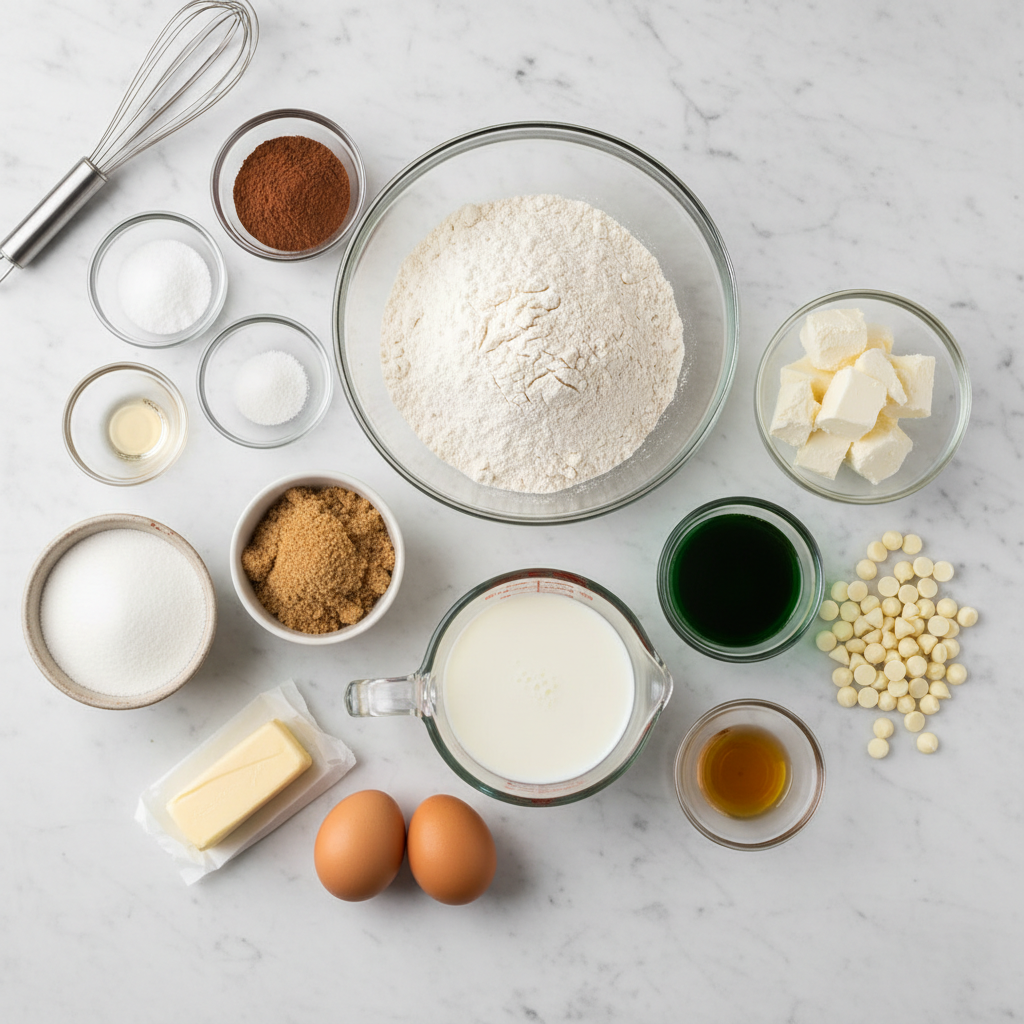
Let me walk you through what makes these cookies so special. Each ingredient plays a crucial role in creating that perfect velvet texture and flavor that’ll have everyone asking for the recipe.
For the Cookies:
- 1 cup unsalted butter, softened: This creates the rich, tender base that gives our cookies their melt-in-your-mouth texture. Make sure it’s properly softened for easy creaming.
- 1 cup granulated sugar: Provides sweetness and helps create that light, fluffy texture when creamed with butter.
- 1/2 cup brown sugar, packed: Adds moisture and a subtle molasses flavor that complements the chocolate notes beautifully.
- 2 large eggs: These bind everything together and add richness while helping create the perfect chewy texture.
- 2 tsp vanilla extract: Brings warmth and depth that balances the other flavors perfectly.
- 1 tbsp green food coloring: This is what transforms ordinary cookies into show-stopping green beauties! Start with less and add more as needed.
- 2 1/2 cups all-purpose flour: The foundation that gives structure to our cookies.
- 1/4 cup cocoa powder: Just enough to give that signature velvet flavor without making the cookies too chocolatey.
- 1 tsp baking soda: Helps the cookies rise slightly for that perfect tender crumb.
- 1/2 tsp baking powder: Works with the baking soda to create the ideal texture.
- 1/2 tsp salt: Brings out all the other flavors and balances the sweetness.
For the Cream Cheese Frosting:
- 8 oz cream cheese, softened: Creates that classic tangy, creamy frosting that’s the perfect contrast to the sweet cookies.
- 1/4 cup unsalted butter, softened: Adds richness and helps create a smooth, spreadable consistency.
- 3 cups powdered sugar: Sweetens and thickens the frosting to perfection.
- 1 tsp vanilla extract: Complements the vanilla in the cookies for a cohesive flavor profile.
Timing
Here’s what you can expect time-wise when making these delightful treats:
| Phase | Time Required |
|---|---|
| Prep Time | 15 minutes |
| Baking Time | 10-12 minutes per batch |
| Cooling Time | 20 minutes |
| Frosting Prep | 10 minutes |
| Total Time | 55-60 minutes |
The beauty of this recipe is that it’s about 25% faster than making a full red velvet cake, but you get all that amazing flavor in convenient, shareable portions. Plus, you can easily double the batch if you’re planning to feed a crowd!
Step-by-Step Instructions
Preheat and Prep Your Kitchen
Start by preheating your oven to 350°F (175°C) and line your baking sheets with parchment paper. This simple step will save you from scraping stuck cookies off your pans later! Trust me, I learned this lesson the hard way during my early baking adventures.
Cream the Butter and Sugar Like a Pro
In your largest mixing bowl, cream together the softened butter, granulated sugar, and brown sugar until the mixture looks light and fluffy. This usually takes about 3-4 minutes with an electric mixer. This step is absolutely critical because it creates tiny air pockets that give your cookies that perfect tender texture.
Add Eggs and Create That Gorgeous Green Color
Mix in your eggs one at a time, then add the vanilla extract. Now comes the fun part! Add your green food coloring gradually, mixing until you achieve that vibrant emerald shade. Don’t worry if it looks a bit intense at first. The color will mellow slightly as you add the dry ingredients.
Combine Your Dry Ingredients Perfectly
In a separate bowl, whisk together the flour, cocoa powder, baking soda, baking powder, and salt. Slowly fold these dry ingredients into your wet mixture, stirring just until everything comes together. Overmixing can make cookies tough, so be gentle here.
Shape and Bake to Perfection
Using a cookie scoop or tablespoon, drop rounded portions of dough onto your prepared baking sheet, spacing them about 2 inches apart. Bake for 10-12 minutes, or until the edges are set but the centers still look slightly soft. They’ll continue cooking on the hot pan even after you remove them from the oven.
Whip Up That Dreamy Cream Cheese Frosting
While your cookies cool, beat the cream cheese and butter until smooth and creamy. Gradually add the powdered sugar, beating until fluffy, then mix in the vanilla. The frosting should be spreadable but hold its shape nicely.
Frost and Add Final Touches
Once your cookies are completely cool (this is important or your frosting will melt!), generously frost each one with the cream cheese mixture. If you want to get fancy, sprinkle with green or gold decorations for that extra festive touch.
Nutritional Information
Here’s the nutritional breakdown per cookie (assuming this recipe makes 24 cookies):
| Nutrient | Amount per Cookie |
|---|---|
| Calories | 285 |
| Total Fat | 11g |
| Saturated Fat | 7g |
| Cholesterol | 45mg |
| Sodium | 195mg |
| Total Carbohydrates | 46g |
| Dietary Fiber | 1g |
| Sugars | 38g |
| Protein | 3g |
While these are definitely a treat, they contain eggs which provide protein and some B vitamins. The cream cheese frosting also adds calcium to your diet.
Healthier Alternatives for the Recipe
Want to lighten these up without sacrificing flavor? Here are some swaps I’ve tested that actually work:
Sugar Substitutions: Replace half the granulated sugar with unsweetened applesauce. This cuts calories by about 15% and adds moisture. You can also use coconut sugar for a slightly lower glycemic index option.
Flour Alternatives: Substitute up to one cup of the all-purpose flour with whole wheat pastry flour for added fiber. White whole wheat flour works beautifully here without making the cookies heavy.
Dairy-Free Options: Use plant-based butter and dairy-free cream cheese for the frosting. I’ve had great success with cashew-based cream cheese alternatives.
Natural Coloring: Instead of artificial food coloring, try using spirulina powder mixed with a tiny bit of turmeric to achieve a natural green color. Start with just 1/4 teaspoon and adjust as needed.
Serving Suggestions
These gorgeous cookies are versatile enough for any occasion! For St. Patrick’s Day parties, arrange them on a green platter with gold accents, or serve them alongside festive treats like Loaded Leprechaun Popcorn for a playful dessert spread. They look absolutely stunning alongside traditional Irish coffee or a cold glass of milk.
During spring celebrations, pair them with fresh strawberries and mint leaves for a beautiful color contrast. I love serving them at baby showers too, especially when they’re for someone having a boy. The green color feels fresh and celebratory without being too over the top.
For kids’ parties, let little ones help decorate with sprinkles or small candies. There’s something so satisfying about letting them add their own creative touches. These cookies also make wonderful gifts when packaged in clear cellophane bags tied with colorful ribbons.
Common Mistakes to Avoid
After making hundreds of these cookies, I’ve seen (and made!) plenty of mistakes. Here’s how to avoid the most common ones:
Overmixing the dough is probably the biggest culprit for tough cookies. Once you add the flour, mix just until combined. The dough should look slightly rough, not smooth.
Using cold ingredients will prevent proper creaming and can lead to dense cookies. Make sure your butter, eggs, and cream cheese are all at room temperature before starting, this step is so important that even baking experts emphasize it in guides like why room-temperature ingredients matter in baking.
Overbaking happens so easily with colored cookies because it’s hard to judge doneness by color. Set a timer and check for set edges rather than waiting for browning.
Adding too much food coloring can affect both taste and texture. Start with less than the recipe calls for and add more gradually. You can always add more, but you can’t take it out!
Storing Tips for the Recipe
These cookies stay fresh and delicious when stored properly. Place unfrosted cookies in an airtight container at room temperature for up to one week. If you’ve already frosted them, store in the refrigerator for up to five days, bringing them to room temperature before serving.
For longer storage, freeze unfrosted cookies for up to three months. Wrap them tightly in plastic wrap, then place in freezer bags. Thaw at room temperature when ready to frost and serve.
The cream cheese frosting can be made up to three days ahead and stored in the refrigerator. Just let it come to room temperature and give it a quick stir before using.
Conclusion
These Green Velvet Cookies have brought so much joy to my kitchen and countless others. They’re proof that sometimes the most magical recipes come from simple moments and a willingness to try something new. Whether you’re celebrating St. Patrick’s Day, hosting a spring gathering, or just wanting to brighten someone’s day, these cookies deliver both visual impact and incredible flavor.
The combination of that signature velvet taste with the festive green color creates something truly special much like other holiday favorites such as Green Velvet Cupcakes. Plus, they’re easier to serve and share than traditional cake, making them perfect for any occasion. I hope they bring as much happiness to your kitchen as they have to mine!
Ready to create some magic in your own kitchen? Give these Green Velvet Cookies a try and let me know how they turn out! Share your photos and any creative variations you discover. I love hearing from fellow bakers who put their own spin on recipes.
Print
Green Velvet Cookies
- Total Time: 60 minutes
- Yield: 24 cookies 1x
Description
Festive Green Velvet Cookies with cream cheese frosting ; a chewy, colorful twist on a classic velvet treat perfect for St. Patrick’s Day or spring celebrations.
Ingredients
- 1 cup unsalted butter, softened
- 1 cup granulated sugar
- 1/2 cup brown sugar, packed
- 2 large eggs
- 2 tsp vanilla extract
- 1 tbsp green food coloring
- 2 1/2 cups all-purpose flour
- 1/4 cup cocoa powder
- 1 tsp baking soda
- 1/2 tsp baking powder
- 1/2 tsp salt
- Frosting:
- 8 oz cream cheese, softened
- 1/4 cup unsalted butter, softened
- 3 cups powdered sugar
- 1 tsp vanilla extract
Instructions
1. Preheat oven to 350°F (175°C) and line baking sheets with parchment paper.
2. Cream together butter, granulated sugar, and brown sugar until light and fluffy.
3. Mix in eggs one at a time, then add vanilla and green food coloring until well combined.
4. In a separate bowl, whisk together flour, cocoa powder, baking soda, baking powder, and salt.
5. Gradually mix dry ingredients into wet mixture until just combined.
6. Drop rounded tablespoons of dough onto baking sheet and bake 10–12 minutes until edges are set.
7. Let cookies cool on pan for 5 minutes, then transfer to wire racks to cool completely.
8. Prepare frosting by beating cream cheese and butter until smooth.
9. Add powdered sugar gradually and beat until fluffy, then mix in vanilla.
10. Frost cooled cookies and garnish with festive sprinkles if desired.
Notes
- Don’t overmix once you add the flour, this ensures tender cookies.
- Use gel food coloring for a more vibrant green without altering texture.
- Frost only when cookies are fully cooled or the frosting will melt.
- Prep Time: 15 minutes
- Cook Time: 12 minutes
- Category: Dessert
- Method: Baking
- Cuisine: American
Nutrition
- Serving Size: 1 cookie
- Calories: 285
- Sugar: 38g
- Sodium: 195mg
- Fat: 11g
- Saturated Fat: 7g
- Carbohydrates: 46g
- Fiber: 1g
- Protein: 3g
- Cholesterol: 45mg
FAQs
Can I make these cookies without food coloring? Absolutely! They’ll taste just as amazing in their natural light brown color. You could call them “chocolate velvet cookies” instead.
How do I get the green color more vibrant? Gel food coloring works better than liquid for achieving intense colors without affecting texture. Start with a small amount and add more as needed.
Can I freeze the cookie dough? Yes! Scoop the dough into balls and freeze on a baking sheet, then transfer to freezer bags. Bake directly from frozen, adding 1-2 extra minutes to the baking time.
What if my frosting is too soft? Chill it in the refrigerator for 30 minutes, then beat again. If it’s still too soft, gradually add more powdered sugar until you reach the desired consistency.
Can I use this recipe to make cupcakes instead? Definitely! Divide the batter among cupcake liners and bake at 350°F for 18-20 minutes. This recipe makes about 18 cupcakes.