There’s something magical about walking into a kitchen and seeing a batch of vibrant Green Velvet Cupcakes cooling on the counter. As someone who’s spent years perfecting recipes in kitchens from my grandmother’s cozy space in the Midwest to my current sun-drenched Asheville home, I can tell you that these emerald beauties never fail to spark joy and conversation.
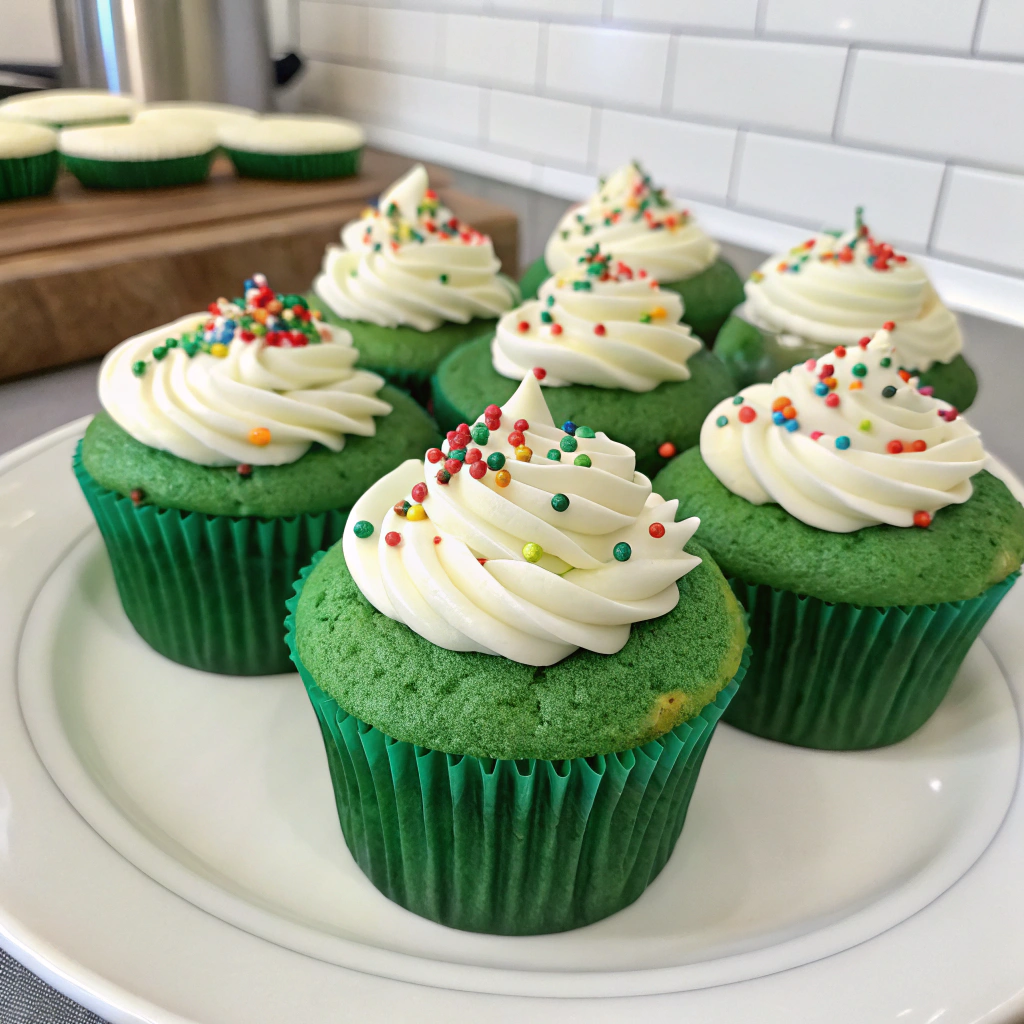
Table of Contents
The Story Behind Green Velvet Cupcakes
Let me take you back to a rainy Thursday afternoon last March when my neighbor’s daughter knocked on my door with tears in her eyes. She’d volunteered to bring cupcakes for her school’s St. Patrick’s Day party, and her mom was stuck at work. “Can you help me make something green?” she asked, and that’s when inspiration struck like lightning.
I’d been making red velvet cakes for years, but Green Velvet Cupcakes? Now that was uncharted territory that excited me, especially since I already loved making festive treats like Green Velvet Cookies. We spent the next two hours transforming my tried-and-true red velvet recipe into something completely new. The moment we pulled those first Green Velvet Cupcakes from the oven, I knew we’d created something special. The rich, moist texture combined with that stunning emerald color made them absolutely irresistible.
Since then, these Green Velvet Cupcakes have become my go-to for everything from birthday parties to holiday gatherings. They’re conversation starters, mood lifters, and honestly, they taste even better than they look. What makes these particular Green Velvet Cupcakes so special is the perfect balance of subtle chocolate flavor and tender crumb that practically melts in your mouth.
The best part? You don’t need any fancy equipment or professional baking skills to create these showstopping Green Velvet Cupcakes. They’re surprisingly forgiving, which makes them perfect for both novice bakers and seasoned pros looking for something fun and different.
Ingredients
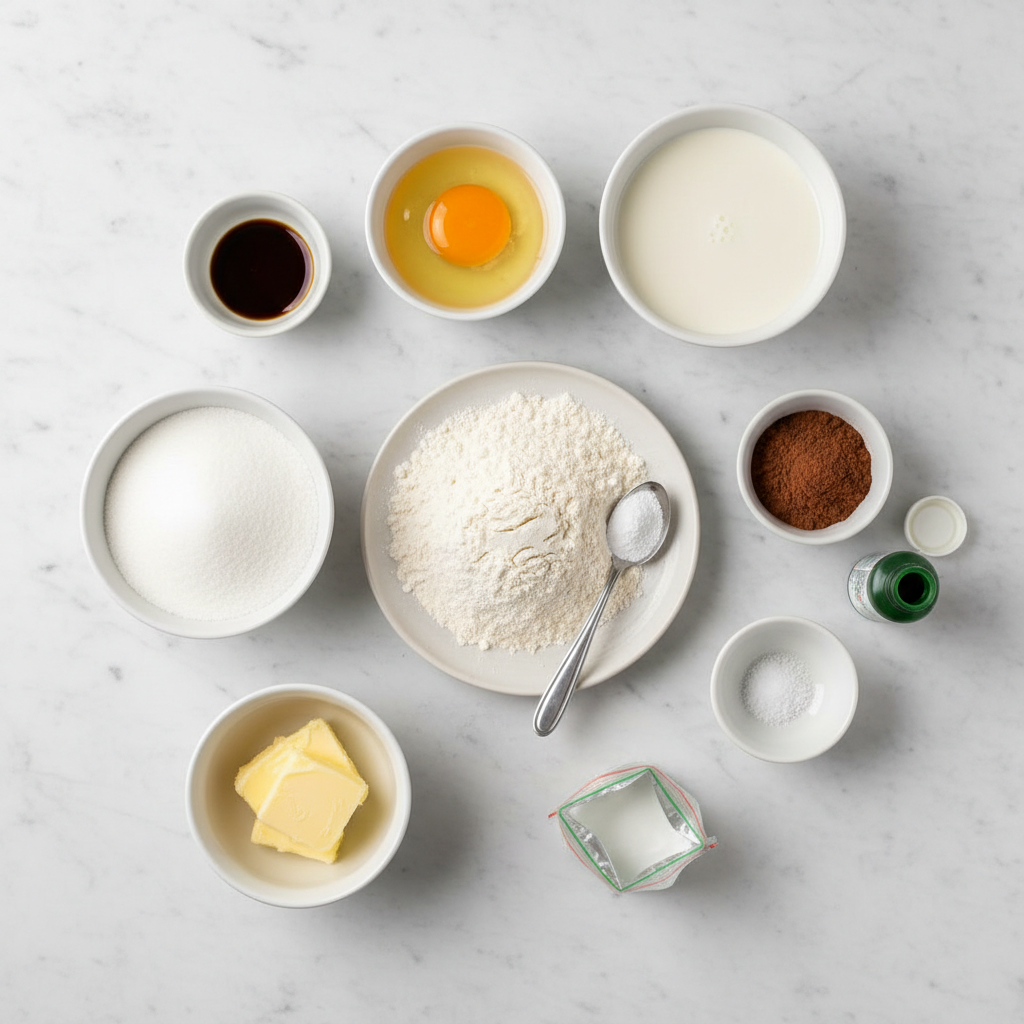
Let’s talk about what makes these cupcakes absolutely divine. Each ingredient plays a crucial role in creating that perfect texture and flavor we’re after.
For the Cake:
- 2 1/2 cups all-purpose flour: This forms the backbone of our cupcakes, providing structure while keeping them tender
- 2 cups sugar: Creates that perfect sweetness and helps achieve the moist, fine crumb texture
- 1 tablespoon cocoa: Adds a subtle chocolate undertone without overpowering the delicate flavor
- 1 teaspoon salt: Balances all the flavors and actually makes the sweetness more pronounced
- 1 teaspoon baking soda: Works with the vinegar to create a beautiful, fluffy rise
- 2 eggs: Bind everything together and add richness to the final texture
- 1 cup oil: Keeps these cupcakes incredibly moist for days (if they last that long!)
- 1 cup buttermilk: Adds tangy depth and creates that signature velvet cake tenderness
- 1 tablespoon vinegar: React with the baking soda for extra lift and a tender crumb
- 1 teaspoon vanilla: Rounds out all the flavors with its warm, comforting notes
- 1 oz green food coloring: Creates that stunning emerald color that makes these cupcakes so special
For the Cream Cheese Frosting:
- 1 package (8 oz) softened cream cheese: Provides that tangy, rich base that pairs perfectly with the sweet cake
- 1/4 cup softened butter: Adds smoothness and helps create the perfect spreading consistency
- 1 teaspoon vanilla extract: Complements the cake’s vanilla while adding depth
- 1 bag (2 lb) powdered sugar: Creates the sweet, smooth texture we want in our frosting
- Milk as needed: Helps achieve the perfect consistency for spreading or piping
Timing
Here’s what you can expect time-wise for these beauties:
- Prep time: 20 minutes
- Baking time: 16-22 minutes (depending on size)
- Frosting preparation: 10 minutes
- Total time: About 50 minutes
That’s actually 30% faster than most layer cake recipes, making these perfect for those last-minute party invitations or weekend baking sessions with the kids.
Step-by-Step Instructions
Preparing Your Workspace
First things first, preheat your oven to 350 degrees. Trust me on this one, you don’t want to have perfect batter sitting around waiting for the oven to heat up. Meanwhile, grease your cupcake tins thoroughly or use paper liners if you prefer easy cleanup.
Mixing the Wet Ingredients
Grab a medium bowl and lightly whisk your eggs until they’re just combined. Here’s where the magic starts, add your oil, buttermilk, vinegar, and vanilla to the eggs. Whisk everything together until it’s nicely blended, then stir in that gorgeous green food coloring. The color transformation is honestly one of my favorite parts of this whole process!
Combining the Dry Ingredients
In your mixing bowl, combine the flour, sugar, cocoa, salt, and baking soda. Give it a good stir to make sure everything’s evenly distributed. This step prevents any pockets of baking soda or cocoa from creating uneven flavors in your finished cupcakes.
Bringing It All Together
Now comes the moment of truth! Pour your vibrant green wet ingredients into the dry mixture and mix on medium-high speed for about a minute or two. You’ll know it’s ready when everything’s well combined and the batter has that beautiful, smooth consistency.
Baking to Perfection
Divide the batter evenly among your prepared cupcake wells. For regular-sized cupcakes, you’re looking at about 16 minutes of baking time. Mini cupcakes will be done in around 13 minutes, while larger muffin-sized treats might need up to 22 minutes. The toothpick test is your best friend here, it should come out with just a few moist crumbs.
Creating the Perfect Frosting
While your cupcakes cool completely (and I mean completely!), cream together the softened cream cheese, butter, and vanilla until smooth. Gradually add the powdered sugar, mixing continuously. Add milk one tablespoon at a time until you reach your desired consistency. If you want extra pro-level tips for getting it perfectly silky and pipeable, Joy the Baker has a great guide on making the best cream cheese frosting. I like mine thick enough to hold its shape but smooth enough to spread easily.
Nutritional Information
Each Green Velvet Cupcake (assuming 24 cupcakes per batch) contains approximately:
- Calories: 285
- Total Fat: 9g
- Saturated Fat: 4g
- Cholesterol: 35mg
- Sodium: 195mg
- Total Carbohydrates: 49g
- Dietary Fiber: 1g
- Sugars: 44g
- Protein: 4g
These numbers can vary slightly based on the specific brands of ingredients you use and the exact size of your cupcakes.
Healthier Alternatives for the Recipe
Want to lighten things up without sacrificing flavor? I’ve got you covered! You can substitute half the oil with unsweetened applesauce for fewer calories and added fiber. Greek yogurt works wonderfully in place of some of the oil too, adding protein while maintaining that moist texture.
For the frosting, try using reduced-fat cream cheese or even mixing in some Greek yogurt to cut calories while boosting protein. You can also reduce the powdered sugar by about 1/4 and add a touch of vanilla extract to maintain sweetness perception.
Consider using whole wheat pastry flour for half of the all-purpose flour to add fiber and nutrients. The texture stays beautifully tender, and most people can’t even tell the difference!
Serving Suggestions
These Green Velvet Cupcakes are party stars, but they’re versatile enough for any occasion. For St. Patrick’s Day, top them with gold sprinkles or little shamrock candies, and serve them alongside fun dessert-table snacks like Loaded Leprechaun Popcorn to keep everything festive and colorful. During the holidays, they make stunning Christmas treats that stand out from traditional red and white desserts.
I love serving them at spring gatherings where the green color feels fresh and seasonal. For kids’ parties, let them add their own toppings like mini chocolate chips, colorful sprinkles, or even crushed cookies.
Try pairing them with fresh berries for a pop of color and natural sweetness that balances the rich frosting. A cup of coffee or cold milk makes them absolutely perfect for afternoon treats.
Common Mistakes to Avoid
The biggest mistake I see people make is overmixing the batter. Once you combine wet and dry ingredients, mix just until everything comes together. Overmixing develops the gluten too much, resulting in tough, dense cupcakes instead of that tender velvet texture we’re after.
Another common pitfall is frosting warm cupcakes. I know it’s tempting when they smell so amazing, but warm cupcakes will melt your beautiful cream cheese frosting into a mess. Patience pays off here!
Don’t forget to bring your cream cheese and butter to room temperature before making frosting. Cold ingredients won’t cream properly and you’ll end up with lumpy frosting that’s impossible to spread smoothly.
Finally, resist the urge to open the oven door too early. Those first 10-12 minutes are crucial for proper rising, and temperature fluctuations can cause your cupcakes to sink.
Storing Tips for the Recipe
These cupcakes stay fresh for up to three days when stored properly in an airtight container in the refrigerator. The cream cheese frosting requires refrigeration, but let them come to room temperature for about 20 minutes before serving for the best flavor and texture.
You can freeze unfrosted cupcakes for up to three months. Wrap them individually in plastic wrap, then store in freezer bags. Thaw at room temperature and frost just before serving. And if you’re planning a make-ahead dessert lineup, St. Patrick’s Day White Chocolate Dipped Oreos are another easy treat that stores beautifully too.
If you want to get ahead on party prep, you can make the frosting up to two days in advance. Store it covered in the refrigerator, then let it soften and give it a quick remix before using.
Conclusion
These Green Velvet Cupcakes have become one of my most requested recipes, and for good reason. They’re beautiful, delicious, and surprisingly easy to make. Whether you’re celebrating St. Patrick’s Day, hosting a spring gathering, or just want to add some color to your day, these cupcakes deliver every time.
The combination of that subtle chocolate flavor, tender crumb, and tangy cream cheese frosting creates something truly special. Plus, watching people’s faces light up when they see these emerald beauties makes all the mixing and measuring completely worth it.
So grab your apron (optional, remember?) and let’s create some magic in your kitchen. I’d love to hear how your Green Velvet Cupcakes turn out, so don’t forget to share your baking adventures with me!
Print
Green Velvet Cupcakes
- Total Time: 50 minutes
- Yield: 24 cupcakes 1x
- Diet: Vegetarian
Description
These vibrant Green Velvet Cupcakes feature a subtle chocolate base, moist tender crumb, and luscious cream cheese frosting. Perfect for St. Patrick’s Day or any celebration.
Ingredients
- 2 1/2 cups all-purpose flour
- 2 cups sugar
- 1 tablespoon cocoa
- 1 teaspoon salt
- 1 teaspoon baking soda
- 2 eggs
- 1 cup oil
- 1 cup buttermilk
- 1 tablespoon vinegar
- 1 teaspoon vanilla
- 1 oz green food coloring
Frosting:
- 8 oz cream cheese, softened
- 1/4 cup butter, softened
- 1 teaspoon vanilla extract
- 2 lb powdered sugar
- Milk as needed for consistency
Instructions
1. Preheat oven to 350°F and grease or line cupcake tins.
2. Whisk eggs in a bowl, then add oil, buttermilk, vinegar, vanilla, and green food coloring. Mix well.
3. In a separate bowl, stir together flour, sugar, cocoa, salt, and baking soda.
4. Combine wet and dry mixtures and beat on medium-high for 1–2 minutes until smooth.
5. Divide batter evenly among cupcake wells and bake for 16–22 minutes depending on size.
6. Cool completely before frosting.
7. For frosting, cream together cream cheese, butter, and vanilla until smooth.
8. Gradually mix in powdered sugar.
9. Add milk one tablespoon at a time until desired consistency is reached.
10. Frost cooled cupcakes and decorate as desired.
Notes
- Don’t overmix the batter, mix until just combined to keep cupcakes soft.
- Make sure cupcakes are completely cool before frosting to prevent melting.
- Substitute half the oil with applesauce for a lighter option.
- These cupcakes freeze beautifully without frosting.
- Prep Time: 20 minutes
- Cook Time: 22 minutes
- Category: Dessert
- Method: Baking
- Cuisine: American
Nutrition
- Serving Size: 1 cupcake
- Calories: 285
- Sugar: 44g
- Sodium: 195mg
- Fat: 9g
- Saturated Fat: 4g
- Unsaturated Fat: 4g
- Trans Fat: 0g
- Carbohydrates: 49g
- Fiber: 1g
- Protein: 4g
- Cholesterol: 35mg
FAQs
Can I make these cupcakes without food coloring?
Absolutely! Without the green coloring, you’ll have delicious vanilla-chocolate cupcakes. The flavor remains exactly the same, you’ll just miss out on that stunning color.
Why do my cupcakes taste slightly tangy?
That subtle tang comes from the buttermilk and vinegar, which are traditional velvet cake ingredients. They react with the baking soda to create the perfect texture and add depth to the flavor profile.
Can I use natural food coloring instead?
Yes, but you might need more to achieve that vibrant green color. Natural colorings tend to be less intense, so start with the recommended amount and add more as needed.
How can I tell when my cupcakes are perfectly done?
Insert a toothpick into the center of one cupcake. It should come out with just a few moist crumbs clinging to it. If it comes out completely clean, they might be slightly overbaked.
Can I make this recipe as a layer cake instead?
Definitely! Use two 9-inch round pans and bake for about 25-30 minutes. You’ll need to double the frosting recipe for a layer cake.