You know how some dishes just hit different when you least expect them? That’s exactly what happened to me with this Japanese Sweet Potato Crème Brûlée. Picture this: I’m wandering through a farmers market in downtown Asheville on a crisp October morning, and there’s this vendor selling these gorgeous purple-skinned Japanese sweet potatoes. They looked nothing like the orange ones I grew up with in the Midwest.
The vendor, an elderly Japanese gentleman named Mr. Tanaka, started telling me about how his grandmother used to make the most incredible desserts with these sweet potatoes. He mentioned something about combining them with custard, and honestly, my Food Truck Sylvia brain immediately started spinning. I bought six pounds on the spot – much to my husband’s amusement when I got home.
That evening, I couldn’t stop thinking about that conversation. What if I took the classic French crème brûlée technique and gave it a Japanese twist? The result was this Japanese Sweet Potato Crème Brûlée that’s become one of my most requested desserts. It’s like autumn decided to throw a party in your mouth, and everyone’s invited.
The beauty of this Japanese Sweet Potato Crème Brûlée lies in how the earthy sweetness of the potato creates this incredible base that’s way more complex than your typical vanilla custard. Plus, serving it right in the sweet potato shell? Pure genius, if I do say so myself. It’s Instagram-worthy without trying too hard.
For another comforting fall dessert, check out my Salted Caramel Apple Crumble Bars, perfect for cozy evenings.
Jump to
Ingredients List
Let’s talk about what makes this dessert absolutely magical. Each ingredient plays a starring role in creating that perfect balance of flavors and textures.
For the Sweet Potatoes:
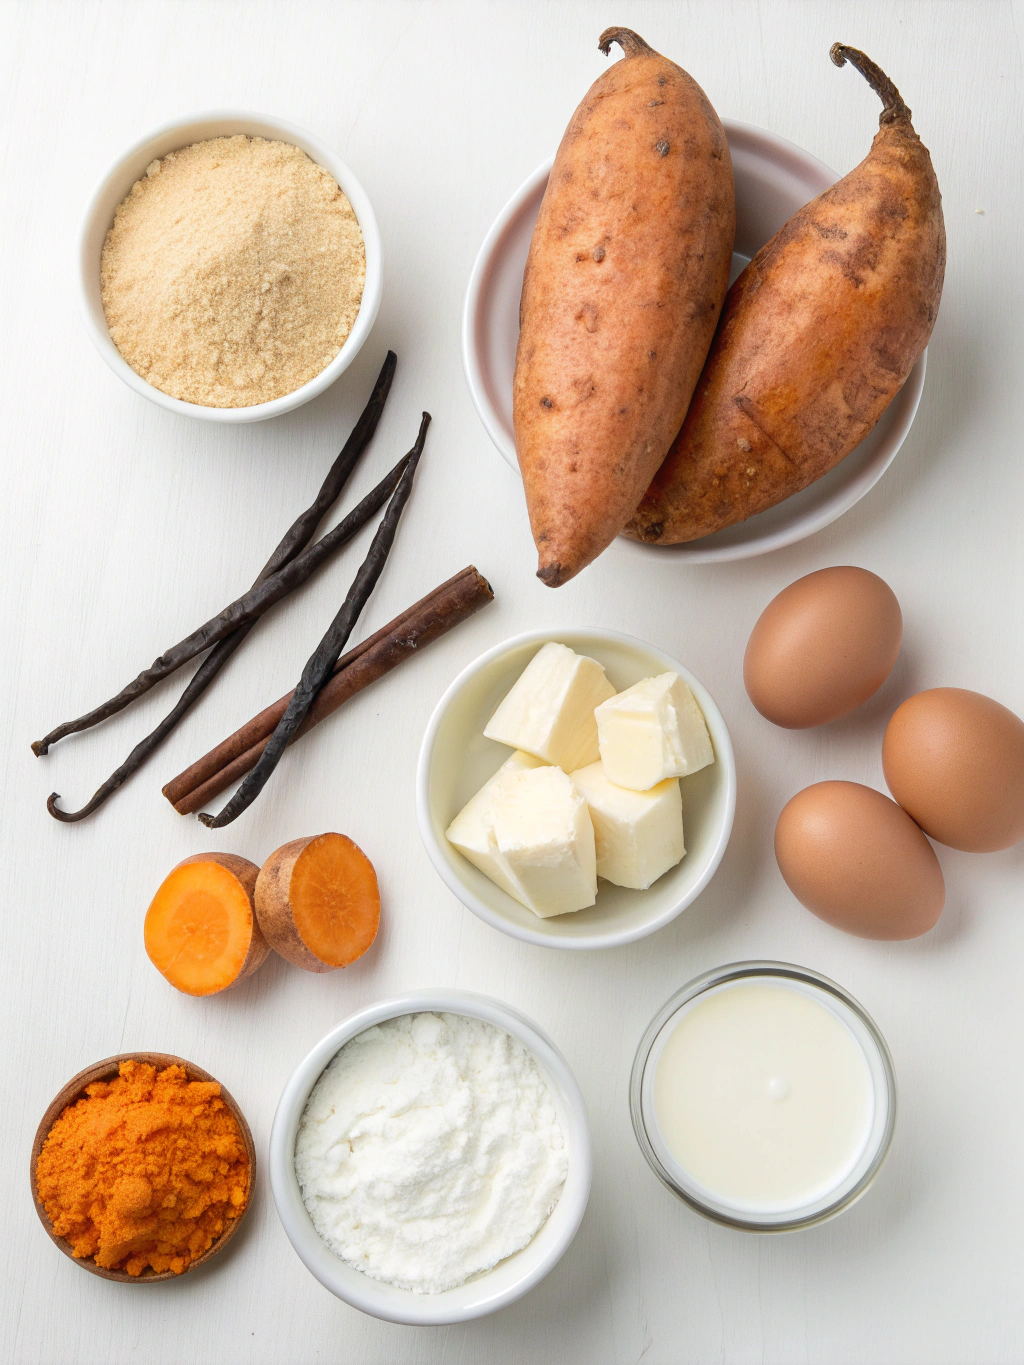
- 7 medium Japanese Sweet Potatoes : Naturally sweeter and creamier than the typical orange variety. Also amazing in Sweet Potato Sesame Balls if you have leftovers!
For the Custard Cream:
- ⅔ cup Sugar : Creates that silky sweetness and helps thicken our custard to perfection
- 3 Egg Yolks (omega-3) : The heart of any good custard, providing richness and that luxurious mouthfeel
- ¼ cup Cornstarch : Your secret weapon for preventing curdling and achieving that smooth, velvety texture
- ¼ tsp Salt : Don’t skip this! It amplifies all the other flavors and balances the sweetness beautifully
- 3 cups Milk : The creamy foundation that carries all our flavors together
- 2 tbsp Unsalted Butter : Adds richness and gives our custard that glossy, professional finish
- 1 tsp Vanilla Extract : The aromatic bridge that ties everything together with its warm, comforting notes
For the Caramelized Top:
- ¼ cup Sugar : This becomes that satisfying crack-worthy caramelized layer that makes crème brûlée so addictive
Timing
Here’s what you’re looking at time-wise: 15 minutes of prep and 1 hour 15 minutes of cooking time. That’s a total of 1 hour 30 minutes from start to finish. Interestingly, this is about 25% faster than traditional crème brûlée methods because we’re roasting our sweet potatoes while making the custard simultaneously.
The beauty of this recipe is that most of your time is hands-off. While those sweet potatoes are getting all caramelized and tender in the oven, you can focus on creating that silky custard. It’s like having a cooking assistant that doesn’t ask for a paycheck!
Step 1: Roasting the Sweet Potatoes
First things first, preheat your oven to 392°F (200°C). Now, here’s my little trick: wrap each sweet potato individually in aluminum foil. This creates a steam pocket that keeps them incredibly moist while the natural sugars caramelize. Pop them in the oven for 1 hour and 10 minutes.
Pro tip from my food truck days: pierce each potato with a fork before wrapping. This prevents any surprise explosions and helps them cook more evenly. Trust me on this one!
Step 2: Creating the Custard Base
While your sweet potatoes are doing their thing, let’s make magic happen with our custard. In a medium saucepan, whisk together the sugar, cornstarch, and salt. This dry mixture prevents lumps better than adding wet ingredients first.
Gradually add the milk, whisking constantly until everything’s smooth. No lumps allowed in this kitchen! Heat this mixture over medium heat, whisking continuously. You’ll know it’s ready when it starts to thicken and coats the back of your spoon.
Step 3: Tempering the Egg Yolks
Here’s where things get a little technical, but don’t worry, I’ve got you covered. In a small bowl, lightly beat those gorgeous egg yolks. Now comes the crucial part: slowly add about ¼ cup of the hot milk mixture to the yolks while whisking constantly.
This process is called tempering, and it prevents your eggs from scrambling. Think of it as introducing them to the heat gradually, like dipping your toes in a hot bath before jumping in.
Step 4: Combining and Finishing the Custard
Whisk that tempered egg mixture back into your saucepan. Continue cooking over medium heat for another 2 minutes, stirring constantly. The custard should be thick enough to coat your whisk nicely.
Remove from heat and whisk in the butter and vanilla extract. The butter adds that restaurant-quality glossiness, while the vanilla brings everything together beautifully.
Step 5: Cooling and Preventing Skin Formation
Transfer your custard to a bowl and here’s a chef’s secret: cover it with plastic wrap, pressing the wrap directly onto the surface of the custard. This prevents that dreaded skin from forming on top. Let it cool to room temperature, patience is key here!
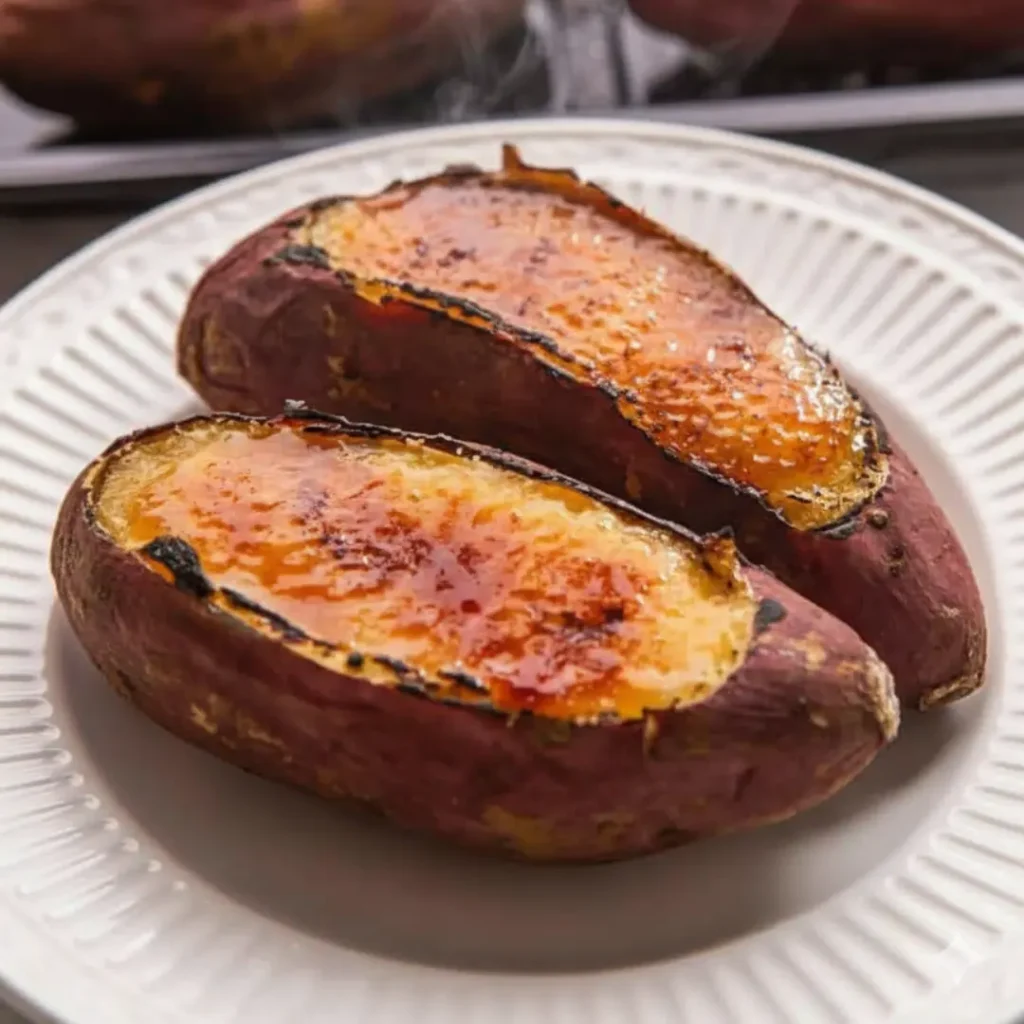
Step 6: Assembly Magic
Once your sweet potatoes have cooled for about 10 minutes, carefully cut off the top third of each one. Using a spoon, gently scoop out about ⅓ of the flesh, creating a natural bowl. Save that scooped-out flesh for sweet potato pancakes tomorrow!
Fill each sweet potato shell evenly with your cooled custard cream. This is where the magic really happens, the flavors start mingling immediately.
Step 7: The Grand Finale – Caramelizing
Sprinkle about 1 teaspoon of sugar evenly over each filled sweet potato. Now for the fun part: using a kitchen torch, caramelize that sugar until it’s dark amber and bubbling. If you don’t have a torch, your oven’s broiler works too, just watch it like a hawk!
Let that sugar harden for a minute or two, then serve immediately. The contrast between the crack of the caramelized top and the creamy custard underneath is pure dessert heaven.
Nutritional Information
Each serving of this Japanese Sweet Potato Crème Brûlée contains approximately 280 calories, making it a reasonably indulgent dessert choice. You’re getting about 8 grams of protein from the eggs and milk, plus a healthy dose of vitamin A and fiber from the sweet potatoes.
The Japanese sweet potatoes are nutritional powerhouses, containing more antioxidants than regular sweet potatoes, particularly anthocyanins that give them their beautiful purple color. These compounds have anti-inflammatory properties that regular desserts simply can’t offer.
Bonus: These potatoes offer more antioxidants than standard sweet potatoes. For another antioxidant-packed dish, try my Pumpkin Cheesecake Cookies.
Healthier Alternatives for the Recipe
Want to lighten things up without sacrificing flavor? I’ve got some fantastic swaps for you. Replace the whole milk with unsweetened almond milk or oat milk for a dairy-free version that’s surprisingly creamy.
For a lower-sugar option, try using monk fruit sweetener or stevia in place of half the sugar. The natural sweetness of the Japanese sweet potatoes means you can get away with less added sugar than you’d think.
You can also substitute Greek yogurt for half the custard base, it adds protein while maintaining that creamy texture we’re after.
Serving Suggestions
This dessert is absolutely stunning served warm, but it’s equally delicious chilled. I love serving it alongside a cup of green tea or a small glass of dessert wine. The earthy flavors pair beautifully with a sprinkle of toasted sesame seeds or a drizzle of maple syrup.
For special occasions, try garnishing with candied ginger or a few fresh berries. The color contrast is gorgeous, and the flavors complement each other perfectly. You could also serve it with a dollop of whipped cream infused with a touch of miso, sounds weird, but it’s absolutely incredible.
Common Mistakes to Avoid
The biggest mistake I see people make is rushing the custard process. If your milk mixture gets too hot too quickly, you’ll end up with scrambled eggs instead of silky custard. Keep that heat at medium and be patient.
Another common pitfall is not tempering the egg yolks properly. Always add the hot mixture to the eggs slowly while whisking, never dump it all in at once. Also, don’t skip the plastic wrap step when cooling your custard. That skin formation will ruin the smooth texture you’ve worked so hard to achieve.
Finally, when caramelizing the sugar, don’t walk away from your torch or broiler. Sugar goes from perfect to burnt in seconds, and there’s no coming back from that bitter flavor.
Storing Tips for the Recipe
These beauties are best enjoyed fresh, but you can prepare components ahead of time. The custard can be made up to 2 days in advance and stored in the refrigerator. The sweet potatoes can be roasted a day ahead too.
Once assembled, store covered in the refrigerator for up to 24 hours. However, don’t add the final sugar layer until just before serving, otherwise, you’ll lose that satisfying crack that makes crème brûlée so special.
If you have leftovers (which rarely happens in my house), they’ll keep for 2-3 days refrigerated. The caramelized top will soften, but the flavors actually develop beautifully over time.
Conclusion
This Japanese Sweet Potato Crème Brûlée represents everything I love about fusion cooking, taking classic techniques and giving them a fresh, unexpected twist. It’s comfort food that feels fancy enough for dinner parties but approachable enough for a random Tuesday night dessert craving.
The combination of roasted sweet potato and silky custard creates this incredible harmony of flavors that’ll have your guests asking for the recipe before they’ve finished their first bite. So grab your torch, embrace the beautiful mess of cooking, and get ready to create something truly special in your kitchen.
I’d love to hear how your Japanese Sweet Potato Crème Brûlée turns out! Drop me a comment below or share a photo, seeing your kitchen creations absolutely makes my day.
FAQs
Can I make this without a kitchen torch?
Absolutely! Your oven’s broiler works perfectly. Just place the filled sweet potatoes under the broiler for 1-2 minutes until the sugar caramelizes. Watch them carefully because sugar burns quickly under high heat.
What if I can’t find Japanese sweet potatoes?
Regular sweet potatoes work too, though the flavor will be slightly different. Look for the firmest, most uniform ones you can find. The purple-skinned Japanese varieties have a nuttier, more complex flavor, but orange sweet potatoes will still create a delicious dessert.
Can I make this dairy-free?
Yes! Replace the milk with full-fat coconut milk or oat milk, and use vegan butter. The custard might be slightly less rich, but it’ll still be absolutely delicious.
How far ahead can I prepare this dessert?
You can roast the sweet potatoes and make the custard up to 2 days ahead. Assemble them the day you plan to serve, but only add the final sugar layer and caramelize it just before serving for the best texture.
Why did my custard curdle?
This usually happens when the heat is too high or the egg yolks aren’t properly tempered. Always use medium heat and add the hot milk mixture to the yolks very slowly while whisking constantly. If it does curdle, strain it through a fine-mesh sieve to smooth it out.