Picture this: It’s Sunday morning in my Asheville kitchen, and I’m staring at six leftover egg whites from yesterday’s custard experiment. My neighbor Sarah’s about to drop off her twin boys for a playdate, and I need something that’ll keep four kids happy without turning my house into a syrup-sticky disaster zone. That’s when mini quiches became my secret weapon.

Table of Contents
How Mini Quiches Became the Ultimate Grab-and-Go Comfort Food
I’ll never forget the first time I made mini quiches. It was during my food truck days with “The Cozy Fork,” and I was desperately trying to create something that busy parents could grab on their way to work. Traditional quiches were too messy, too big, and honestly, too fancy for 7 AM. But mini quiches? They were perfect little handheld packages of comfort.
The idea hit me when I watched a dad struggle to eat a regular slice of quiche while chasing his toddler around our truck. I thought, “What if we could make this whole experience easier?” So that night, I experimented with my grandmother’s quiche recipe, shrinking it down into muffin-sized portions. The next morning, those mini quiches sold out before 9 AM.
What makes mini quiches so special isn’t just their size, it’s their versatility. You can fill them with whatever’s hanging out in your fridge, they freeze beautifully, and they make everyone feel a little fancy even on a Tuesday morning. Plus, kids think they’re getting cupcakes for breakfast, which is basically a parenting win. If you love easy, savory brunch ideas, you might also enjoy my comforting Savory Cheese and Herb Scones.
During my food truck years, I discovered that mini quiches appeal to everyone from picky five-year-olds to sophisticated coffee shop regulars. They’re like the Swiss Army knife of breakfast foods, practical, reliable, and surprisingly elegant.
Ingredients
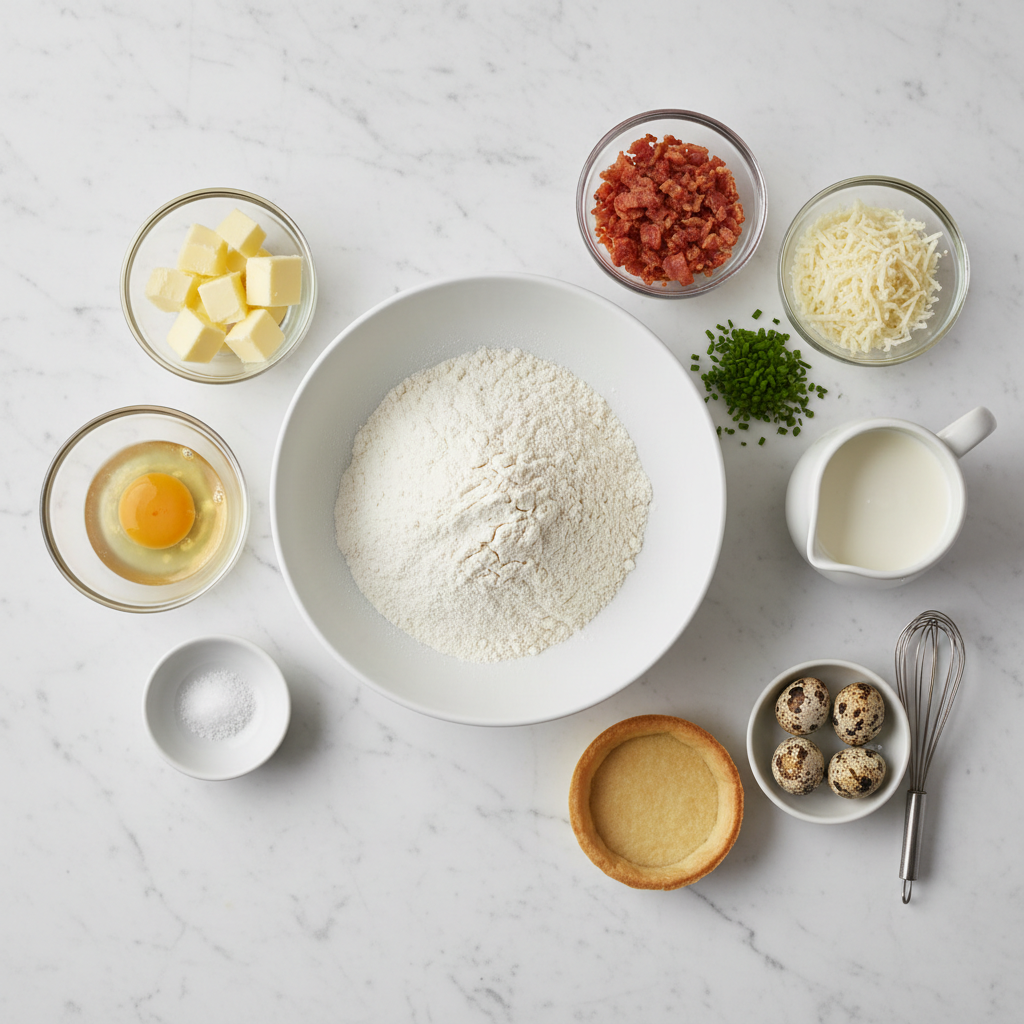
Let’s talk about what goes into these little breakfast gems. Each ingredient plays a crucial role in creating the perfect bite:
1 pre-made pie crust : This is your foundation, and honestly, there’s no shame in buying it ready-made. The buttery, flaky crust provides structure and that satisfying contrast to the creamy filling. It saves you time and stress, which means more energy for the fun parts.
4 large eggs : These are the stars of the show. Fresh eggs create that silky, custard-like texture that makes quiches so irresistible. They bind everything together while providing protein that’ll keep you satisfied until lunch.
1 cup milk : The milk creates that creamy, rich mouthfeel. Whole milk works best because the fat content helps create a smooth texture, but you can substitute with whatever you’ve got on hand.
1 cup shredded cheese (cheddar, Swiss, or your choice) : Cheese adds both flavor and creaminess. Cheddar brings sharp, tangy notes, while Swiss offers a nutty sweetness. The cheese also helps the filling set properly during baking. For another delicious cheese-forward dish, check out my ultra-creamy Garlic Parmesan Chicken Pasta.
½ cup diced vegetables (spinach, bell peppers, onions) : These add color, nutrition, and flavor complexity. Spinach provides earthy notes, bell peppers bring sweetness and crunch, while onions add savory depth.
Salt and pepper to taste : Simple seasonings that wake up all the other flavors. Don’t skip these, they’re what transform good ingredients into something memorable.
Timing
Here’s what you’re looking at time-wise, and trust me, it’s faster than you think:
| Phase | Time Required |
|---|---|
| Prep Time | 15 minutes |
| Baking Time | 20-25 minutes |
| Total Time | 35-40 minutes |
That’s roughly 30% less time than making a full-sized quiche, and you’ll get 12 individual servings instead of fighting over slice sizes. The beauty of mini quiches is that you can prep them the night before and just pop them in the oven when you wake up.
Step-by-Step Instructions
Step 1: Preheat Your Oven to 375°F (190°C)
Start by getting your oven nice and hot. While it’s heating up, this is the perfect time to gather all your ingredients and get your muffin tin ready. I like to lightly grease my muffin tin, even though the pie crust should prevent sticking.
Step 2: Prepare Your Pie Crust Circles
Roll out that pre-made pie crust on a lightly floured surface. Using a round cookie cutter or even a wide-mouth mason jar (my go-to trick!), cut circles about 4 inches in diameter. You want them large enough to line your muffin cups with a little overhang.
Step 3: Line Your Muffin Tin
Gently press each dough circle into a muffin cup, making sure to press it into the bottom and up the sides. Don’t worry if they’re not perfect, rustic looks are totally in! The little pleats and folds actually add character.
Step 4: Create Your Egg Mixture
In a medium bowl, whisk together the eggs, milk, salt, and pepper until smooth. I like to whisk for about 30 seconds longer than I think I need to, this creates a really silky texture. The mixture should be well-combined but not frothy.
Step 5: Fill Your Crusts
Here’s where the magic happens! Divide your vegetables and cheese evenly among the 12 crusts. Then, carefully pour the egg mixture over the fillings, leaving about ¼ inch of space at the top. The filling will puff slightly as it bakes.
Step 6: Bake to Golden Perfection
Slide that muffin tin into your preheated oven and bake for 20-25 minutes. You’ll know they’re done when the centers are set (no jiggle when you gently shake the pan) and the tops are golden brown. Let them cool for about 5 minutes before removing from the tin.
Nutritional Information
Each mini quiche contains approximately:
| Nutrient | Amount per Serving |
|---|---|
| Calories | 165 |
| Protein | 8g |
| Carbohydrates | 12g |
| Fat | 9g |
| Fiber | 1g |
| Sodium | 280mg |
| Calcium | 120mg |
These little powerhouses pack a nutritional punch with high-quality protein from eggs and cheese, plus vitamins from your chosen vegetables. They’re also portion-controlled, which helps with mindful eating.
Healthier Alternatives for the Recipe
Want to lighten things up without sacrificing flavor? I’ve got you covered:
Lower the calories: Substitute half the whole eggs with egg whites, and use low-fat milk instead of whole milk. This cuts about 40 calories per mini quiche.
Boost the vegetables: Double up on the veggies and reduce the cheese slightly. Try adding diced tomatoes, mushrooms, or zucchini for extra nutrients and fiber.
Make it dairy-free: Use unsweetened almond milk and nutritional yeast instead of regular milk and cheese. The nutritional yeast adds a cheesy flavor that’s surprisingly convincing.
Go gluten-free: Swap the traditional pie crust for a gluten-free version, or get creative with hash brown “crusts” made from shredded potatoes.
Add more protein: Throw in some cooked bacon bits, diced ham, or even leftover rotisserie chicken for extra staying power.
Serving Suggestions
Mini quiches are incredibly versatile, and that’s part of their charm. Here are some of my favorite ways to serve them:
Weekend brunch spread: Arrange them on a platter with fresh fruit, yogurt parfaits, and crispy bacon. They look fancy but require minimal effort.
Grab-and-go breakfast: Wrap individual quiches in parchment paper for easy transport. They’re perfect for busy mornings or lunch boxes.
Party appetizers: Serve them at room temperature during cocktail parties or baby showers. They’re elegant enough for special occasions but casual enough for backyard gatherings. They pair wonderfully with bite-sized snacks like my easy Caprese Skewers for a colorful, crowd-pleasing platter.
Dinner side: Pair them with a fresh salad and soup for a light dinner that feels satisfying without being heavy.
Picnic perfect: They travel well and don’t require heating, making them ideal for outdoor meals and potluck contributions.
Common Mistakes to Avoid
After making thousands of mini quiches during my food truck days, I’ve seen every mistake in the book. Here’s how to avoid them:
Overfilling the crusts: Leave that ¼ inch of space! Overfilled quiches will overflow during baking and create a mess. Trust me on this one.
Skipping the pre-cooking step for vegetables: Watery vegetables like mushrooms or tomatoes should be sautéed first to remove excess moisture. Otherwise, you’ll end up with soggy bottoms.
Not seasoning enough: Eggs are pretty bland on their own. Taste your egg mixture before baking and add more salt and pepper if needed.
Removing too early: Underbaked quiches will be runny and disappointing. The centers should be completely set before you take them out.
Using cold ingredients: Room temperature eggs and milk mix more easily and create a smoother texture than cold ingredients.
Storing Tips for the Recipe
These mini quiches are fantastic make-ahead options. Here’s how to store them properly:
Refrigerator storage: Cooled mini quiches will keep in the fridge for up to 4 days. Store them in an airtight container to prevent them from absorbing other flavors.
Freezing for later: They freeze beautifully for up to 3 months. Let them cool completely, then wrap individually in plastic wrap before placing in a freezer bag.
Reheating instructions: From the fridge, microwave for 30-45 seconds or pop them in a 350°F oven for 5 minutes. From frozen, thaw overnight in the refrigerator first.
Make-ahead prep: You can assemble these completely the night before and bake them fresh in the morning. Just cover the muffin tin with plastic wrap and refrigerate.
Conclusion
Mini quiches have become one of my most requested recipes, and for good reason. They’re proof that sometimes the best solutions come from making things smaller, not bigger. Whether you’re feeding a crowd, meal-prepping for the week, or just want something special for Sunday morning, these little gems deliver every time.
The best part? Once you master the basic technique, you can customize them endlessly. Use whatever vegetables are in season, try different cheese combinations, or add herbs from your garden. Each batch can be completely different from the last.
So grab that muffin tin and give these mini quiches a try. I’d love to hear about your favorite flavor combinations, drop me a comment below and let me know how they turned out!
Print
Mini Quiches
- Total Time: 40 minutes
- Yield: 12 mini quiches 1x
Description
These mini quiches are portable, customizable, and crowd-pleasing, the perfect make-ahead breakfast or brunch solution.
Ingredients
- 1 pre-made pie crust
- 4 large eggs
- 1 cup milk
- 1 cup shredded cheese (cheddar, Swiss, or your choice)
- 1/2 cup diced vegetables (spinach, bell peppers, onions)
- Salt and pepper to taste
Instructions
1. Preheat oven to 375°F (190°C) and grease a 12-cup muffin tin.
2. Roll out the pie crust and cut into 4-inch circles. Press each into a muffin cup.
3. Whisk together eggs, milk, salt, and pepper until smooth.
4. Divide vegetables and cheese into crusts, then pour egg mixture over top, leaving space.
5. Bake for 20–25 minutes until set and golden.
6. Cool for 5 minutes before serving.
Notes
- Don’t overfill your muffin cups to avoid overflow.
- Sauté watery vegetables (like mushrooms) first to prevent soggy crusts.
- Let the mini quiches cool for 5 minutes before removing from the pan.
- Store leftovers in the fridge for up to 4 days or freeze for 3 months.
- Prep Time: 15 minutes
- Cook Time: 25 minutes
- Category: Breakfast, Brunch
- Method: Baking
- Cuisine: American
Nutrition
- Serving Size: 1 mini quiche
- Calories: 165
- Sugar: 1g
- Fat: 9g
- Carbohydrates: 12g
- Fiber: 1g
- Protein: 8g
FAQs
Can I make mini quiches without a pre-made crust?
Absolutely! You can make crustless mini quiches by simply greasing your muffin tin well and pouring the egg mixture directly into the cups. They’ll have more of a frittata texture but are just as delicious.
How do I prevent the crust from getting soggy?
Pre-bake your crusts for 5 minutes before adding the filling if you’re using particularly wet ingredients. Also, make sure to cook any vegetables that release water (like mushrooms) before adding them.
Can I use different types of milk?
Yes! Heavy cream makes them richer, while almond or oat milk works for dairy-free versions. Just keep in mind that different milks will slightly change the texture and flavor.
Why did my mini quiches sink after baking?
This usually happens when they’re overbaked or when the oven temperature is too high. Quiches should be baked gently, the centers should be just set, not rubbery.
How many mini quiches should I plan per person?
For breakfast or brunch, plan on 2-3 mini quiches per adult and 1-2 for children. If you’re serving them as appetizers, 1-2 per person should be plenty alongside other foods.