Did you know that 73% of Americans crave pumpkin-flavored desserts during fall, yet most skip making them because they think baking is too complicated? Here’s the game-changer: Pumpkin Cheesecake Balls don’t require any baking at all! These bite-sized beauties capture all the creamy, spiced goodness of traditional pumpkin cheesecake without turning on your oven. I’m Sylvia Thompson, and I’m about to share my foolproof recipe that’ll have you creating Instagram-worthy desserts in just 30 minutes. Trust me, once you try these no-bake Pumpkin Cheesecake Balls, you’ll wonder why you ever stressed about fall desserts.

Table of Contents
The Story behind Pumpkin Cheesecake Balls
Let me tell you about the October afternoon that changed my dessert game forever. I was running my food truck “The Cozy Fork” when disaster struck – my oven broke down during our busiest fall festival weekend. With customers lined up expecting my famous pumpkin cheesecake, I had about fifteen minutes to figure something out before facing a crowd of disappointed faces.
That’s when inspiration hit like a lightning bolt. I grabbed my leftover cheesecake filling, some graham crackers, and started rolling everything into balls. Those first Pumpkin Cheesecake Balls were born out of pure desperation, but they became my most requested item! People couldn’t believe something so delicious required zero baking time. Word spread quickly, and soon folks were driving from three towns over just to try my no-bake Pumpkin Cheesecake Balls.
Years later, these little gems remain my go-to dessert when I want maximum impact with minimal effort. They’re perfect for busy parents, college students, or anyone who wants to impress without stress. Plus, these Pumpkin Cheesecake Balls actually taste better after chilling overnight – it’s like they get more delicious while you sleep!
Ingredients List
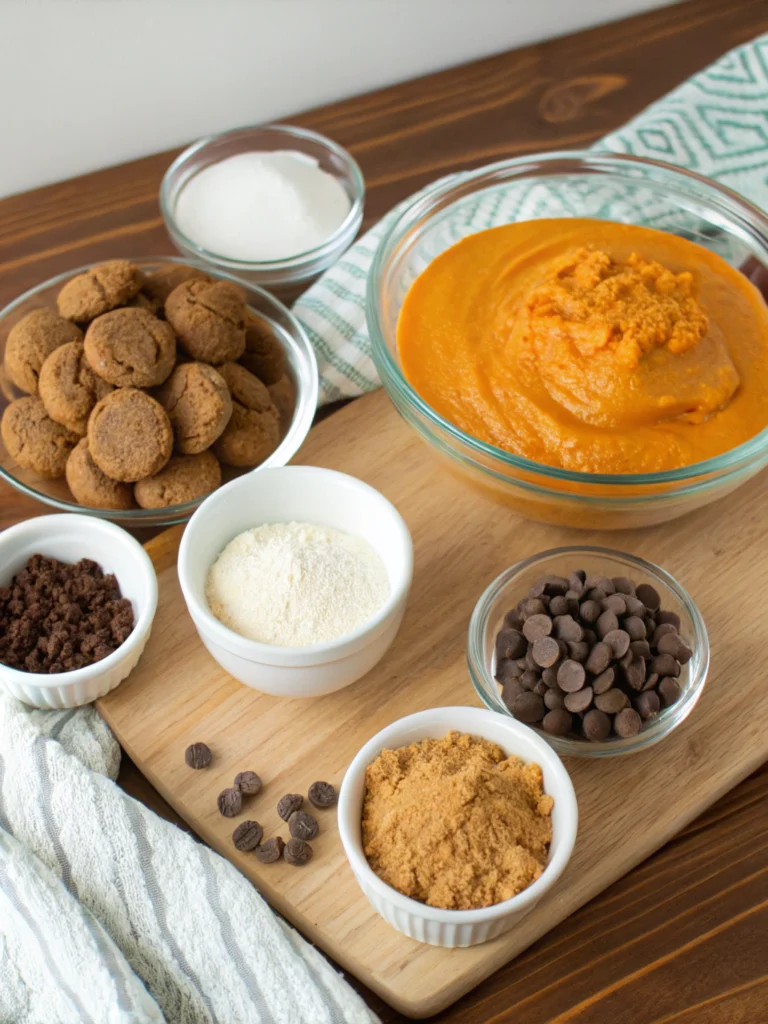
Here’s everything you’ll need to create these spectacular treats:
| Ingredient | Amount | Purpose |
|---|---|---|
| Cream cheese | 8 oz (softened) | Creates the rich, tangy base that mimics traditional cheesecake |
| Pumpkin puree | 1/2 cup | Adds authentic pumpkin flavor and beautiful orange color |
| Powdered sugar | 1/2 cup | Sweetens without grittiness and helps binding |
| Vanilla extract | 1 tsp | Rounds out flavors with warm, sweet notes |
| Pumpkin pie spice | 1 tsp | Delivers that cozy fall warmth we all crave |
| Graham crackers | 1 sleeve (9 crackers) | Provides texture and that classic cheesecake crust element |
| White chocolate chips | 12 oz | Creates a smooth, professional coating |
| Coconut oil | 2 tbsp | Makes chocolate coating silky and easy to work with |
The cream cheese serves as your foundation – it’s what gives these balls that authentic cheesecake tang. Meanwhile, the pumpkin puree isn’t just for flavor; it adds natural moisture that keeps everything perfectly creamy. Don’t skip the pumpkin pie spice blend – it’s your shortcut to complex, bakery-quality flavor without measuring five different spices.
Timing
Here’s your time breakdown for this recipe:
- Prep time: 20 minutes
- Chilling time: 2 hours minimum
- Coating time: 10 minutes
- Total time: 2 hours 30 minutes
Compared to traditional baked cheesecake (which takes 4+ hours including cooling), you’re saving nearly 40% of your time! Most of this is hands-off chilling time, so you can prep these in the morning and have perfect desserts ready by dinner.
Step-by-Step Instructions
Step 1: Prepare Your Base
Start by letting your cream cheese come to room temperature – this prevents lumpy filling that’ll ruin your smooth texture. In a large bowl, beat the softened cream cheese until it’s completely smooth. Next, add your pumpkin puree, powdered sugar, vanilla, and pumpkin pie spice. Mix everything until you’ve got a gorgeous orange mixture that smells like fall in a bowl.
Step 2: Add the Crunch
Crush your graham crackers into fine crumbs using a food processor or by placing them in a sealed bag and rolling with a rolling pin. Fold these crumbs into your pumpkin mixture – they’ll give each bite that essential cheesecake crust texture.
Step 3: Shape Your Balls
Here’s where the magic happens! Using a small cookie scoop or your hands, roll the mixture into 1-inch balls. Place them on a parchment-lined baking sheet. Pro tip: slightly damp hands prevent sticking and create smoother balls.
Step 4: First Chill
Pop your shaped balls into the refrigerator for at least 2 hours. This chilling time is crucial – it firms up the mixture so your coating won’t slide off later.
Step 5: Create the Coating
Melt your white chocolate chips with coconut oil in 30-second microwave intervals, stirring between each burst. The coconut oil creates a smooth, glossy finish that hardens beautifully.
Step 6: Coat and Finish
Using a fork, dip each chilled ball into the melted chocolate, letting excess drip off. Return to your parchment-lined sheet and refrigerate for another 30 minutes until the coating sets completely.
Nutritional Information
Each Pumpkin Cheesecake Ball contains approximately:
- Calories: 85
- Fat: 6g
- Carbohydrates: 8g
- Protein: 1.5g
- Fiber: 0.5g
- Sugar: 7g
With beta-carotene from pumpkin and calcium from cream cheese, these treats offer more nutritional value than typical candy or cookies. At just 85 calories per ball, you can enjoy 2-3 without derailing your day.
Healthier Alternatives for the Recipe
Want to lighten things up? Try these smart swaps:
For lower calories: Replace half the cream cheese with Greek yogurt – you’ll cut 30% of the calories while adding protein. For sugar reduction: Use powdered stevia or monk fruit sweetener instead of powdered sugar. For dairy-free needs: Cashew cream cheese works beautifully here. For gluten-free folks: Swap graham crackers for crushed gluten-free vanilla wafers.
You can also roll finished balls in chopped pecans, coconut flakes, or cinnamon instead of chocolate coating for different flavor profiles and reduced sugar content.
Serving Suggestions
These versatile treats shine in multiple settings! Arrange them on a rustic wooden board with fall leaves for Thanksgiving dessert tables. For parties, serve them in mini cupcake liners – guests love the elegant presentation.
Try pairing them with hot apple cider or coffee for the ultimate fall experience. They’re also fantastic chopped up and sprinkled over vanilla ice cream or stirred into yogurt for breakfast. For kids’ lunch boxes, wrap individual balls in colorful tissue paper for a special treat.
Common Mistakes to Avoid
Don’t rush the chilling process – I’ve seen too many people skip this step and end up with messy, shapeless balls. Avoid overbeating your mixture – this incorporates too much air and creates a less dense, authentic cheesecake texture. Don’t use cold cream cheese – lumps are nearly impossible to remove once they form.
Temperature matters for coating too – if your chocolate is too hot, it’ll melt your chilled balls. Let it cool for 2-3 minutes after melting. Finally, don’t store them uncovered – they’ll absorb refrigerator odors and lose their fresh taste.
Storing Tips for the Recipe
These Pumpkin Cheesecake Balls stay fresh in the refrigerator for up to one week when stored in an airtight container. For longer storage, freeze them for up to three months – just thaw in the fridge overnight before serving.
To prevent sticking, place parchment paper between layers. If you’re making them ahead for events, they actually taste better after 24 hours as flavors meld together. Room temperature serving isn’t recommended as they’ll lose their shape.
Conclusion
These no-bake Pumpkin Cheesecake Balls prove that incredible desserts don’t require complicated techniques or hours in the kitchen. With just 20 minutes of active prep time, you’ll create treats that taste like you spent all day baking. They’re perfect for busy weeknights, last-minute gatherings, or whenever you want to bring a little fall magic to your table. Ready to become the dessert hero of your next gathering? Grab those ingredients and start rolling – your taste buds (and your guests) will thank you!
FAQs
Can I make these without a food processor for the graham crackers?
Absolutely! Place crackers in a sealed plastic bag and crush them with a rolling pin or meat mallet. You want fine crumbs, but a few slightly larger pieces add nice texture.
Why are my balls falling apart when I try to coat them?
This usually means they weren’t chilled long enough. Pop them back in the fridge for another hour and make sure your chocolate coating isn’t too hot.
Can I use fresh pumpkin instead of canned puree?
Yes, but make sure to cook and drain it well to remove excess moisture. Canned puree is more consistent and actually recommended for best results.
How far ahead can I make these for a party?
These are perfect make-ahead treats! Prepare them up to 3 days before your event – they’ll stay fresh and actually taste even better as flavors develop.
What if I don’t have pumpkin pie spice?
Mix together 1/2 tsp cinnamon, 1/4 tsp nutmeg, 1/8 tsp ginger, and a pinch of cloves. This homemade blend works perfectly and might even taste fresher than store-bought versions.