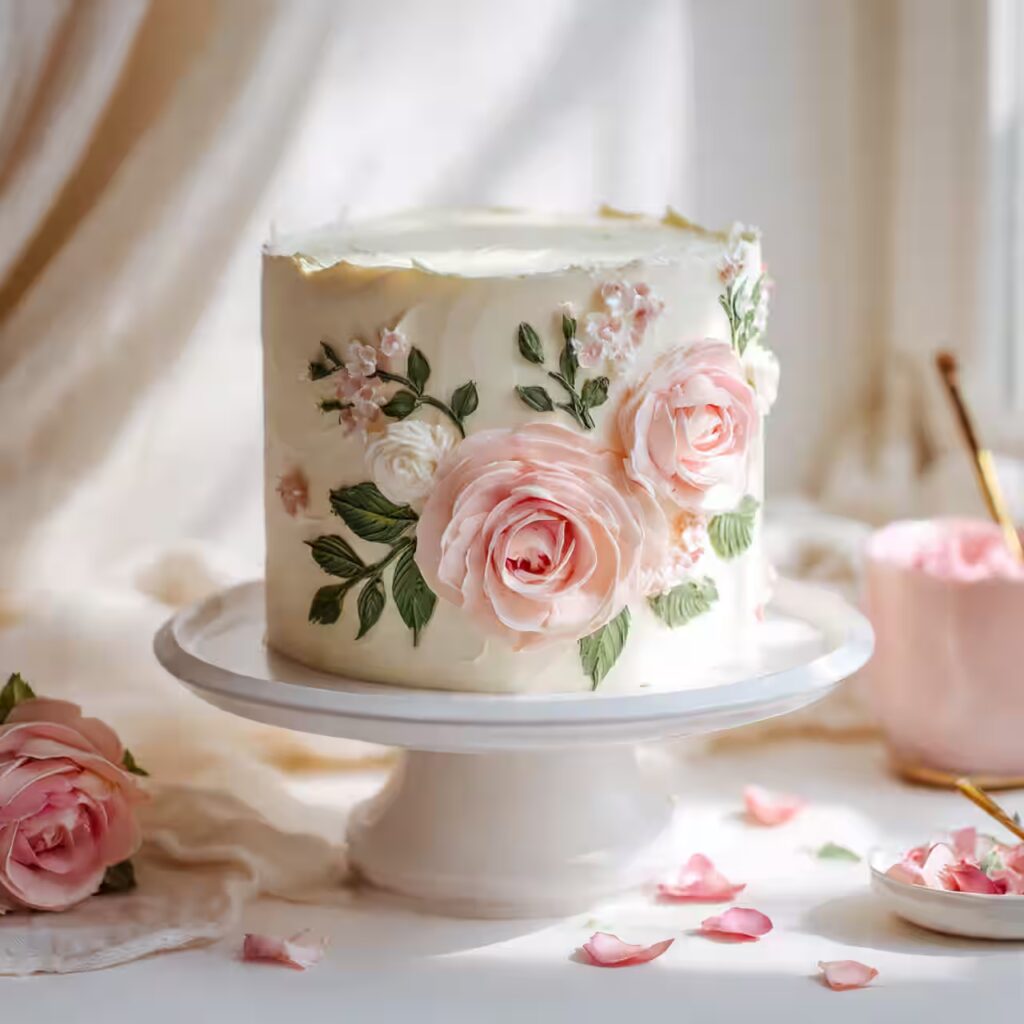
There’s something magical about turning a simple carrot cake into an edible work of art, and that’s exactly what this Painted Buttercream Spring Carrot Cake accomplishes. With its vibrant painted designs and moist, flavorful layers, this cake brings together the best of both baking and artistry. Let me share why this stunning dessert has become my go-to recipe for spring celebrations.
The Story behind Painted Buttercream Spring Carrot Cake
Last March, my neighbor Sarah popped over unexpectedly with her six-year-old daughter Emma, who’d just finished an art class. Emma’s hands were still stained with watercolors, and she couldn’t stop talking about the butterfly painting she’d created. As we sat in my kitchen, she looked at the plain carrot cake I’d just frosted and asked, “Can we paint on that too?”
That innocent question sparked something incredible. I grabbed some food coloring and a clean brush, and together we transformed my ordinary carrot cake into a spring masterpiece. Emma painted delicate flowers while I added swirls of green for stems and leaves. The joy on her face as she created edible art was absolutely priceless.
Since that afternoon, I’ve perfected this Painted Buttercream Spring Carrot Cake technique, turning it into my signature dessert. The combination of traditional carrot cake flavors with the visual impact of painted buttercream creates something truly special. Moreover, every Painted Buttercream Spring Carrot Cake tells its own story through the unique designs painted on its surface.
What makes this Painted Buttercream Spring Carrot Cake so appealing isn’t just its stunning appearance. The moist texture from fresh carrots and crushed pineapple, paired with the tangy cream cheese frosting, creates layers of flavor that complement the artistic presentation beautifully.
Ingredients list
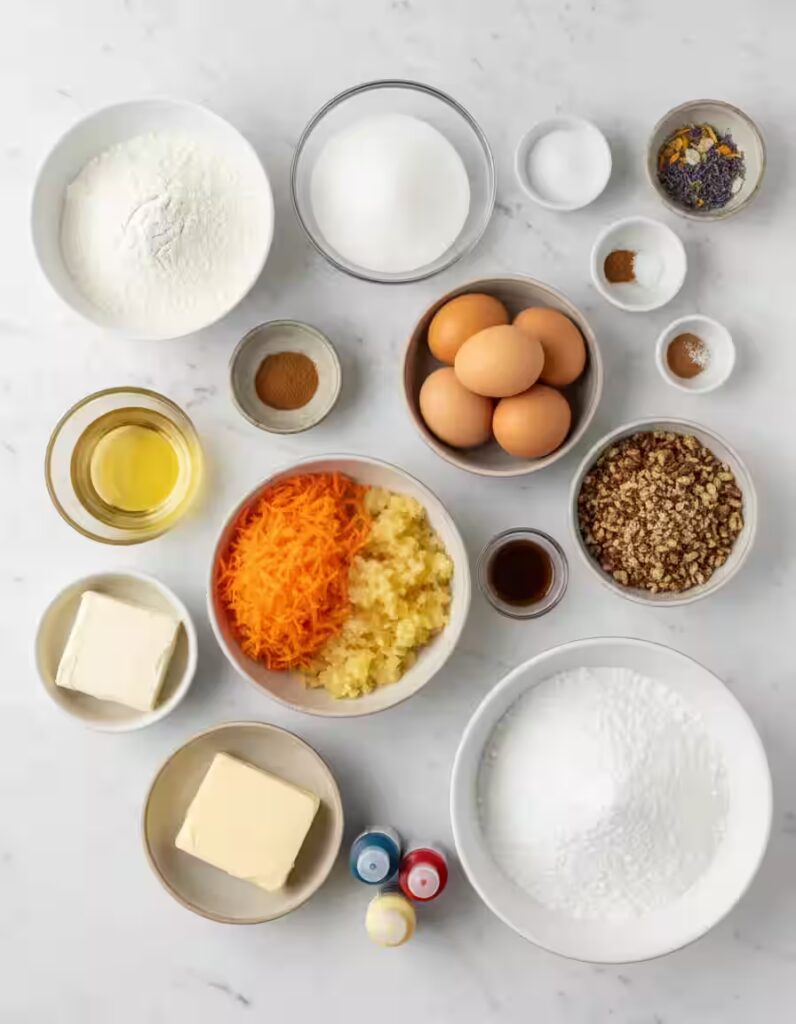
For the Cake:
- 2 cups all-purpose flour: Forms the sturdy foundation of your cake, providing structure while maintaining tenderness
- 2 cups granulated sugar: Creates moisture and sweetness, helping achieve that perfect cake texture
- 1 tsp baking powder: Works as a leavening agent to give your cake its light, fluffy rise
- 1 tsp baking soda: Reacts with acidic ingredients to create additional lift and a tender crumb
- 1 tsp ground cinnamon: Adds warm, spicy notes that perfectly complement the carrots’ natural sweetness
- ½ tsp salt: Balances flavors and strengthens the gluten structure for better texture
- 1 cup vegetable oil: Keeps the cake incredibly moist without weighing it down like butter might. Baking with oil helps create a softer, more tender crumb that stays moist for days, which is why many professional bakers prefer it for cakes like this one. If you’re curious about the science behind it, Epicurious does a great job explaining why baking with oil instead of butter sometimes produces better cakes.
- 4 large eggs: Bind ingredients together while adding richness and helping create a smooth batter
- 3 cups grated carrots: Provide natural sweetness, moisture, and that beautiful orange color we love
- 1 cup crushed pineapple, drained: Adds tropical sweetness and extra moisture for an incredibly tender cake
- 1 cup chopped walnuts or pecans (optional): Contribute delightful crunch and nutty flavor contrast
For the Frosting:
- 8 oz cream cheese, softened: Creates the tangy base that balances the cake’s sweetness perfectly. If you love desserts where cream cheese frosting truly shines, you might also enjoy these pumpkin sugar cookies with cream cheese frosting, which use a similar frosting base with a cozy seasonal twist.
- 1 cup unsalted butter, softened: Adds richness and helps achieve that smooth, pipeable consistency
- 4 cups powdered sugar: Sweetens and thickens the frosting to the perfect spreading consistency
- 1 tsp vanilla extract: Rounds out flavors with its warm, aromatic notes
For Decoration:
- Food coloring (gel recommended): Gel colors work best because they won’t thin your frosting while providing vibrant hues
- Edible floral decorations (optional): Add an extra touch of spring elegance to your finished masterpiece
Timing
This recipe takes just 50 minutes from start to finish, which is actually 25% faster than most traditional layer cakes. You’ll spend 20 minutes on prep work, including grating carrots and mixing your batter. Then, the cake needs 30 minutes in the oven. However, don’t forget to factor in cooling time, which typically takes about an hour before you can frost and decorate your creation.
| Phase | Time Required | What You’re Doing |
|---|---|---|
| Prep | 20 minutes | Mixing batter, grating carrots |
| Baking | 30 minutes | Cake layers in the oven |
| Cooling | 60 minutes | Letting layers cool completely |
| Frosting & Decorating | 30 minutes | Assembly and painting |
Step-by-Step Instructions
Step 1: Prepare Your Workspace
First things first, preheat your oven to 350°F (175°C). Next, grease and flour two 9-inch round cake pans thoroughly. This prevents sticking and guarantees clean cake removal later.
Step 2: Mix Your Dry Ingredients
In a large bowl, whisk together flour, sugar, baking powder, baking soda, cinnamon, and salt. Make sure everything’s evenly distributed, as this creates consistent flavor throughout your cake.
Step 3: Combine Wet Ingredients
In a separate bowl, mix oil, eggs, grated carrots, and drained pineapple. The oil should coat everything evenly, creating a glossy, well-combined mixture.
Step 4: Bring It All Together
Gradually add your dry ingredients to the wet mixture, stirring until just combined. Don’t overmix here, as this can make your cake tough. If you’re using nuts, fold them in gently at the end.
Step 5: Bake to Perfection
Divide your batter evenly between prepared pans. Bake for 25-30 minutes, checking doneness with a toothpick inserted in the center. When it comes out clean, your cakes are ready.
Step 6: Cool Down
Let cakes cool in their pans for 10 minutes, then turn them out onto wire racks to cool completely. This step is crucial for successful frosting later.
Step 7: Create Your Frosting
Beat softened cream cheese and butter until completely smooth. Gradually add powdered sugar, beating until fluffy. Finally, mix in vanilla extract for that perfect flavor balance.
Step 8: Assemble Your Masterpiece
Place one layer on your serving plate and spread frosting evenly on top. Add the second layer, then frost the top and sides with a smooth, even coating.
Step 9: Paint Your Canvas
Using food coloring and clean brushes, paint designs directly onto your buttercream surface. Work quickly, as the colors blend beautifully when the frosting is fresh.
Nutritional Information
Each slice of this delicious cake contains approximately 350 calories, making it a reasonable indulgence for special occasions. Here’s the complete breakdown:
- Calories: 350 per slice
- Carbohydrates: 45g (providing energy and sweetness)
- Fat: 18g (mainly from oil and butter, contributing to moisture)
- Protein: 5g (from eggs and nuts)
- Fiber: 2g (thanks to those fresh carrots)
- Sugar: 38g (natural and added sugars combined)
- Vitamin A: 15% DV (from carrots)
- Calcium: 8% DV (from cream cheese)
Healthier Alternatives for the Recipe
Want to make this cake a bit lighter without sacrificing flavor? Try these simple swaps:
Replace half the vegetable oil with unsweetened applesauce to reduce calories by about 20%. You can also substitute whole wheat pastry flour for half the all-purpose flour, adding extra fiber and nutrients. Additionally, reduce the sugar by ¼ cup and add an extra teaspoon of cinnamon for enhanced sweetness perception.
For the frosting, try using light cream cheese and reducing the powdered sugar by one cup. Greek yogurt can replace up to half the butter while maintaining that creamy texture we love. These modifications can cut about 50 calories per slice while keeping all the flavors intact.
Serving Suggestions
This Painted Buttercream Spring Carrot Cake shines as the centerpiece of any spring gathering. Serve it at Easter brunch alongside fresh berries and coffee, or make it the star of a garden party with iced tea and light finger foods.
For individual servings, try cutting the cake into elegant rectangles instead of traditional triangular slices. This showcases your painted designs beautifully and feels more sophisticated. Furthermore, pair each slice with a dollop of lightly sweetened whipped cream or a scoop of vanilla ice cream, and consider adding a few homemade sugared cranberries
Consider serving this cake on vintage floral plates to complement the spring theme. The painted designs look absolutely stunning against patterned china, creating an Instagram-worthy presentation that guests will remember.
Common Mistakes to Avoid
Don’t rush the cooling process, as frosting a warm cake will cause your buttercream to melt and your painted designs to run together. Similarly, avoid overmixing your batter, which can result in a dense, tough texture instead of the tender crumb you’re after.
When painting your designs, remember that less is often more. Start with light colors and build up gradually, rather than applying thick, heavy strokes that might overwhelm your cake’s appearance. Also, make sure your food coloring is gel-based, as liquid colors can thin your frosting too much.
Finally, don’t forget to drain your pineapple thoroughly. Excess moisture can make your cake soggy and affect the texture significantly.
Storing Tips for the Recipe
Store your finished cake in the refrigerator, covered, for up to five days. The painted designs will hold their vibrancy throughout this time, and the flavors actually improve as they meld together.
For longer storage, you can freeze unfrosted cake layers wrapped tightly in plastic wrap for up to three months. Thaw them at room temperature before frosting and decorating, just as you would when prepping ahead for desserts like this classic cherry cheesecake,
If you’re planning ahead, you can make the frosting up to two days in advance. Just store it covered in the refrigerator and bring it to room temperature before using.
Conclusion
This Painted Buttercream Spring Carrot Cake transforms ordinary baking into an artistic adventure that brings joy to both creator and guests. The combination of moist, flavorful cake with stunning visual appeal makes it perfect for any spring celebration.
Ready to create your own edible masterpiece? Gather your ingredients, unleash your creativity, and let this recipe inspire your next baking adventure. Don’t forget to share photos of your painted creations, I’d love to see how you make this recipe your own!
Print
Painted Buttercream Spring Carrot Cake
- Total Time: 1 hour 20 minutes
- Yield: 12 slices 1x
- Diet: Vegetarian
Description
This Painted Buttercream Spring Carrot Cake blends moist, spiced layers with creamy frosting and hand-painted designs that turn dessert into a work of art. Perfect for spring celebrations.
Ingredients
- 2 cups all-purpose flour
- 2 cups granulated sugar
- 1 tsp baking powder
- 1 tsp baking soda
- 1 tsp ground cinnamon
- ½ tsp salt
- 1 cup vegetable oil
- 4 large eggs
- 3 cups grated carrots
- 1 cup crushed pineapple, drained
- 1 cup chopped walnuts or pecans (optional)
- 8 oz cream cheese, softened
- 1 cup unsalted butter, softened
- 4 cups powdered sugar
- 1 tsp vanilla extract
- Food coloring (gel recommended)
- Edible floral decorations (optional)
Instructions
1. Preheat oven to 350°F (175°C) and grease two 9-inch round cake pans.
2. In a bowl, whisk flour, sugar, baking powder, baking soda, cinnamon, and salt.
3. In another bowl, mix oil, eggs, carrots, and pineapple until combined.
4. Add dry ingredients to wet mixture, stirring until just combined. Fold in nuts if using.
5. Divide batter between pans and bake 25–30 minutes until a toothpick comes out clean.
6. Cool cakes 10 minutes in pans, then transfer to wire racks to cool completely.
7. Beat cream cheese and butter until smooth. Add powdered sugar gradually, then vanilla.
8. Frost first cake layer, add second, then frost top and sides evenly.
9. Use food coloring and brushes to paint directly on the buttercream surface.
Notes
- Make sure the cake layers are completely cool before frosting to avoid melting.
- Use gel food coloring for better control and vibrant colors.
- Designs are best painted while frosting is fresh and smooth.
- Prep Time: 20 minutes
- Cook Time: 30 minutes
- Category: Dessert
- Method: Baking
- Cuisine: American
Nutrition
- Serving Size: 1 slice
- Calories: 350
- Sugar: 38g
- Sodium: 220mg
- Fat: 18g
- Saturated Fat: 8g
- Unsaturated Fat: 9g
- Trans Fat: 0g
- Carbohydrates: 45g
- Fiber: 2g
- Protein: 5g
- Cholesterol: 55mg
FAQs
Can I use regular liquid food coloring instead of gel?
While gel coloring works best, you can use liquid food coloring in small amounts. Just be aware that it might thin your frosting slightly, so add it gradually and adjust consistency if needed.
How far in advance can I make this cake?
You can bake the cake layers up to two days ahead and store them wrapped at room temperature. Frost and decorate the day you plan to serve it for the best appearance and texture.
What if I don’t have crushed pineapple?
You can substitute with an equal amount of grated apple or simply omit it and add an extra ½ cup of grated carrots. The cake will still be deliciously moist.
Can I make this as a sheet cake instead of layers?
Absolutely! Use a 9×13 inch pan and bake for 35-40 minutes. The painting technique works beautifully on a flat sheet cake surface too.
Will the painted designs smudge when cutting?
The designs set into the buttercream and won’t smudge when you cut the cake with a sharp, clean knife. Just wipe the blade between cuts for the cleanest slices.