Let me take you back to October 2018, when I was still running my food truck “The Cozy Fork” and absolutely drowning in the pre-Halloween rush. I’d planned this elaborate pumpkin cheesecake for our fall menu, but my industrial mixer decided to give up the ghost on the busiest weekend of the season.

Standing there with three cases of pumpkin puree and a line of customers already forming, I had what you might call a beautiful panic moment. That’s when I remembered my college roommate Sarah’s go-to dessert hack: pumpkin bars with cake mix. She’d whip these up for our dorm parties, and they’d disappear faster than free pizza at finals week.
I grabbed a box of yellow cake mix from the grocery store next door, crossed my fingers, and threw together what would become one of my most requested recipes. Those pumpkin bars saved my Saturday, and honestly, they’ve been saving my fall baking ever since. The best part? They taste like you spent hours in the kitchen when really, you just outsmarted the whole process.
These pumpkin bars became my secret weapon for potlucks, last-minute dinner party desserts, and those moments when you need something that screams “I’ve got my life together” without actually having to get your life together. Sometimes the most delicious solutions come from the most unexpected places.
Table of Contents
Ingredients List
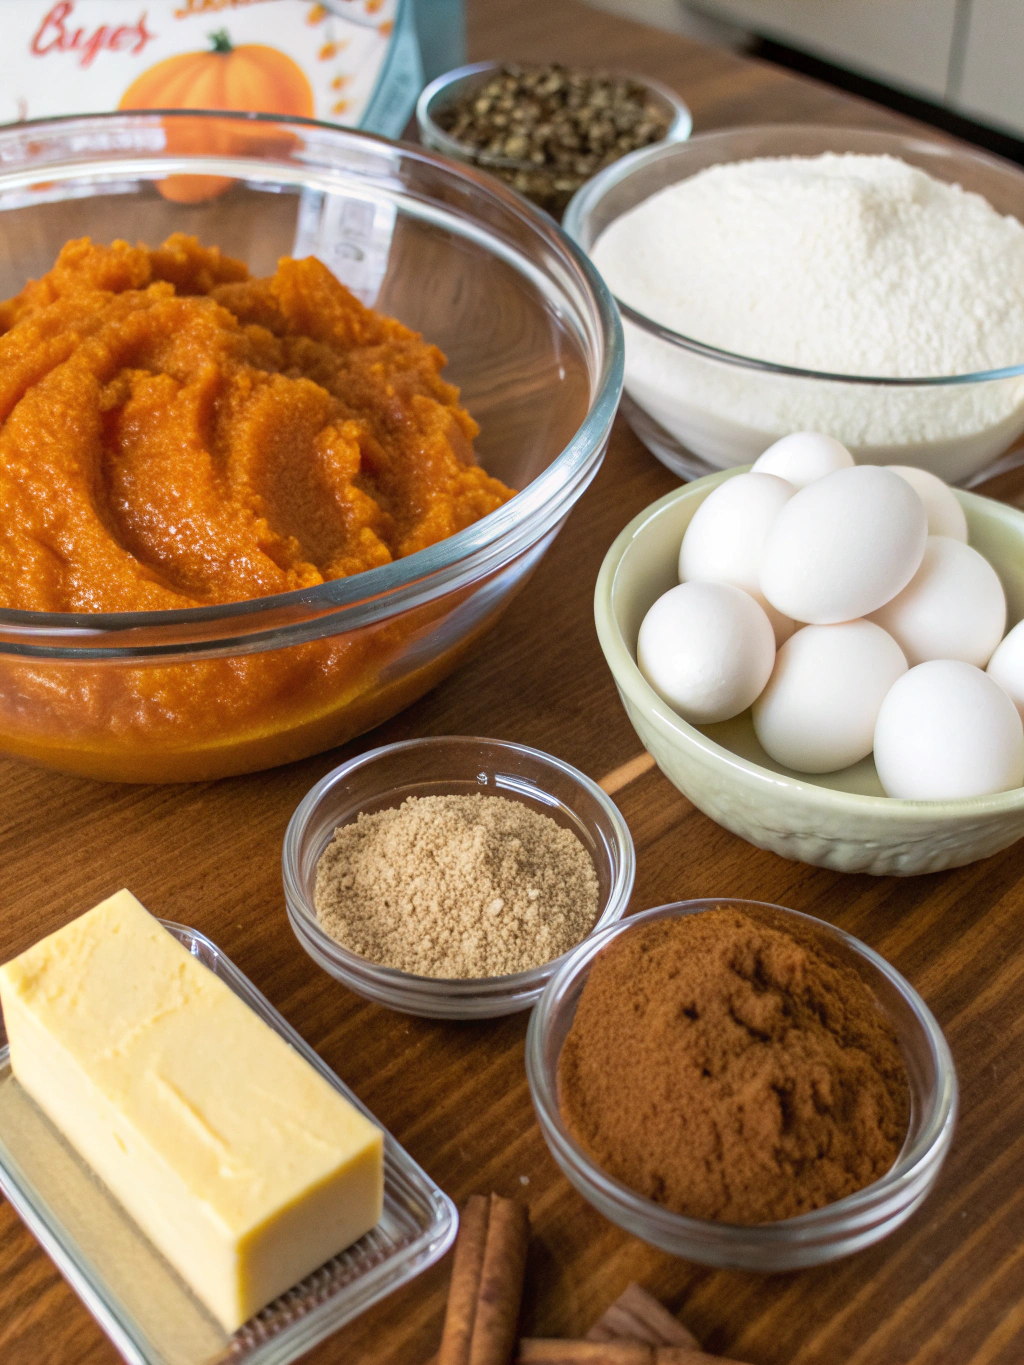
Here’s what you’ll need to create these crowd-pleasing bars:
For the bars:
- 1 box (15.25 oz) yellow cake mix – This creates the perfect tender crumb without the guesswork of flour ratios
- 1 can (15 oz) pumpkin puree – Provides moisture, natural sweetness, and that gorgeous orange color we’re after
- 2 large eggs – Acts as the binding agent and adds richness to the texture
- 1/3 cup vegetable oil – Keeps everything moist and prevents that dreaded dry cake situation
- 1 teaspoon vanilla extract – Rounds out the flavors with warm, sweet notes
- 1 teaspoon ground cinnamon – The aromatic backbone that screams “fall is here”
- 1/2 teaspoon ground nutmeg – Adds depth and complexity to the spice profile
- 1/4 teaspoon ground ginger – Brings a subtle warmth that complements the pumpkin beautifully
- 1/4 teaspoon ground cloves – Just a whisper of this potent spice adds sophistication
For the cream cheese frosting:
- 8 oz cream cheese, softened – The tangy base that balances the sweetness perfectly
- 1/4 cup butter, softened – Creates that smooth, spreadable consistency we love
- 2 cups powdered sugar – Sweetens and thickens the frosting to the right texture
- 1 teaspoon vanilla extract – Ties all the flavors together harmoniously
Timing
Here’s your time breakdown for these game-changing bars:
| Phase | Time Required |
|---|---|
| Prep Time | 15 minutes |
| Baking Time | 25-30 minutes |
| Cooling Time | 45 minutes |
| Frosting Prep | 10 minutes |
| Total Time | 1 hour 35 minutes |
What I love about this timing is that it’s about 30% faster than traditional pumpkin bars made from scratch. You’re essentially getting bakery-quality results in under two hours, which means you can start these after lunch and have them ready for dinner guests. If you enjoy quick fall desserts, you might also love this Pumpkin Dump Cake.
Step-by-Step Instructions
Step 1: Get Your Kitchen Ready
Preheat your oven to 350°F and grease a 9×13 inch baking pan. I like to use a light coating of butter followed by a dusting of flour, but cooking spray works just fine too. Trust me, there’s nothing worse than beautiful bars that stick to the pan.
Step 2: Mix Your Dry Ingredients
In a large mixing bowl, combine the cake mix, cinnamon, nutmeg, ginger, and cloves. Give it a good whisk to distribute those spices evenly. This step is crucial because nobody wants to bite into a pocket of pure clove!
Step 3: Combine the Wet Ingredients
In a separate bowl, whisk together the pumpkin puree, eggs, oil, and vanilla extract until smooth. The mixture should be well-blended and free of any egg streaks. This is where the magic starts happening.
Step 4: Bring It All Together
Pour the wet ingredients into the dry mixture and stir until just combined. Don’t overmix here, we want tender bars, not tough ones. The batter should be thick but spreadable, kind of like a dense brownie batter.
Step 5: Bake to Perfection
Spread the batter evenly in your prepared pan and bake for 25-30 minutes. You’ll know they’re done when a toothpick inserted in the center comes out with just a few moist crumbs. The top should spring back lightly when touched.
Step 6: Cool Completely
This is the hardest part, letting them cool completely before frosting. I know it’s tempting, but warm bars plus cream cheese frosting equals a melted mess. Use this time to clean up or start on that frosting.
Step 7: Make the Frosting
Beat the softened cream cheese and butter until fluffy, about 2-3 minutes. Gradually add the powdered sugar and vanilla, beating until smooth and spreadable. If it’s too thick, add a tablespoon of milk.
Step 8: Frost and Serve
Once the bars are completely cool, spread the frosting evenly over the top. Cut into squares and watch them disappear!
Nutritional Information
Here’s what you’re looking at nutritionally per serving (based on 24 bars):
| Nutrient | Amount per Serving |
|---|---|
| Calories | 185 |
| Total Fat | 6g |
| Saturated Fat | 3g |
| Cholesterol | 25mg |
| Sodium | 210mg |
| Total Carbohydrates | 32g |
| Dietary Fiber | 1g |
| Sugars | 24g |
| Protein | 2g |
| Vitamin A | 15% DV |
The pumpkin in these bars contributes beta-carotene, which your body converts to vitamin A. Plus, you’re getting some fiber and potassium from the pumpkin puree. Not bad for a dessert that tastes completely indulgent!
The pumpkin in these bars contributes beta-carotene, which your body converts to vitamin A. Studies also highlight pumpkin’s antioxidant benefits. Plus, you’re getting some fiber and potassium from the pumpkin puree.
Healthier Alternatives for the Recipe
Want to lighten these up without sacrificing flavor? I’ve got you covered with some smart swaps:
Sugar Reduction: Replace half the cake mix with whole wheat pastry flour and add 1/2 cup coconut sugar. This cuts about 25% of the refined sugar while adding fiber.
Oil Substitute: Swap the vegetable oil for unsweetened applesauce or mashed banana. This reduces calories and adds natural sweetness. You might need to bake for an extra 5 minutes.
Protein Boost: Add 1/4 cup vanilla protein powder to the dry ingredients and increase the liquid slightly. This bumps up the protein content significantly.
Frosting Makeover: Try a lighter version using whipped cream cheese mixed with Greek yogurt and a touch of honey instead of the traditional frosting.
Gluten-Free Option: Use a gluten-free cake mix instead – Bob’s Red Mill makes an excellent one that works perfectly in this recipe.
Serving Suggestions
These pumpkin bars are incredibly versatile, and I’ve seen them shine in so many different settings:
Classic Presentation: Cut into neat squares and arrange on a fall-themed platter with some cinnamon sticks and mini pumpkins for decoration. Perfect for potlucks or family gatherings.
Elegant Touch: Dust with a light sprinkle of cinnamon before serving, or add a small dollop of whipped cream and a candied pecan on top of each square.
Coffee Shop Style: Pair with a spiced chai or coffee, just like a slice of Pumpkin Crisp.
Party Ready: Cut into smaller bite-sized pieces for parties. They’re much easier to eat while mingling than traditional cake slices.
Ice Cream Pairing: Warm a square slightly and serve with vanilla bean ice cream for an elevated dessert experience.
Common Mistakes to Avoid
After making these bars countless times (and teaching others to make them), I’ve noticed some recurring pitfalls:
Overmixing the Batter: This is the number one mistake I see. Once you add the wet ingredients to the dry, mix just until combined. Overmixing develops the gluten too much, resulting in tough, chewy bars instead of tender ones.
Using Cold Ingredients: Make sure your eggs and oil are at room temperature. Cold ingredients don’t blend as well and can create an uneven texture. Take them out about 30 minutes before you start baking.
Skipping the Spice Distribution: Don’t just dump the spices on top of the cake mix. Actually whisk them together to distribute evenly, or you’ll end up with some bland bites and some overly spiced ones.
Frosting Too Soon: I can’t stress this enough, wait until the bars are completely cool. Even slightly warm bars will melt your beautiful frosting into a soggy mess.
Cutting Too Early: Let the frosted bars set for at least 30 minutes before cutting. This helps them hold their shape and makes for cleaner slices.
Storing Tips for the Recipe
Proper storage keeps these bars fresh and delicious for days:
Room Temperature: Store covered at room temperature for up to 3 days. I use a cake dome or cover the pan tightly with plastic wrap.
Refrigerated Storage: These actually keep better in the fridge, especially if your kitchen is warm. They’ll stay fresh for up to a week when properly covered.
Freezing Options: Freeze unfrosted bars for up to 3 months. Wrap them tightly in plastic wrap, then aluminum foil. Thaw completely before frosting and serving.
Make-Ahead Strategy: You can bake these bars a day ahead and frost them the morning you plan to serve. This actually improves the texture as the flavors have time to meld together.
Individual Wrapping: For lunch boxes or grab-and-go treats, wrap individual squares in plastic wrap. They’ll stay fresh for 2-3 days this way.
Conclusion
These pumpkin bars with cake mix prove that sometimes the best recipes come from the most unexpected moments. What started as a food truck emergency has become one of my most treasured fall recipes, and I hope it becomes one of yours too.
The beauty of this recipe lies in its simplicity and reliability. You don’t need special equipment, advanced baking skills, or hours of prep time. Just good ingredients, a little love, and the confidence to trust the process.
Whether you’re a seasoned baker or someone who considers boxed mix a food group, these bars will make you look like a fall baking superstar. For more cozy autumn flavors, don’t miss my Apple Pumpkin Streusel Muffins. So grab that cake mix, embrace the shortcut, and get ready to wow everyone at your next gathering.
I’d love to hear how your pumpkin bars turn out! Drop a comment below, share a photo on social media, or tell me about any fun variations you tried. Happy baking, friends!
FAQs
Can I use a different flavor of cake mix?
Absolutely! Spice cake mix works beautifully and adds extra warmth to the flavor profile. Vanilla cake mix is another great option, though yellow cake mix gives the best color and flavor balance.
What if I don’t have all the spices listed?
You can substitute 2 teaspoons of pumpkin pie spice for all the individual spices. Most grocery stores carry this blend, and it’s specifically designed for pumpkin recipes.
Can I make these without the frosting?
Definitely! They’re delicious on their own, or you can dust them with powdered sugar for a simpler finish. Some people love them plain with just a cup of coffee.
How do I know when they’re perfectly baked?
The top should spring back lightly when touched, and a toothpick inserted in the center should come out with just a few moist crumbs. Overbaking will make them dry.
Can I double this recipe?
Yes, but you’ll need two 9×13 pans or one large sheet pan. Keep the baking time the same and check for doneness with the toothpick test.
What’s the best way to get clean cut lines?
Use a sharp knife wiped clean between cuts, or try dental floss for really clean lines. Chilling the frosted bars for 30 minutes before cutting also helps.