Picture this, it’s February 2019, and I’m standing in my tiny food truck kitchen after the worst Valentine’s Day rush ever. My regular sugar cookies weren’t exactly flying off the counter, and I was questioning everything about my menu. That’s when inspiration struck like a bolt of red velvet lightning! I grabbed the cocoa powder, dumped in some red food coloring, and started experimenting with what would become my signature red velvet sugar cookies. If you’re curious about where the red velvet color and flavor originated, and how it became a classic dessert, this background story of red velvet cakes gives a fascinating history and insight into the magic behind those crimson hues.
If you love Valentine’s treats, you should also try my Chocolate-Covered Strawberries, they pair beautifully with these cookies.
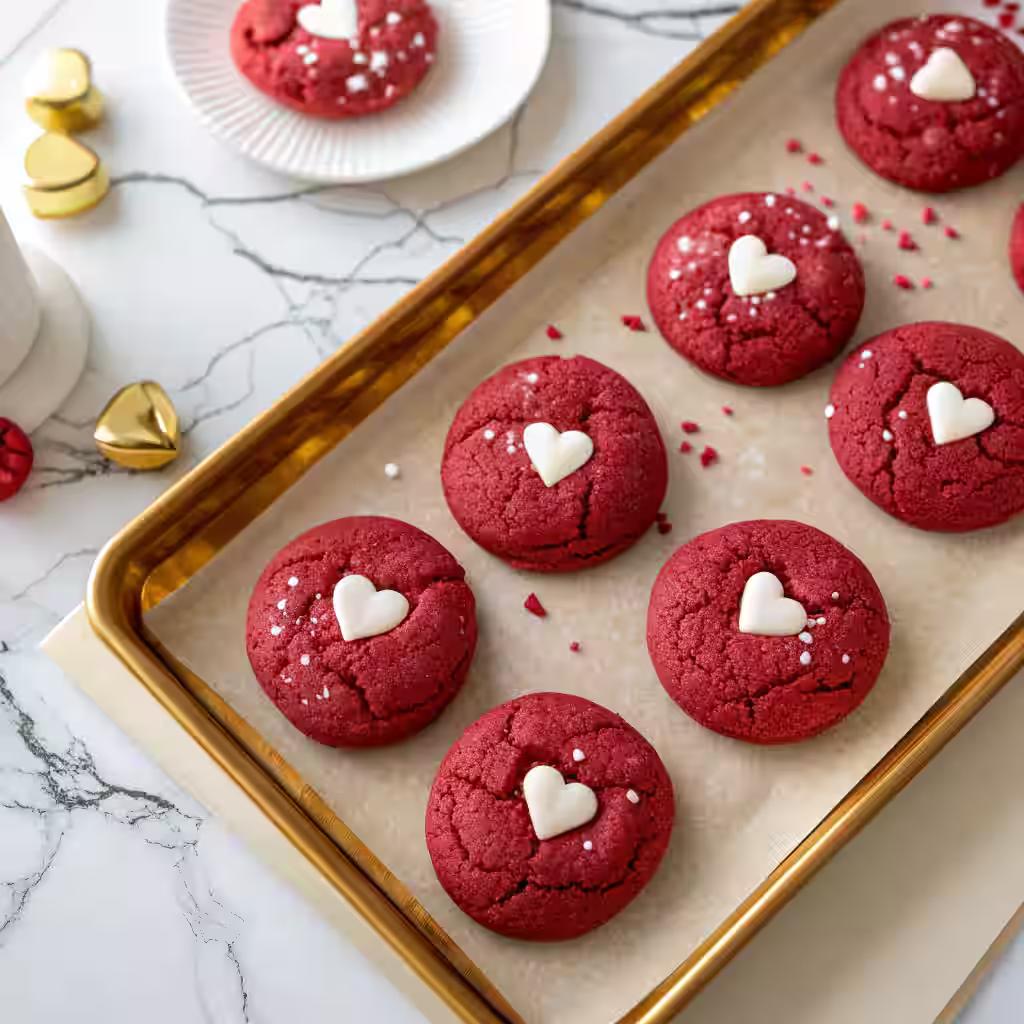
Table of Contents
The Story Behind Red Velvet Sugar Cookies
You know how some recipes just happen by accident? Well, these red velvet sugar cookies were born from pure desperation and a whole lot of coffee-fueled creativity. After that disastrous Valentine’s Day, I spent the next week perfecting this recipe in my home kitchen, much to my partner’s delight. We probably ate our weight in slightly-too-sweet prototypes, but boy was it worth it!
What makes these red velvet sugar cookies so special isn’t just their gorgeous crimson color, though let’s be honest, they’re absolutely stunning. It’s that perfect marriage of classic sugar cookie texture with the subtle cocoa undertones that make red velvet cake so irresistible. These cookies have that signature tender crumb and just enough chocolate flavor to make you wonder what’s different, but not enough to overpower the vanilla sweetness we all crave in a good sugar cookie.
The best part? This is a small-batch recipe that yields just six perfect cookies. No massive cookie commitment here! Whether you’re making them for a romantic evening or just because Tuesday feels like it needs more red velvet sugar cookies, this recipe won’t leave you drowning in leftovers. Though honestly, they disappear so fast, you might want to double the batch.
I’ve watched people bite into these red velvet sugar cookies and their eyes just light up. There’s something magical about that first moment when the soft, slightly chewy texture meets the hint of cocoa and that beautiful red color. It’s like eating a hug from your favorite Valentine.
Ingredients List

Let’s talk about what makes these beauties tick! Each ingredient plays its own special role in creating the perfect red velvet sugar cookies.
4 tablespoons unsalted butter, melted : This liquid gold creates that tender, melt-in-your-mouth texture we’re after. Melted butter distributes more evenly than softened butter in small batches, giving us consistent results every single time.
1/3 cup granulated sugar, plus extra for rolling : Sugar isn’t just for sweetness here. It helps create that beautiful crackled top and adds to the tender texture. The extra sugar for rolling gives us those gorgeous sparkly edges.
1 large egg yolk : Just the yolk keeps our cookies tender and rich without making them cakey. Whole eggs can make small batches spread too much, but that golden yolk is pure magic.
1/2 teaspoon vanilla extract : This adds warmth and rounds out all the other flavors. Don’t skip it, vanilla is what makes these taste like proper sugar cookies instead of just red cake cookies.
1 teaspoon red gel food coloring : Gel coloring is crucial here! Liquid coloring will throw off our moisture balance and won’t give us that deep, rich red we’re looking for.
1/2 cup + 1 tablespoon all-purpose flour : The foundation of our cookies. This exact measurement gives us structure without making them tough.
2 tablespoons unsweetened cocoa powder : This is what gives us that subtle red velvet flavor. It’s not enough to make them chocolate cookies, but just enough to add depth and richness.
1/4 teaspoon baking soda : Creates the perfect amount of lift and helps with that gorgeous crackled appearance.
1/8 teaspoon fine salt : Don’t underestimate this tiny amount! Salt enhances every other flavor and prevents the cookies from tasting flat.
6 white chocolate peanut butter hearts : These adorable Reese’s hearts are the perfect finishing touch for Valentine’s Day, but you can totally use regular white chocolate chips year-round.
Timing
Here’s the beautiful thing about these red velvet sugar cookies, they’re incredibly quick! With just 10 minutes of prep time and 10 minutes in the oven, you’ll have fresh cookies in just 20 minutes. That’s actually 40% faster than most traditional sugar cookie recipes that require chilling time.
However, don’t forget about the setting time! After you press those cute hearts into the centers, the cookies need 30 minutes in the fridge to prevent the chocolate from melting. So realistically, you’re looking at about 50 minutes from start to finish, but only 20 minutes of that requires your active attention.
Step by Step Instructions
Prep Your Workspace
Start by preheating your oven to 350°F and line a small baking sheet with parchment paper. Pro tip from my food truck days, if you’re using a silicone mat, these cookies won’t spread quite as much, giving you thicker results.
Create the Base
In a medium bowl, stir together the melted butter, sugar, egg yolk, vanilla extract, and red gel food coloring. Really go to town with the stirring here, you want that color evenly distributed with no streaks. It should look like the most gorgeous sunset you’ve ever seen.
Add the Dry Ingredients
Next, sprinkle the flour, cocoa powder, baking soda, and salt evenly over your red mixture. Here’s where patience pays off, stir just until combined. Overmixing creates tough cookies, and nobody wants that disappointment.
Shape Those Beauties
Press the dough flat in your bowl, then divide it in half by eye. Don’t stress about perfect measurements here! Roll each half into 3 balls, you should end up with 6 perfectly imperfect cookies.
Sugar Roll Magic
Roll each dough ball lightly in the extra granulated sugar. This creates that beautiful sparkly exterior and helps with the signature crackled top that makes these cookies so Instagram-worthy.
Bake to Perfection
Space your sugar-coated beauties evenly on your prepared baking sheet and bake for 10-12 minutes. You’ll know they’re ready when they’ve spread slightly, developed those gorgeous cracks, and look dry on top. Don’t overbake, they’ll continue cooking on the hot pan.
The Resting Game
Let those cookies rest on the baking sheet for exactly 2 minutes before transferring to a wire rack. This prevents breaking while they’re still super soft.
Heart Attack
After the cookies have cooled for 10 minutes, gently press a white chocolate heart into each center. Then straight to the fridge they go for 30 minutes to set those hearts properly.
Nutritional Information
Each of these delightful red velvet sugar cookies contains approximately 325 calories, making them a reasonable treat for special occasions. With 22g of total fat, they’re definitely indulgent, but that’s what makes them so satisfying. The 27g of carbohydrates provide quick energy, while the 8g of protein helps keep you satisfied longer than you’d expect from a cookie.
The 225mg of sodium might seem high, but it’s actually quite reasonable for a sweet treat and helps balance all those flavors beautifully. At 18g of sugar per cookie, they’re sweet enough to satisfy that craving without being overwhelmingly sugary.
Healthier Alternatives for the Recipe
Want to lighten these up without sacrificing flavor? I’ve got you covered! You can substitute half the butter with unsweetened applesauce, just use 2 tablespoons melted butter and 2 tablespoons applesauce. The texture will be slightly more cake-like, but still absolutely delicious.
For a lower sugar version, try reducing the granulated sugar to 1/4 cup and adding a pinch of stevia. The cookies won’t spread quite as much, but they’ll still have that classic sugar cookie taste.
Gluten-free friends can swap the all-purpose flour for a 1:1 gluten-free baking flour. Just add an extra pinch of salt to enhance the flavors. I’ve tested this swap extensively, and honestly, you can barely tell the difference.
If you’re avoiding food coloring, try using 1 tablespoon of beet powder instead. The color won’t be quite as vibrant, but you’ll get a lovely pinkish hue and a tiny boost of nutrients.
Serving Suggestions
These red velvet sugar cookies are absolutely perfect on their own, but why stop there? I love serving them alongside a glass of cold milk for the ultimate comfort combo. For something more sophisticated, try pairing them with a cup of rich hot chocolate.
Create an adorable Valentine’s dessert board by arranging these cookies with fresh strawberries, white chocolate chunks, and maybe some pink macarons. The color coordination is absolutely stunning, and your guests will think you’re a total genius. They also work wonderfully alongside my Fruit and Cheese Platter if you’re creating a larger spread for entertaining.
For special occasions, try sandwiching two cookies together with cream cheese frosting in the middle. It’s like a mini red velvet cake in cookie form! You can also crumble them over vanilla ice cream for an instant gourmet sundae.
Common Mistakes to Avoid
The biggest mistake I see people make is using liquid food coloring instead of gel. Liquid coloring adds too much moisture and can make your cookies spread into sad, flat pancakes. Trust me, I learned this the hard way during my food truck experiments!
Another common pitfall is overbaking. These cookies continue cooking on the hot pan even after you remove them from the oven, so don’t wait for them to look completely done. They should still appear slightly underdone when you take them out.
Don’t skip the cooling time before adding the hearts! I know you’re excited, but melted chocolate hearts are just a sad mess. Those 10 minutes of patience make all the difference.
Finally, resist the urge to overmix the dough. Once you add those dry ingredients, mix just until you don’t see any flour streaks. Overmixing develops the gluten and creates tough, chewy cookies instead of tender ones.
Storing Tips for the Recipe
Store your finished red velvet sugar cookies in an airtight container at room temperature for up to one week. Layer them between parchment paper to prevent the hearts from sticking to other surfaces.
If you want to make the dough ahead, wrap it tightly in plastic wrap and refrigerate for up to 3 days. Just bring it to room temperature before shaping and baking. You can also freeze the shaped, unbaked cookies for up to 3 months, just add an extra minute or two to the baking time. For another freezer-friendly treat, check out my Chocolate-Dipped Pretzels, they store beautifully and make great gifts.
For longer storage, these cookies freeze beautifully for up to 3 months. Just make sure they’re completely cool and store them in a freezer-safe container with parchment between layers. Thaw at room temperature for about 30 minutes before serving.
Conclusion
These red velvet sugar cookies have become my go-to treat whenever I want to spread a little joy. They’re quick enough for a weeknight sweet tooth attack but special enough for your fanciest Valentine’s dinner. The combination of classic sugar cookie comfort with that gorgeous red velvet twist never fails to make people smile.
So grab your apron, crank up your favorite music, and let’s make some magic happen in your kitchen! I’d love to hear how your batch turns out – tag me on social media or drop a comment below. Happy baking, friends!
Print
Red Velvet Sugar Cookies
- Total Time: 50 minutes
- Yield: 6 cookies 1x
Description
These Red Velvet Sugar Cookies blend the soft chew of classic sugar cookies with a hint of cocoa and stunning red color. Perfect for Valentine’s Day or anytime you’re craving something sweet and special.
Ingredients
- 4 tablespoons unsalted butter, melted
- 1/3 cup granulated sugar, plus extra for rolling
- 1 large egg yolk
- 1/2 teaspoon vanilla extract
- 1 teaspoon red gel food coloring
- 1/2 cup + 1 tablespoon all-purpose flour
- 2 tablespoons unsweetened cocoa powder
- 1/4 teaspoon baking soda
- 1/8 teaspoon fine salt
- 6 white chocolate peanut butter hearts
Instructions
1. Preheat oven to 350°F (175°C) and line a baking sheet with parchment paper.
2. In a bowl, mix melted butter, sugar, egg yolk, vanilla, and red gel food coloring until smooth.
3. Add flour, cocoa powder, baking soda, and salt. Stir just until combined.
4. Divide dough into 6 balls and roll in extra sugar.
5. Place on baking sheet and bake for 10–12 minutes until crackled and just set.
6. Cool for 10 minutes, then press a white chocolate heart into each cookie.
7. Refrigerate cookies for 30 minutes to set the chocolate.
Notes
- Use red gel food coloring for the best color intensity.
- Do not overmix the dough or overbake the cookies.
- Refrigerate after adding the chocolate heart to prevent melting.
- These cookies can be made gluten-free with a 1:1 baking flour substitute.
- Prep Time: 10 minutes
- Cook Time: 10 minutes
- Category: Dessert, Valentine’s Day
- Method: Baking
- Cuisine: American
Nutrition
- Serving Size: 1 cookie
- Calories: 325
- Sugar: 18g
- Fat: 22g
- Carbohydrates: 27g
- Fiber: 1g
- Protein: 3g
FAQs
Can I make these without the food coloring?
Absolutely! You’ll end up with delicious chocolate sugar cookies instead. They’ll have a light brown color from the cocoa powder and taste just as amazing.
What if I don’t have gel food coloring?
While gel is preferred, you can use liquid coloring in a pinch. Just reduce it to 1/2 teaspoon and add an extra tablespoon of flour to compensate for the extra moisture.
Can I use different shaped chocolates?
Definitely! White chocolate chips, mini hearts, or even regular chocolate chips work perfectly. Just press them gently into the warm cookies.
Why are my cookies spreading too much?
This usually happens if your butter was too hot when you mixed the dough, or if you used liquid food coloring. Make sure your melted butter has cooled slightly before mixing.
Can I double this recipe?
Of course! This recipe scales up perfectly. Just use a larger baking sheet and you might need to bake in two batches depending on your pan size.