Picture this: It’s 2018, and I’m standing in a bustling dim sum restaurant in San Francisco’s Chinatown, my eyes wide as I watch a server roll by with a cart full of golden, sesame-studded spheres. Those sweet potato sesame balls looked absolutely magical, glistening under the restaurant lights like little edible treasures. I’d never seen anything quite like them before, and honestly, I was a bit intimidated by their perfect, crispy exterior.

Fast forward to last month in my Asheville kitchen, and there I was, flour dusting my countertop, attempting to recreate those same sweet potato sesame balls that had captured my heart all those years ago. Let me tell you, my first batch was… well, let’s just say they resembled more of a science experiment than a dessert! But that’s the beauty of cooking, isn’t it? Each failed attempt teaches us something new.
What I discovered through my trials (and plenty of errors) is that sweet potato sesame balls are surprisingly forgiving once you understand the basics. These Chinese desserts, traditionally called “jian dui,” have been bringing families together for centuries. The combination of sweet, earthy sweet potato with the nutty crunch of sesame seeds creates this incredible contrast that’s both comforting and exciting.
The magic happens when that glutinous rice flour transforms into a chewy, stretchy coating that holds everything together. Meanwhile, the sweet potato filling becomes creamy and rich, while the sesame seeds provide that satisfying crunch we all crave. Trust me, once you bite into your first homemade sweet potato sesame ball, you’ll understand why they’ve been a beloved treat for generations.
Table of Contents
Ingredients You’ll Need
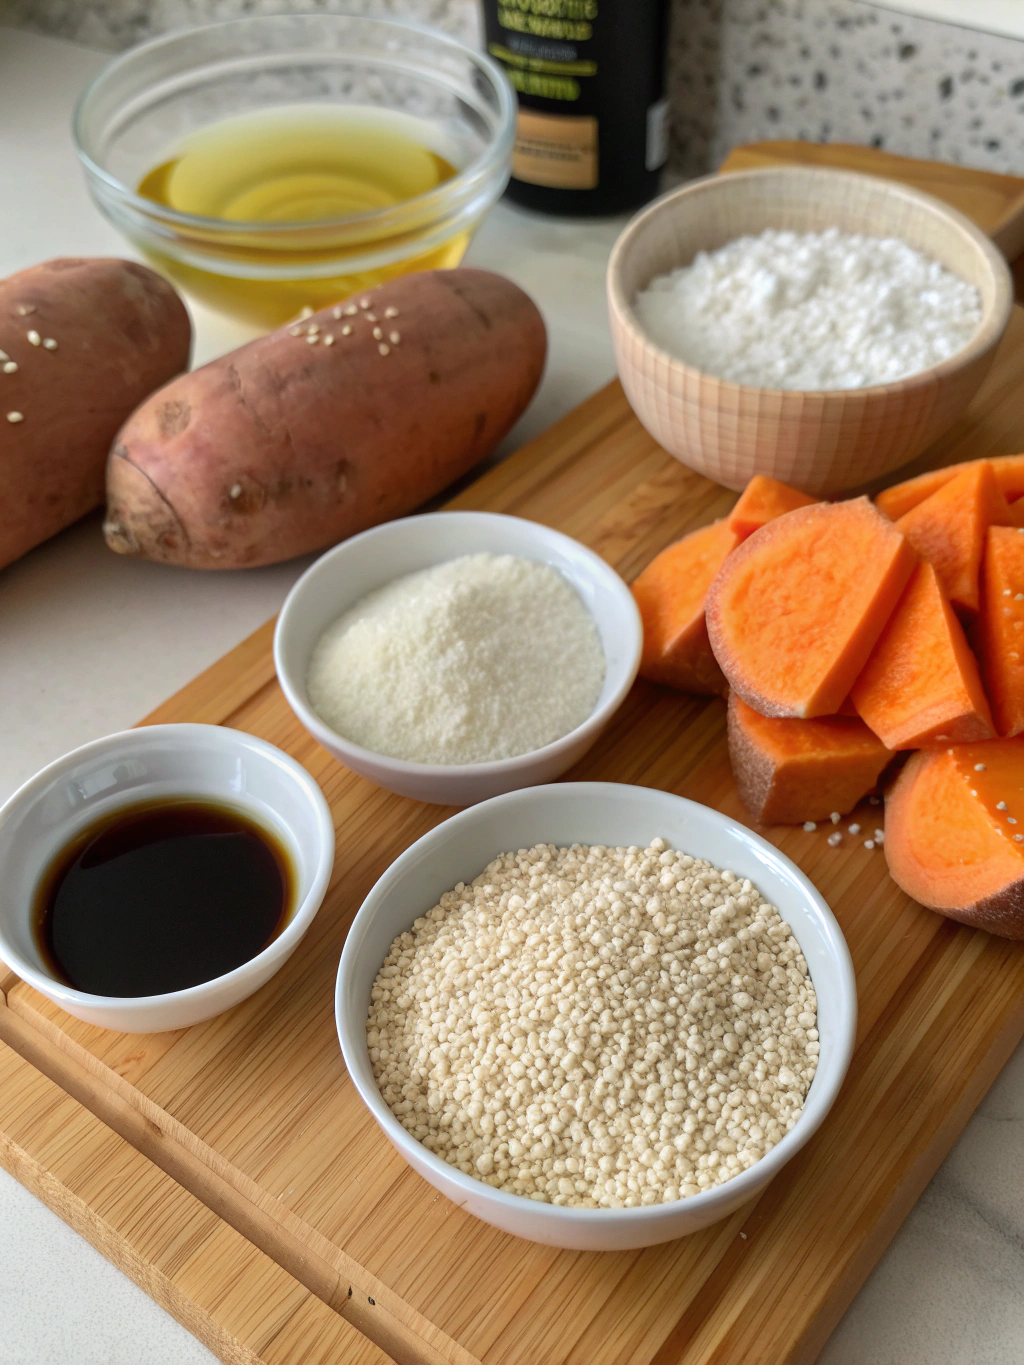
Let’s talk about what makes these golden beauties so special. Each ingredient plays a crucial role in creating that perfect balance of textures and flavors:
260g sweet potato (9oz): This is your star player! Sweet potatoes bring natural sweetness and that gorgeous orange color that makes these balls so visually appealing. They also provide moisture and act as the binding agent for your dough. Choose firm, unblemished sweet potatoes for the best results.
110g glutinous rice flour (4oz), plus 1 tablespoon for coating: Don’t let the name fool you, this flour is actually gluten-free! It’s what gives these balls their signature chewy, stretchy texture. The extra tablespoon helps create a slurry that makes the sesame seeds stick better.
2 tablespoons sugar: This adds just enough sweetness to complement the natural sweetness of the sweet potato without overwhelming your taste buds. You can adjust this based on your preference or the sweetness of your potato.
4 tablespoons sesame seeds: These little powerhouses provide that essential nutty flavor and satisfying crunch. They also create that beautiful textured exterior that makes these treats so Instagram-worthy!
600ml cooking oil: This is for deep frying, and the amount gives you the right depth for proper cooking. The oil temperature is crucial, so don’t skip using a thermometer if you have one.
If you love baking with sweet potatoes, you might also enjoy my Fluffy Cinnamon Butter Baked Sweet Potato or Creamy Garlic Butter Sweet Potato Bake, both showcase that same cozy sweetness in different
Timing
Here’s what you’re looking at time-wise, and honestly, it’s more manageable than you might think! The total time clocks in at 1 hour and 15 minutes, which is actually about 25% faster than many traditional dim sum recipes that require overnight resting periods.
Prep time: 15 minutes – This covers forming your balls and coating them with sesame seeds. It’s surprisingly quick once you get into a rhythm!
Cook time: 1 hour – Most of this is hands-off oven time for roasting the sweet potato (45-60 minutes), with just 10-15 minutes of active frying time.
Total time: 1 hour 15 minutes – Perfect for a weekend afternoon project or when you want to impress dinner guests with something special.
Step-by-Step Instructions
Cook the Sweet Potato
Start by preheating your oven to 400°F (200°C). Take your sweet potato and pierce it several times with a fork or knife, just like you’re giving it tiny acupuncture sessions! This prevents it from exploding in the oven and helps it cook evenly.
Pop that sweet potato into the oven without peeling it first. The skin acts like nature’s cooking vessel, keeping all those wonderful flavors locked inside. Bake for 45-60 minutes, depending on size. You’ll know it’s ready when a fork slides through the center without any resistance.
Once it’s done, let it cool until you can handle it comfortably. Then, peel off that skin. It should slip right off if the potato is properly cooked.
Make the Dough
Now comes the fun part! Mash your cooked sweet potato with a fork until it’s completely smooth. No lumps allowed here, they’ll create weak spots in your balls later.
Gradually add the glutinous rice flour and sugar while mixing with a spatula. Start slowly because the amount of flour you need can vary depending on how moist your sweet potato is. You’re aiming for a dough that’s soft but doesn’t stick to your hands.
Once it starts coming together, switch to using your hands. This dough should feel smooth and pliable, almost like Play-Doh but stickier.
Form the Balls
Divide your dough into 12 equal portions. I like to weigh them for consistency, but eyeballing works too. Roll each piece between your palms to create smooth, round balls. Don’t worry if they’re not perfectly round; rustic charm is part of their appeal!
Coat the Balls
This step is where the magic happens! Mix that extra tablespoon of glutinous rice flour with half a cup of water to create a slurry. This acts like edible glue for your sesame seeds.
Dip each ball into the slurry, making sure it’s completely wet. Then, place it into a bowl filled with sesame seeds. Here’s a pro tip I learned the hard way: shake the bowl in circular motions to let the ball roll around naturally. This creates even coverage without you having to touch it.
Once each ball is completely covered, gently press the seeds into the surface with your palm. This helps them stay put during frying.
Fry the Balls
Heat your oil to exactly 250°F (125°C). This temperature is crucial! Too hot, and the outside burns before the inside cooks. Too cool, and they’ll absorb too much oil and become greasy.
Gently lower the balls into the oil. Initially, they’ll sink to the bottom, which is normal. As they cook, they’ll slowly rise to the surface like little golden submarines.
Once they’re floating, occasionally push them down with a slotted spoon to ensure even browning. They’re done when the dough between the sesame seeds turns bright orange, which usually takes about 8-10 minutes.
If you enjoy simple, step-by-step comfort food recipes like this, check out my Ground Turkey Sweet Potato Bake, it’s a savory favorite that’s just as easy to master.
Nutritional Information
These little golden treats pack quite a nutritional punch! At just 105 calories per ball, they’re a relatively light dessert option. Here’s what you’re getting in each serving:
| Nutrient | Amount per Ball |
|---|---|
| Calories | 105 kcal |
| Carbohydrates | 14g |
| Protein | 1g |
| Fat | 5g |
| Fiber | 1g |
| Vitamin A | 3074 IU |
| Potassium | 93mg |
That impressive vitamin A content comes from the sweet potato, supporting eye health and immune function. The sesame seeds contribute healthy fats and minerals like calcium and iron. Plus, the fiber content helps with satiety, so you won’t feel like you need to eat the entire batch (though you might want to!).
Healthier Alternatives for the Recipe
Want to make these treats even better for you? I’ve got some tricks up my sleeve! First, you can reduce the sugar by half and add a teaspoon of vanilla extract for sweetness without the calories.
For a lighter version, try air frying instead of deep frying. Brush the coated balls with a light layer of oil and air fry at 350°F for 12-15 minutes, shaking the basket every 5 minutes.
You can also experiment with different flours. A mix of glutinous rice flour and almond flour (75/25 ratio) adds protein and healthy fats while maintaining that chewy texture.
For those watching their oil intake, try baking them at 375°F for 20-25 minutes, turning once halfway through. They won’t be quite as crispy, but they’ll still be delicious!
Serving Suggestions
These golden beauties are incredibly versatile! Serve them warm as a dessert with green tea for an authentic experience. They’re also fantastic alongside fresh fruit like sliced pears or grapes.
For a modern twist, try them with a scoop of vanilla ice cream and a drizzle of honey. The temperature contrast is absolutely divine! They also make great party appetizers, especially when served on small plates with decorative picks.
During holidays, arrange them on a tiered serving stand with other bite-sized desserts. Their golden color makes them particularly festive for autumn gatherings or Chinese New Year celebrations.
If you’re hosting a spread, pair them with Caramel Apple Cheesecake Dip for a cozy East-meets-West dessert table.
Common Mistakes to Avoid
Let me save you from some of the heartbreak I experienced! First, don’t skip the temperature check on your oil. I learned this lesson when my first batch turned into sad, greasy spheres instead of crispy delights.
Another common mistake is making the dough too wet. If your sweet potato is particularly moist, you’ll need extra flour. The dough should be soft but not sticky enough to cling to your hands.
Also, resist the urge to press the sesame seeds too hard when coating. Gentle pressure is enough, and too much force can crack your carefully formed balls.
Finally, don’t overcrowd the pan when frying. Cook them in batches if necessary. Overcrowding drops the oil temperature and leads to uneven cooking.
Storing Tips for the Recipe
Fresh is definitely best, but these can be stored! Once completely cooled, place them in an airtight container in the refrigerator for up to 3 days. To reheat, pop them in a 350°F oven for 5-7 minutes to restore some crispiness.
You can also freeze the shaped, uncoated balls for up to a month. Just coat and fry them straight from frozen, adding an extra 2-3 minutes to the cooking time.
For meal prep, prepare the dough and store it covered in the refrigerator for up to 2 days before shaping and cooking.
Conclusion
Sweet potato sesame balls might seem intimidating at first glance, but they’re honestly one of the most rewarding treats you can make at home. With just five simple ingredients and some patience, you’ll create something that looks restaurant-quality and tastes even better because it’s made with love in your own kitchen.
The combination of that crispy, sesame-studded exterior with the soft, sweet interior is pure magic. Plus, there’s something deeply satisfying about mastering a technique that’s been perfected over centuries.
So grab your apron (or don’t, I won’t judge!), fire up that oven, and give these golden beauties a try. I’d love to hear about your experience, so drop a comment below and let me know how your sweet potato sesame balls turned out!
FAQs
Can I use regular flour instead of glutinous rice flour?
Unfortunately, no. Glutinous rice flour is essential for that signature chewy texture. Regular flour won’t give you the same stretchy, bouncy consistency that makes these balls special.
Why do my sesame balls collapse after frying?
This usually happens when the oil temperature is too high, cooking the outside too quickly while leaving the inside undercooked. Stick to that 250°F temperature, and be patient!
Can I make these without a deep fryer?
Absolutely! A heavy-bottomed saucepan works perfectly. Just make sure you have enough oil to cover the balls and use a candy thermometer to monitor temperature.
How do I know when the sweet potato is fully cooked?
A fork should slide through the center without any resistance. If there’s any firmness in the middle, give it another 10-15 minutes in the oven.
Can I prepare these ahead of time for a party?
Yes! You can shape and coat the balls up to 4 hours ahead, then fry them just before serving for the best texture and flavor.