Valentine’s Day Red Velvet Bear Cookies bring together everything I love about February baking, that gorgeous red velvet flavor, adorable bear shapes, and the perfect excuse to get creative in the kitchen. These soft, chocolatey cookies with their sweet little faces are bound to make your Valentine’s Day extra special.
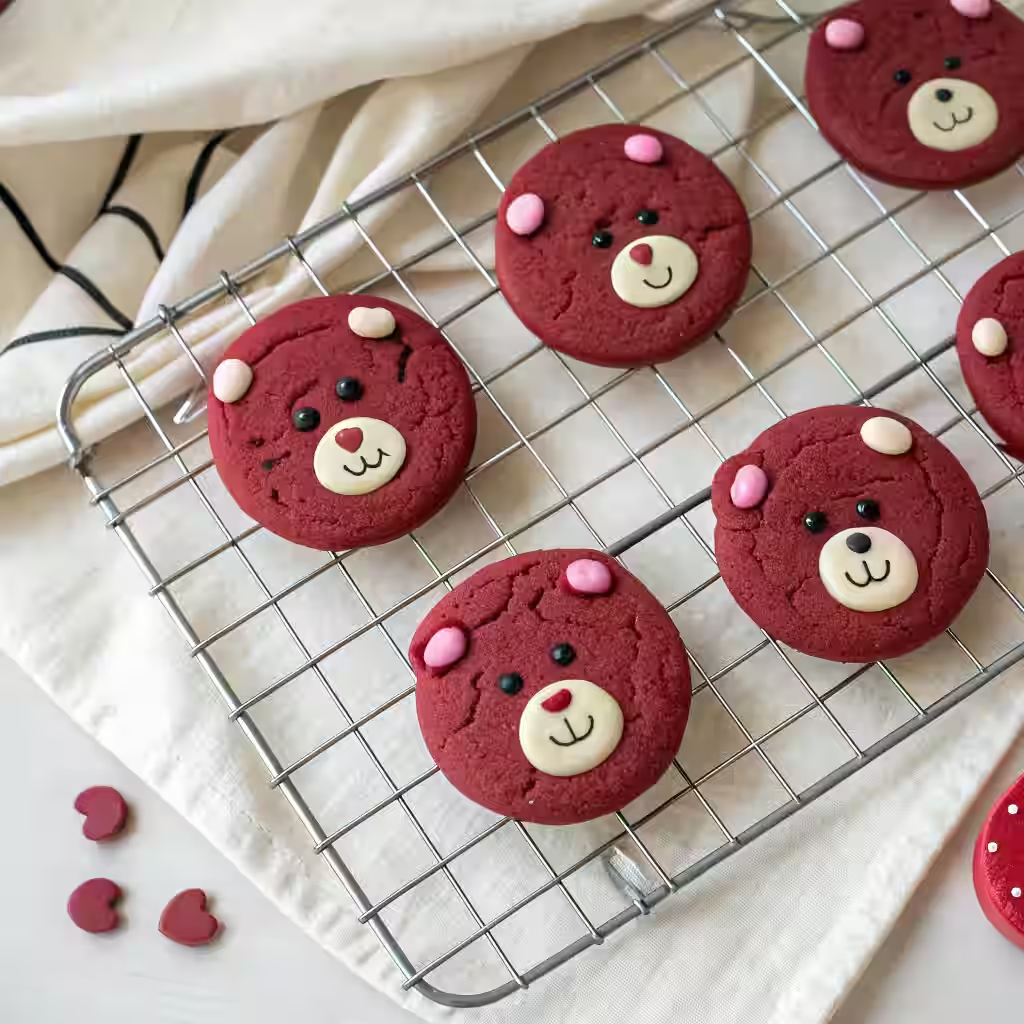
Table of Contents
The Story Behind Valentine’s Day Red Velvet Bear Cookies
Last February, I found myself staring at a rainy Portland afternoon with nothing but time and a sudden craving for something both adorable and delicious. My neighbor’s kids had been asking me to teach them how to bake, and Valentine’s Day was just around the corner. That’s when inspiration struck, why not combine the classic appeal of red velvet with cute bear-shaped cookies?
I’ll never forget the giggles that filled my kitchen as we rolled tiny balls of crimson dough for bear ears. The kids were mesmerized watching the Valentine’s Day Red Velvet Bear Cookies transform in the oven, their edges setting while the centers stayed perfectly soft. When we piped on those chocolate faces, each cookie developed its own personality, some looked sleepy, others seemed to be winking.
The magic really happened when we boxed them up as gifts. These Valentine’s Day Red Velvet Bear Cookies became instant conversation starters. Friends texted photos of their kids refusing to eat something “so cute,” while others confessed to hiding them from their families so they could savor every bite themselves, much like what happens every year with my Red Velvet Sugar Cookies when Valentine’s Day rolls around.
What makes these Valentine’s Day Red Velvet Bear Cookies special isn’t just their Instagram-worthy appearance. The texture hits that perfect sweet spot between chewy and tender, while the subtle cocoa flavor balances beautifully with the tangy hint from the vinegar, a hallmark of red velvet desserts. If you’ve ever wondered why red velvet tastes different from chocolate, the history and flavor profile behind it are fascinating, as explained in this deep dive on the origins of red velvet flavor.
Plus, decorating them feels more like play than work, exactly what Valentine’s Day baking should be.
Since then, I’ve made these Valentine’s Day Red Velvet Bear Cookies countless times, tweaking the recipe until it became foolproof. Whether you’re baking with kids, surprising a loved one, or just treating yourself, these little bears deliver pure joy in every bite.
Ingredients List
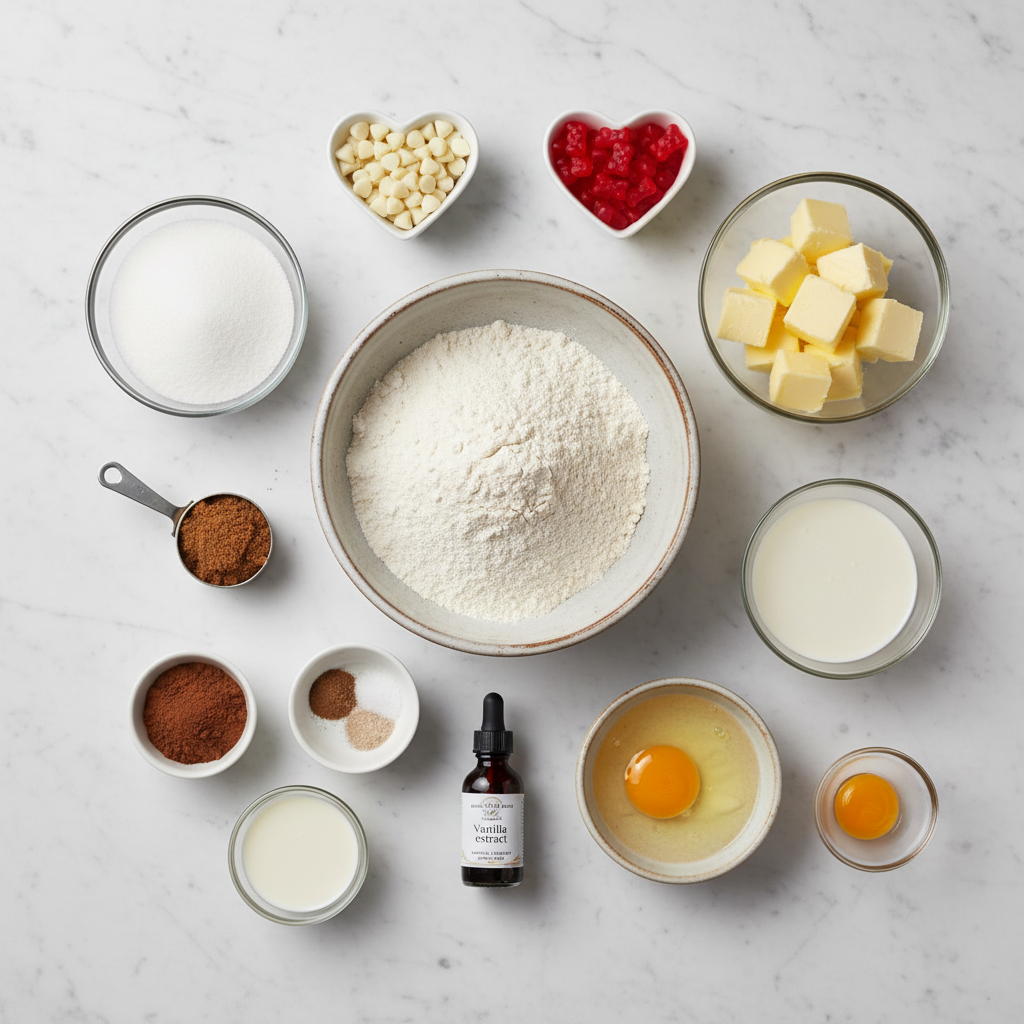
These Valentine’s Day Red Velvet Bear Cookies come together with simple pantry staples that work in perfect harmony. Here’s everything you’ll need and why each ingredient matters:
Dry Ingredients:
- 1½ cups all-purpose flour (180g) : The foundation that gives our bears their structure while keeping them tender
- 2 tablespoons cocoa powder (14g) : Creates that signature red velvet depth without overpowering sweetness
- ½ teaspoon baking soda (2g) : Provides gentle lift and that classic red velvet tang
- ½ teaspoon baking powder (2g) : Works with baking soda for perfect cookie height
- ½ teaspoon salt (3g) : Balances sweetness and brightens all the other flavors
Wet Ingredients:
- ½ cup unsalted butter, melted and cooled (113.5g) : Creates chewy texture while adding rich, buttery flavor
- ¼ cup granulated sugar (50g) : Provides sweetness and helps cookies hold their bear shape
- ¼ cup brown sugar, packed (55g) : Adds moisture and subtle molasses notes that complement the cocoa
- 1 teaspoon vanilla extract (4g) : Rounds out flavors with warm, aromatic sweetness
- 1 teaspoon white vinegar (5g) : The secret to authentic red velvet tang and tender crumb
- 1 large egg : Binds everything together while adding richness
- Red food coloring : Transforms ordinary cookie dough into vibrant Valentine’s magic
For Decoration:
- 1 tablespoon melted chocolate (15g) : Perfect for creating expressive little eyes and noses
- 3 tablespoons melted white chocolate (44.36g) : Makes adorable snouts and inner ears
- Oil-based food coloring : Tints white chocolate pink for sweet blush cheeks
Timing
This recipe moves at a comfortable pace, perfect for afternoon baking sessions. You’ll spend about 20 minutes on prep time, which includes mixing the dough and shaping your bears. The 30-minute resting period in the fridge is crucial, don’t skip it! This chilling time allows the flour to fully hydrate while firming up the butter, resulting in cookies that hold their shape beautifully and develop that coveted chewy texture.
Baking takes just 11 minutes, making this recipe about 25% faster than traditional sugar cookies. The total active time clocks in at 1 hour and 1 minute, but most of that is hands-off waiting. Compared to elaborate Valentine’s desserts that can take 3-4 hours, these bears are surprisingly efficient while delivering maximum impact.
Step-by-Step Instruction
Step 1: Prepare Your Dry Mix
Start by whisking together your dry ingredients in a medium bowl. I always sift my cocoa powder first, those little lumps can create uneven chocolate distribution, and nobody wants a spotty bear! Combine the all-purpose flour, sifted cocoa powder, baking powder, baking soda, and salt until everything looks evenly mixed.
Step 2: Create the Wet Base
In your stand mixer fitted with the paddle attachment (or use a hand mixer), combine the melted, cooled butter with both sugars on medium speed. Don’t worry if it looks a bit grainy, that’s normal with melted butter. Scrape down the bowl, then add your vanilla extract, white vinegar, egg, and a few drops of red food coloring. Mix until the mixture becomes smooth and unified.
Step 3: Bring It All Together
Dump all your dry ingredients into the wet mixture at once. Mix just until everything comes together, overmixing leads to tough cookies, and we want these bears to be tender! Now’s the time to add more red food coloring if needed. I like mine to look like a rich Valentine’s red, but you can adjust to your preference.
Step 4: The Essential Rest
Cover your dough and pop it in the fridge for 20-30 minutes. I know it’s tempting to skip this step, but trust me, chilled dough shapes better, bakes more evenly, and creates that perfect chewy texture we’re after. Use this time to preheat your oven to 325°F and line two baking sheets with parchment paper.
Step 5: Shape Your Bears
Using a small cookie scoop (about 1½ tablespoons), portion your dough into balls and place them 3 inches apart on your prepared baking sheets. For the ears, take about 1 teaspoon of dough, split it in half, and roll into two small balls. Gently press these onto the top of each bear’s head, they’ll spread and attach during baking.
Step 6: Bake to Perfection
Bake for 9-11 minutes, watching for edges that look set while centers remain slightly puffy. Here’s a pro tip: slightly underbaking gives you those coveted chewy cookies! Let them cool on the pan for 5-10 minutes before transferring to a wire rack to cool completely.
Step 7: Bring Your Bears to Life
Once completely cool, it’s time for the fun part! Use melted white chocolate in a piping bag (or even a zip-top bag with the corner snipped) to create snouts and inner ears. Tint leftover white chocolate with oil-based food coloring for rosy cheeks. Finally, use melted milk or dark chocolate to dot on eyes and noses, giving each bear its own personality.
Nutritional Information
Each Valentine’s Day Red Velvet Bear Cookie contains approximately:
| Nutrient | Per Cookie |
|---|---|
| Calories | 145 |
| Total Fat | 5.2g |
| Saturated Fat | 3.1g |
| Cholesterol | 28mg |
| Sodium | 125mg |
| Carbohydrates | 24g |
| Fiber | 1g |
| Sugar | 12g |
| Protein | 2.8g |
These cookies provide a moderate 145 calories per serving, making them a reasonable Valentine’s treat. The combination of butter and egg delivers essential fats and protein, while the flour provides energy-sustaining carbohydrates.
Healthier Alternatives for the Recipe
Want to lighten up these Valentine’s Day Red Velvet Bear Cookies without sacrificing flavor? Try these smart swaps:
Sugar Reduction: Replace half the granulated sugar with unsweetened applesauce or mashed banana. This cuts calories by about 15% while adding natural sweetness and moisture.
Flour Alternatives: Substitute up to ½ cup of the all-purpose flour with almond flour for added protein and healthy fats. Whole wheat pastry flour works too, though it’ll create a slightly denser texture.
Butter Swaps: Greek yogurt or mashed avocado can replace up to half the butter, reducing saturated fat while maintaining moisture. For vegan versions, use high-quality plant-based butter.
Natural Coloring: Skip artificial food coloring and use beet juice powder or freeze-dried strawberry powder for natural red hues.
Serving Suggestions
These adorable Valentine’s Day Red Velvet Bear Cookies shine in countless ways. Pack them in clear cellophane bags tied with red ribbon for perfect classroom Valentine’s treats, kids absolutely love receiving these instead of store-bought cards.
For romantic evenings, arrange them on a white plate alongside fresh strawberries and a glass of milk, or pair them with Chocolate-Covered Strawberries for a truly classic Valentine’s dessert spread. The contrast is stunning! They also make fantastic ice cream sandwich filling, just press softened vanilla ice cream between two cookies and roll the edges in mini chocolate chips.
Consider creating a “build-your-own-bear” station for parties. Provide plain cooled cookies alongside bowls of melted chocolate, sprinkles, and candy pieces so guests can decorate their own. It’s interactive entertainment that doubles as dessert!
For gift-giving, layer these cookies in decorative tins with parchment paper between layers. They’ll stay fresh for up to a week, making them perfect for shipping to long-distance loved ones.
Common Mistakes to Avoid
Skipping the Chill Time: Warm dough spreads too much, turning your cute bears into flat, unrecognizable shapes. Always refrigerate for at least 20 minutes.
Overbaking: These cookies continue cooking on the hot pan after removal. Take them out when centers still look slightly underdone for perfect texture.
Using Water-Based Food Coloring in Chocolate: This causes chocolate to seize and become lumpy. Stick with oil-based coloring or add a teaspoon of neutral oil to fix seized chocolate.
Making Ears Too Large: Oversized ears can break off during baking or cooling. Keep them small and proportionate.
Not Cooling Completely Before Decorating: Warm cookies will melt your chocolate decorations instantly. Patience pays off here!
Storing Tips for the Recipe
Store finished Valentine’s Day Red Velvet Bear Cookies in an airtight container at room temperature for up to one week. Layer them between sheets of parchment paper to prevent decorations from smudging.
For longer storage, freeze decorated cookies in a single layer on baking sheets until solid, then transfer to freezer bags. They’ll maintain quality for up to three months. Thaw at room temperature for about 30 minutes before serving.
The cookie dough itself freezes beautifully! Portion into balls, freeze on baking sheets, then transfer to freezer bags. Bake directly from frozen, adding 1-2 extra minutes to the baking time.
Pro tip: Make extra dough during your baking session and freeze portions for spontaneous cookie emergencies. Nothing beats having homemade Valentine’s treats ready in under 15 minutes!
Conclusion
These Valentine’s Day Red Velvet Bear Cookies prove that the sweetest gestures often come in small packages. With their perfect balance of flavor, texture, and pure adorable factor, they’re destined to become your go-to recipe for February celebrations and beyond.
The beauty lies in their simplicity, no special equipment, no complicated techniques, just good ingredients and a little creativity. If you love playful, themed baking like this, you might also enjoy making Heart Jam Cookies, another sweet, love-filled treat that’s perfect for sharing during February celebrations.
Ready to spread some edible joy? Grab your ingredients and let’s get baking! Don’t forget to snap photos of your finished bears and share them, I’d love to see how your cookie personalities turn out.
Print
Valentine’s Day Red Velvet Bear Cookies
- Total Time: 1 hour
- Yield: 24 cookies 1x
Description
These Valentine’s Day Red Velvet Bear Cookies are soft, chewy, and irresistibly adorable ; perfect for gifting, sharing, or just treating yourself.
Ingredients
- 1½ cups all-purpose flour (180g)
- 2 tablespoons cocoa powder (14g)
- ½ teaspoon baking soda (2g)
- ½ teaspoon baking powder (2g)
- ½ teaspoon salt (3g)
- ½ cup unsalted butter, melted and cooled (113.5g)
- ¼ cup granulated sugar (50g)
- ¼ cup brown sugar, packed (55g)
- 1 teaspoon vanilla extract (4g)
- 1 teaspoon white vinegar (5g)
- 1 large egg
- Red food coloring
- 1 tablespoon melted chocolate (15g)
- 3 tablespoons melted white chocolate (44.36g)
- Oil-based food coloring for decoration
Instructions
1. Whisk together flour, sifted cocoa, baking soda, baking powder, and salt in a bowl.
2. In a mixer, combine melted butter, both sugars, then add vanilla, vinegar, egg, and red food coloring.
3. Mix in the dry ingredients until just combined; chill dough for 30 minutes.
4. Preheat oven to 325°F and line baking sheets with parchment paper.
5. Shape dough into balls, add small dough balls for ears.
6. Bake 9–11 minutes until edges are set.
7. Cool cookies before decorating with melted chocolate for faces.
Notes
- Chilling dough prevents excessive spreading and enhances chewiness.
- Use oil-based food coloring for smooth chocolate decorations.
- Undercook slightly for perfect texture.
- Store in airtight container up to a week or freeze for 3 months.
- Prep Time: 20 minutes
- Cook Time: 11 minutes
- Category: Dessert
- Method: Baking
- Cuisine: American
Nutrition
- Serving Size: 1 cookie
- Calories: 145
- Sugar: 12g
- Fat: 5.2g
- Carbohydrates: 24g
- Fiber: 1g
- Protein: 2.8g
FAQs
Can I make these cookies without a stand mixer?
Absolutely! A hand mixer works perfectly, or you can even mix by hand with a wooden spoon. The melted butter makes manual mixing much easier than traditional cookie recipes.
What if I don’t have red food coloring?
You can make these as chocolate bear cookies, they’ll taste just as amazing! Alternatively, try natural options like beet juice powder or freeze-dried strawberry powder for subtle color.
How do I fix chocolate that becomes lumpy when adding food coloring?
This happens with water-based coloring. Stir in neutral oil (vegetable or canola) one teaspoon at a time until the chocolate becomes smooth again. Prevention is better, always use oil-based food coloring with chocolate.
Can I make these gluten-free?
Yes! Substitute the all-purpose flour with a 1:1 gluten-free baking blend. The cookies might be slightly more fragile, but they’ll taste great.
Why do my cookies spread too much during baking?
This usually means the dough was too warm. Make sure your butter has cooled completely and always chill the shaped cookies for the full 20-30 minutes before baking.
How far ahead can I make these for a party?
Bake and decorate up to 3 days ahead, storing in airtight containers. For maximum freshness, decorate the day before serving. The cookies actually improve in texture after a day of storage!